
If you’ve ever looked at a beautiful cheesecake and then backed away slowly because the idea of a water bath seemed terrifyingly complex, friend, I get it! Kitchen tools aren’t magic; they’re just gadgets, and I want you to spend less time wrestling foil and more time enjoying dessert. That’s why I’m sharing my absolute favorite white chocolate cheesecake recipe with you today. This isn’t just some flimsy dessert; we are aiming for that rich, velvety texture that screams “showstopper” but uses my tested, secret method for a no crack cheesecake every single time, oven-babysitting unnecessary!
This recipe comes straight from my kitchen experiments after realizing that nobody has extra time for complicated steam setups. It’s built on the very practicality I focus on here at The YumMagnet, which you can read more about on our About Page. It’s about bringing family-loved quality to your busy schedule. Get ready for the easiest, creamiest, most decadent chocolate hug of a dessert you’ve ever made from scratch.
- Why This Creamy White Chocolate Cheesecake Recipe Works (No Water Bath Needed)
- Gathering Ingredients for Your White Chocolate Cheesecake
- How to Prepare the Ultimate Creamy White Chocolate Cheesecake
- Tips for Success with Your White Chocolate Cheesecake
- Making This White Chocolate Cheesecake a Showstopper Dessert
- Storage and Reheating Instructions for Your Indulgent Sweet
- Frequently Asked Questions About White Chocolate Cheesecake
- Estimated Nutritional Data for This White Chocolate Cheesecake Recipe
- Share Your White Chocolate Treats Creations
Why This Creamy White Chocolate Cheesecake Recipe Works (No Water Bath Needed)
I know what you’re thinking: “No water bath? It’s going to crack!” Nope! Trust me, I’ve tested this about a dozen times so you don’t have to. This Ultimate Creamy White Chocolate Cheesecake delivers that luxurious, melt-in-your-mouth texture without making you feel like you need an engineering degree to get it out of the oven intact. We are skipping the fuss and focusing purely on flavor and texture.
- No Stress Baking: Say goodbye to perfectly wrapped springforms and juggling scalding hot water trays!
- Velvet Finish: The slow cooling process we use guarantees that signature smooth top you expect from a creamy cheesecake.
- Perfectly Set: This method is specifically designed to yield a pristine no crack cheesecake.
Achieving the Ultimate Smooth Texture
The real secret isn’t the foil wrap—though we do that for insurance! It’s the slow transition out of the heat. Once the baking time is up, we turn the oven off, crack the door, and let the cheesecake gently sit inside for a full hour. This slow descent in temperature avoids the quick contraction that causes cracks. It’s patience, not complex plumbing, that gives you the smooth finish.
Simple Steps for a Decadent Dessert
Even though this baked cheesecake looks like something you’d order at a fancy restaurant, the steps are shockingly straightforward. We’re keeping things simple so you can master this homemade cheesecake experience without any drama. It’s truly an easy cheesecake recipe wrapped up in an elegant package.
Gathering Ingredients for Your White Chocolate Cheesecake
Alright, let’s talk about what you need to pull together this incredible white chocolate cheesecake. Remember, using good quality ingredients is crucial here, especially the chocolate—you’ll really taste the difference! This whole experience takes about 25 minutes of prep time, plus that 65 minutes in the oven. If you stop by here for inspiration later, you’ll see how this comes together beautifully. Let’s make sure your pantry is stocked!
For the Graham Cracker Crust
The crust should be buttery and crisp, holding up perfectly to that rich cream cheese dessert filling. Don’t skimp on packing this layer tightly!
- 1 1/2 cups graham cracker crumbs
- 1/4 cup granulated sugar
- 6 tablespoons unsalted butter, melted
For the Rich Cream Cheese Dessert Filling
The key to that totally smooth finish is making sure the cream cheese and eggs are exactly what the recipe calls for: softened and at room temperature. This makes a huge difference for a truly creamy cheesecake.
- 3 (8 ounce) packages cream cheese, softened
- 1 1/2 cups granulated sugar
- 1 teaspoon vanilla extract
- 1/4 teaspoon salt
- 4 large eggs, room temperature
- 12 ounces good quality white chocolate, melted and slightly cooled
- 1/4 cup heavy cream
How to Prepare the Ultimate Creamy White Chocolate Cheesecake
Alright, let’s get baking! This is where we make the magic happen for your white chocolate cheesecake. Remember, taking your time in the mixing stage is what sets up this whole operation for success. We want air incorporated gently, not whipped into a frenzy! If you’re new to baking things like this, just remember this process is similar to getting a great, solid base for lots of wonderful morning bakes, just much richer.
Step 1: Preparing the Crust and Pan
First things first, preheat your oven to 325 degrees F. It’s insurance time: wrap the bottom of your 9-inch springform pan tightly in heavy-duty aluminum foil. We do this just in case a little condensation tries to sneak in, even without a full water bath. For the crust, mix those graham cracker crumbs, 1/4 cup of sugar, and your melted butter until everything is nice and sandy. Press that firmly into the bottom of the prepared pan. Pop that into the oven for exactly 10 minutes, then pull it out to cool just a bit while you whip up the filling.
Step 2: Mixing the Filling for Your Baked Cheesecake
Grab your largest bowl! Beat the softened cream cheese until it is perfectly smooth—I mean zero lumps! Scrape down the sides, then add the 1 1/2 cups of sugar, vanilla, and salt. Now, here’s a key moment for that rich cream cheese dessert: beat in your room-temperature eggs one at a time. Seriously, just until you see the yellow disappear before adding the next one. Overmixing the eggs is a huge source of air bubbles, and we want to avoid that! When the eggs are in, gently—and I mean gently—fold in that slightly cooled, melted white chocolate.
Step 3: Baking and Slow Cooling for a No Crack Cheesecake
Pour that luscious filling over your slightly cooled crust. Give the pan a gentle little tap on the counter to settle everything. Bake this beauty for about 55 to 65 minutes. You’re looking for edges that look set firm, but that center—about two inches across—should still have a slight, gentle jiggle to it. When the time is up, turn the oven completely OFF. Crack the door open just a smidge, and you let it sit in that cooling environment for a full hour. This slow cooling is the number one defense against a no crack cheesecake!
Tips for Success with Your White Chocolate Cheesecake
Getting that perfect, indulgent texture in your white chocolate cheesecake really comes down to a couple of tiny details that I’ve learned make all the difference in the world. My grandmother always said attention to the little things separates the good from the truly great, and that’s absolutely true here!
First up: temperature! For the smoothest result—the kind of creamy cheesecake texture we are aiming for—your cream cheese absolutely must be fully softened. If it’s cold, you get lumps, plain and simple. The same goes for those eggs; room temperature eggs blend in seamlessly without requiring you to overmix the batter, which keeps that precious air structure intact.
Also, please don’t skimp on the chocolate quality here. Since white chocolate is the star, using good quality bars instead of standard chips makes your decadent dessert shine. If you want to see some other amazing, fool-proof baking methods that focus on texture, check out my tips for perfect bread pudding. And if you’re feeling adventurous, this external resource has some great insights on baked dessert structure too!
Making This White Chocolate Cheesecake a Showstopper Dessert
Okay, once your white chocolate cheesecake is perfectly chilled—which it absolutely must be—that’s when you get to have fun and turn it into a true showstopper! This is where we talk about those beautiful garnishes that make it perfect for birthdays, anniversaries, or just dazzling your family during the holidays. We don’t need complicated piping bags to achieve an elegant dessert, promise!
For instance, if you want to make this a true holiday cheesecake ideas centerpiece, think about the colors! I have shared some great ideas for holiday treats before, and the same thought process applies here: contrast makes it pop.
Flavor Twists: Raspberry White Chocolate Cheesecake and More
Did you notice in the recipe notes that you can actually swirl in some fruit puree? That’s my favorite trick to make this a raspberry white chocolate cheesecake! Before you bake it, reserve just half a cup of that gorgeous filling batter. Mix just a couple of tablespoons of bright raspberry puree into that small portion. Then, dollop those spoonfuls onto the main batter and swirl them gently with a knife. It creates these gorgeous, natural patterns!

For something more autumnal or wintery, a tart cranberry white chocolate cheesecake topping would be stunning. You’re really only limited by what lovely fruit you have on hand. Think of it as adding a little extra layer of fun to your already decadent dessert.
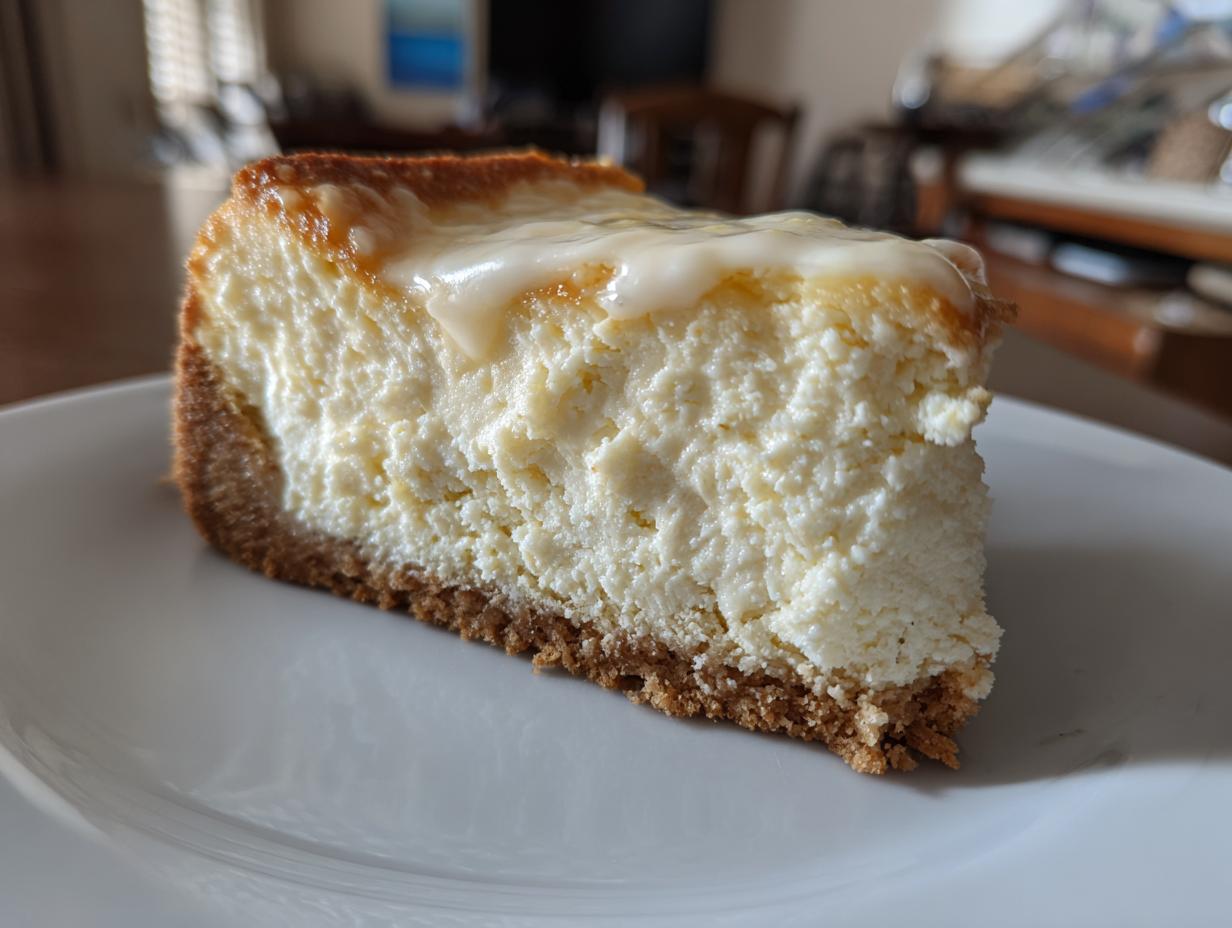
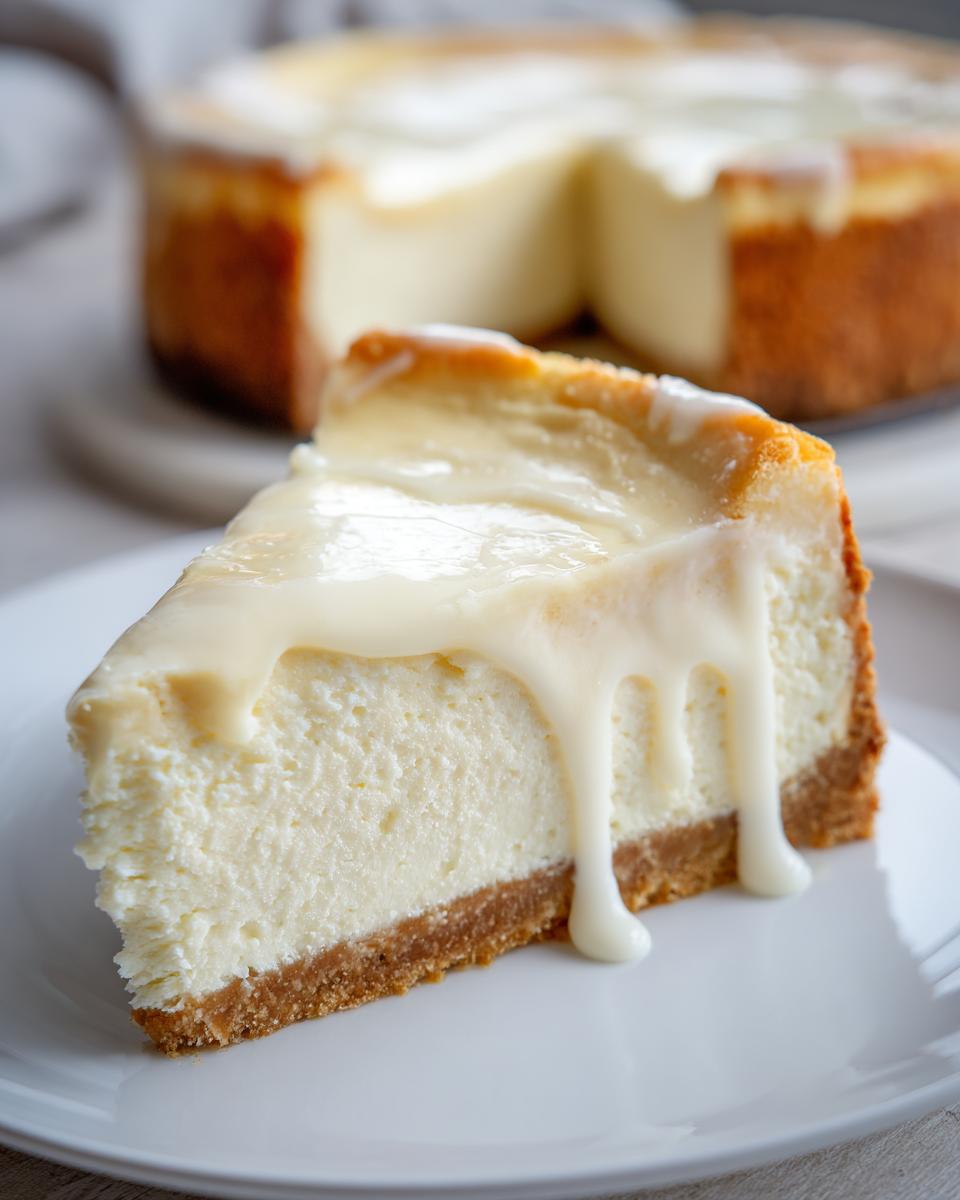
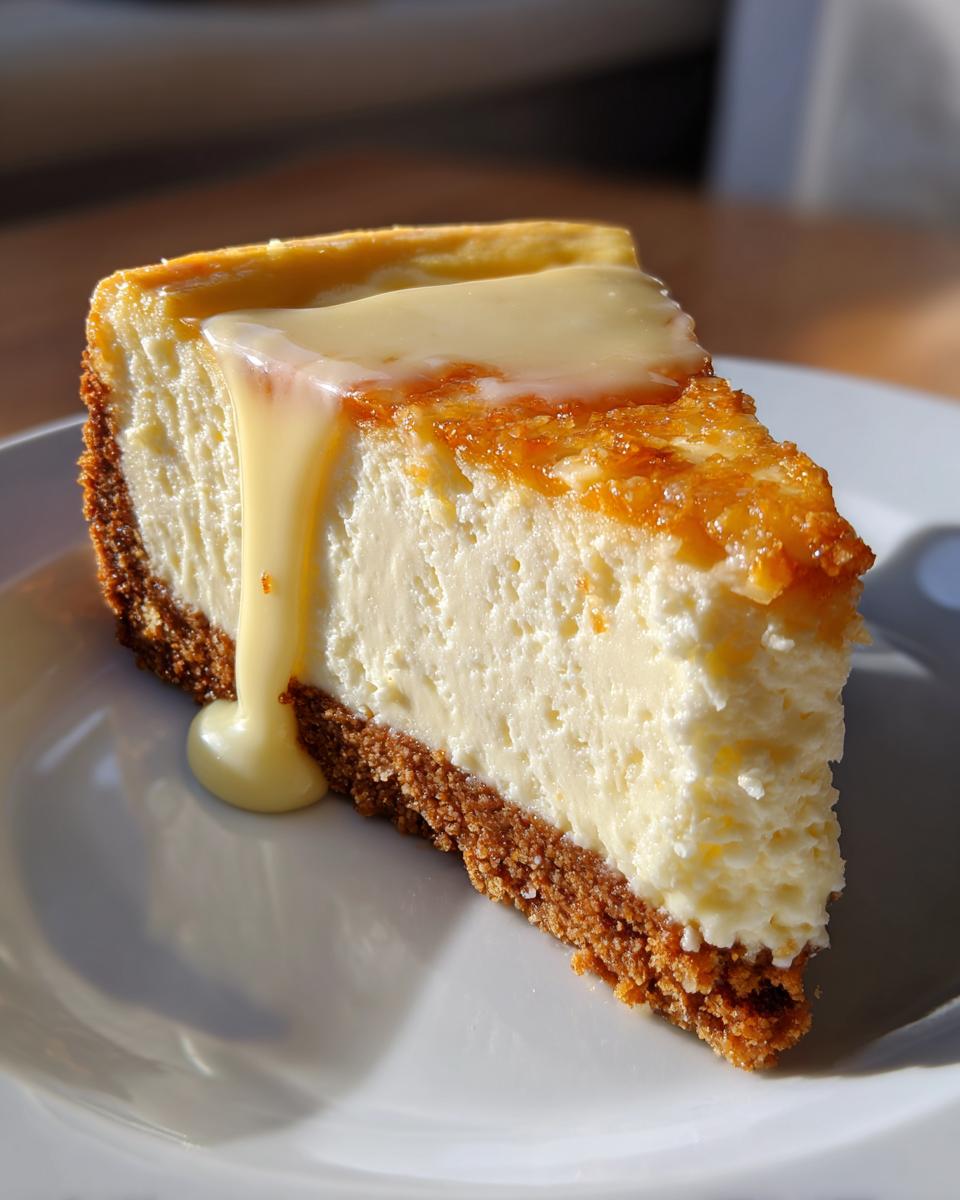
Simple Glaze for an Elegant Dessert Finish
Sometimes, after all that baking, you just want a fast, gorgeous finish. That’s why I love the simple cream topping in the instructions. It’s not a heavy frosting, but pouring that warm heavy cream over the chilled cake right before serving gives it this professional, glossy look. It sets up beautifully as it cools down again, making your homemade cheesecake look totally gourmet.

This simple pour transforms the top surface into a smooth canvas. If I’m feeling extra fancy, I’ll top that glaze with a dusting of white chocolate shavings. If you want to see how someone else made a fantastic swirl design, check out this pin for swirl inspiration!
Storage and Reheating Instructions for Your Indulgent Sweet
You’ve poured your heart into making this incredible dessert, and now you need to know how to save those leftovers—if there are any, ha! This indulgent sweet needs time to set properly, and that’s non-negotiable if you want that signature texture you worked so hard for. Don’t even think about slicing into it right away!
The absolute minimum chilling time for this creamy cheesecake is six hours, but honestly, you really need to let it chill overnight. I know waiting is the hardest part, but the flavors meld, and the texture firms up perfectly during that extended chill time. If you rush it, you risk a slightly soft center, and nobody wants that!
Once it’s totally chilled, cover the springform pan loosely with plastic wrap or foil and keep it in the refrigerator. It keeps beautifully this way for about four to five days. If you happen to freeze any slices—and I highly suggest wrapping them individually before freezing—let them thaw slowly in the fridge overnight for the best results.
When you get ready to serve, pull your slice out of the fridge about 15 minutes before you plan on eating it. This slight warming just takes the chill off the top glaze and makes it even more tender and dreamy on the palate. If you’re looking for other comforting, make-ahead dishes that save time later, like my favorite creamy rice casserole, check that out for your next meal prep!
Frequently Asked Questions About White Chocolate Cheesecake
When you’re making a beautiful dessert like this white chocolate cheesecake, it’s natural to have a few questions pop up. Don’t worry, I’ve answered the big ones right here so you can bake with total confidence and create your own stunning, decadent dessert without any guesswork!
Can I substitute the crust for an Oreo crust?
Oh, absolutely! I love the thought of an Oreo crust with this sweet, creamy filling; it adds that lovely hint of dark chocolate contrast. If you swap out the graham crackers for Oreo crumbs, you’ll need about 2 1/4 cups of crumbs total. Since Oreos already have a bit of fat, try cutting that melted butter down slightly—maybe start with 4 tablespoons instead of 6—and then adjust as needed if the mix seems too dry. It’s a fantastic, simple cheesecake crust idea!
Is this the best cheesecake recipe if I want to avoid a water bath?
In my book? Yes, this is the absolute best cheesecake recipe if you want to skip the water bath fuss! The reason this baked cheesecake stays crack-free isn’t magic; it’s all down to the slow cooling technique we talked about. By turning the oven off and letting the cake cool inside for a full hour, we prevent that shocking temperature drop that causes cracking. It’s the easiest insurance policy for a gorgeous, smooth top ever.
What is the difference between this and a no bake white chocolate cheesecake?
That’s a great question for comparing textures! A no bake white chocolate cheesecake is generally much lighter, almost mousse-like, because it uses gelatin or whipped cream to set up in the fridge. My recipe, featuring eggs and baking, gives you that famously dense, rich, and ultra-creamy cheesecake structure that melts slowly on your tongue. You get a true, luxurious flavor profile when you bake it, which is why I always lean towards this method for an elegant dessert.
If you have any other burning questions while you’re whipping up your batch, don’t hesitate to reach out on my contact page! Happy baking!
Estimated Nutritional Data for This White Chocolate Cheesecake Recipe
Now, before you dive into slicing up this incredible indulgent sweet, I want to give you an idea of what we’re looking at nutritionally. Remember, since we are baking this from scratch with rich ingredients like real cream cheese and good white chocolate, this is definitely a treat! Every recipe is slightly different based on brands and exact measurements, so please consider this data as an estimate only for one slice.
- Serving Size: 1 slice
- Calories: 450
- Fat: 30g (That’s where the richness comes from!)
- Saturated Fat: 18g
- Trans Fat: 0.5g
- Cholesterol: 110mg
- Carbohydrates: 40g
- Sugar: 35g
- Protein: 7g
- Sodium: 280mg
It’s a truly satisfying dessert, meant for those special moments we talked about! You’ll enjoy every calorie of this gourmet cheesecake when you savor it slowly!
Share Your White Chocolate Treats Creations
Now that you’ve seen my secrets for making the ultimate creamy cheesecake without the drama of a water bath, I’m dying to know how yours turned out! Remember, here at The YumMagnet, we’re all about building a shared kitchen experience. I learned from my mom and grandma, and now I want to learn from you as you make these incredible white chocolate treats.
If you baked this recipe, please take a minute to leave a quick star rating right below the recipe card. It helps other home cooks, just like you, know that this is a trustworthy, tried-and-true recipe for a truly decadent dessert. It’s how we keep that community strong!
Even better, snap a picture! Head over to social media and tag me so I can see your beautiful creations. Did you stick with the simple cream glaze, or did you go bold with a raspberry swirl? I love seeing how you put your own spin on these simple, heartfelt recipes—it keeps the joy of baking alive in everyone’s kitchen. You can find more inspiration for your next amazing bake, like my famous delicious dessert recipes collection, when you have a moment!
Don’t be shy; sharing your successes (and even your little kitchen oopsies!) is how we all get better at this. Thank you so much for trusting me with your baking time today. Happy eating!
PrintUltimate Creamy Baked White Chocolate Cheesecake (No Water Bath Needed)

Make a rich, smooth, and decadent white chocolate cheesecake without the hassle of a water bath. This recipe delivers a showstopper dessert perfect for holidays or any special occasion.
- Prep Time: 25 min
- Cook Time: 65 min
- Total Time: 7 hours 30 min
- Yield: 12 servings 1x
- Category: Dessert
- Method: Baking
- Cuisine: American
- Diet: Vegetarian
Ingredients
- 1 1/2 cups graham cracker crumbs
- 1/4 cup granulated sugar
- 6 tablespoons unsalted butter, melted
- 3 (8 ounce) packages cream cheese, softened
- 1 1/2 cups granulated sugar
- 1 teaspoon vanilla extract
- 1/4 teaspoon salt
- 4 large eggs, room temperature
- 12 ounces good quality white chocolate, melted and slightly cooled
- 1/4 cup heavy cream
Instructions
- Preheat your oven to 325 degrees F. Wrap the outside bottom of a 9-inch springform pan tightly with heavy-duty aluminum foil.
- Prepare the crust: Mix graham cracker crumbs, 1/4 cup sugar, and melted butter until combined. Press the mixture firmly into the bottom of the prepared springform pan. Bake for 10 minutes. Remove from the oven and let cool slightly.
- Prepare the filling: In a large bowl, beat the softened cream cheese, 1 1/2 cups sugar, vanilla extract, and salt until completely smooth. Scrape down the sides of the bowl.
- Beat in the eggs one at a time, mixing just until each egg is incorporated. Do not overmix.
- Gently fold in the melted and cooled white chocolate until just combined.
- Pour the filling over the cooled crust. Gently tap the pan on the counter a few times to release any large air bubbles.
- Bake for 55 to 65 minutes. The edges should look set, but the center 2 inches should still have a slight jiggle.
- Turn off the oven, crack the oven door open slightly, and let the cheesecake cool inside the oven for 1 hour. This slow cooling helps prevent cracks.
- Remove the cheesecake from the oven and let it cool completely on a wire rack. Once cool, cover and chill in the refrigerator for at least 6 hours, or preferably overnight.
- Before serving, gently warm the heavy cream until hot but not boiling. Pour the warm cream over the top of the chilled cheesecake and spread evenly for a simple glaze. Let the glaze set slightly before slicing.
Notes
- Use room temperature ingredients for the cream cheese and eggs; this prevents lumps and ensures a creamy cheesecake texture.
- For a richer flavor, use high-quality white chocolate bars instead of chips.
- If you want a fruit swirl, reserve 1/2 cup of the cream cheese mixture before adding the eggs, swirl in 1/4 cup of raspberry puree, and layer it on top of the batter before baking.
Nutrition
- Serving Size: 1 slice
- Calories: 450
- Sugar: 35g
- Sodium: 280mg
- Fat: 30g
- Saturated Fat: 18g
- Unsaturated Fat: 12g
- Trans Fat: 0.5g
- Carbohydrates: 40g
- Fiber: 1g
- Protein: 7g
- Cholesterol: 110mg