

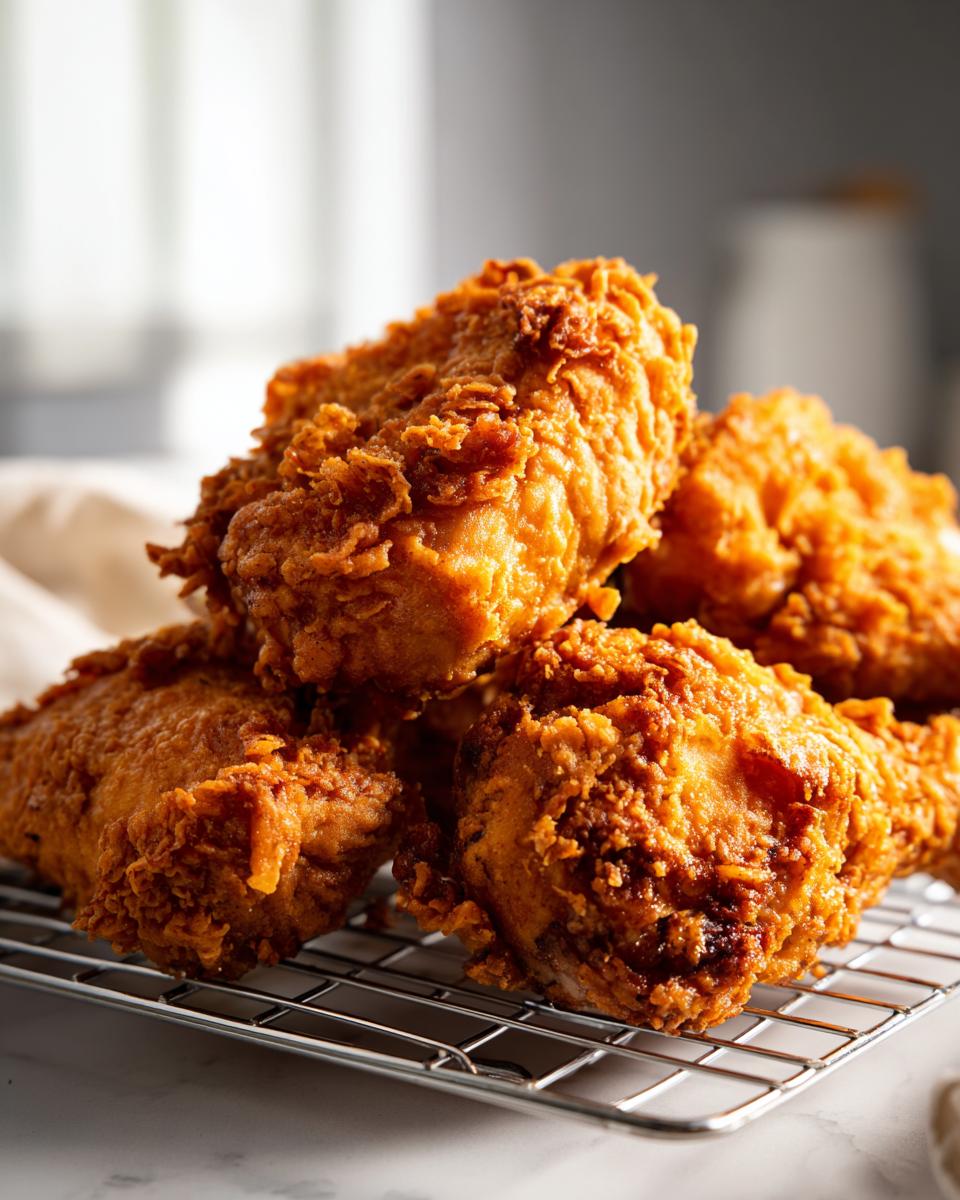
Oh, you know that feeling, right? That deep, undeniable craving for that pinnacle of comfort food? I’m talking about the kind of aroma that stops everyone in the house in their tracks. For me, that scent always brings me back to my grandmother’s kitchen, even though I’ve adapted her methods for our busy lives now. That’s why I’m so excited to share what I honestly believe is The Best Crispy & Juicy Southern Fried Chicken recipe out there. We aren’t just making simple fried chicken here; we’re using a magic buttermilk brine and a double-dredge technique to guarantee that shatteringly crisp crust. If you want to see how I manage fantastic flavors even when whipping up something intense—like a quick spicy chicken pozole—you know my philosophy is about maximizing flavor fast. Trust me, getting that perfect crunch and tender interior takes just a touch more effort, but the payoff for this classic homemade fried chicken is unbelievable.
- Why This Is The Best Crispy & Juicy Southern Fried Chicken Recipe
- Ingredients for Your Classic Homemade Fried Chicken
- How to Make Incredible Fried Chicken: The Step-by-Step Tutorial
- Tips for Success with Your Fried Chicken
- Making This Authentic Southern Chicken Recipe Ahead of Time
- Serving Suggestions for Your Comfort Food Chicken Dinner
- FAQ: Mastering Your Fried Chicken
- Nutritional Estimate for This Fried Chicken
- Share Your Family Favorite Fried Chicken Creations
Why This Is The Best Crispy & Juicy Southern Fried Chicken Recipe
When I started developing this recipe, I knew I couldn’t just settle for “okay” fried chicken. Nobody wants soggy skins or dry meat! This method beats out every other standard recipe I’ve tried because it focuses on building incredible texture layer by layer. We nail the two most important things: crunch and moisture. If you’ve ever struggled with bland or greasy results, this is the chicken fried rice equivalent of perfection. It just works, every single time.
- It delivers that textbook, shatteringly crispy coating people always ask me about.
- The meat stays incredibly tender, even the breast pieces, thanks to the soak.
- It utilizes tried-and-true Southern cooking elements for authentic flavor.
Achieving That Golden Brown Crackle Crust Chicken
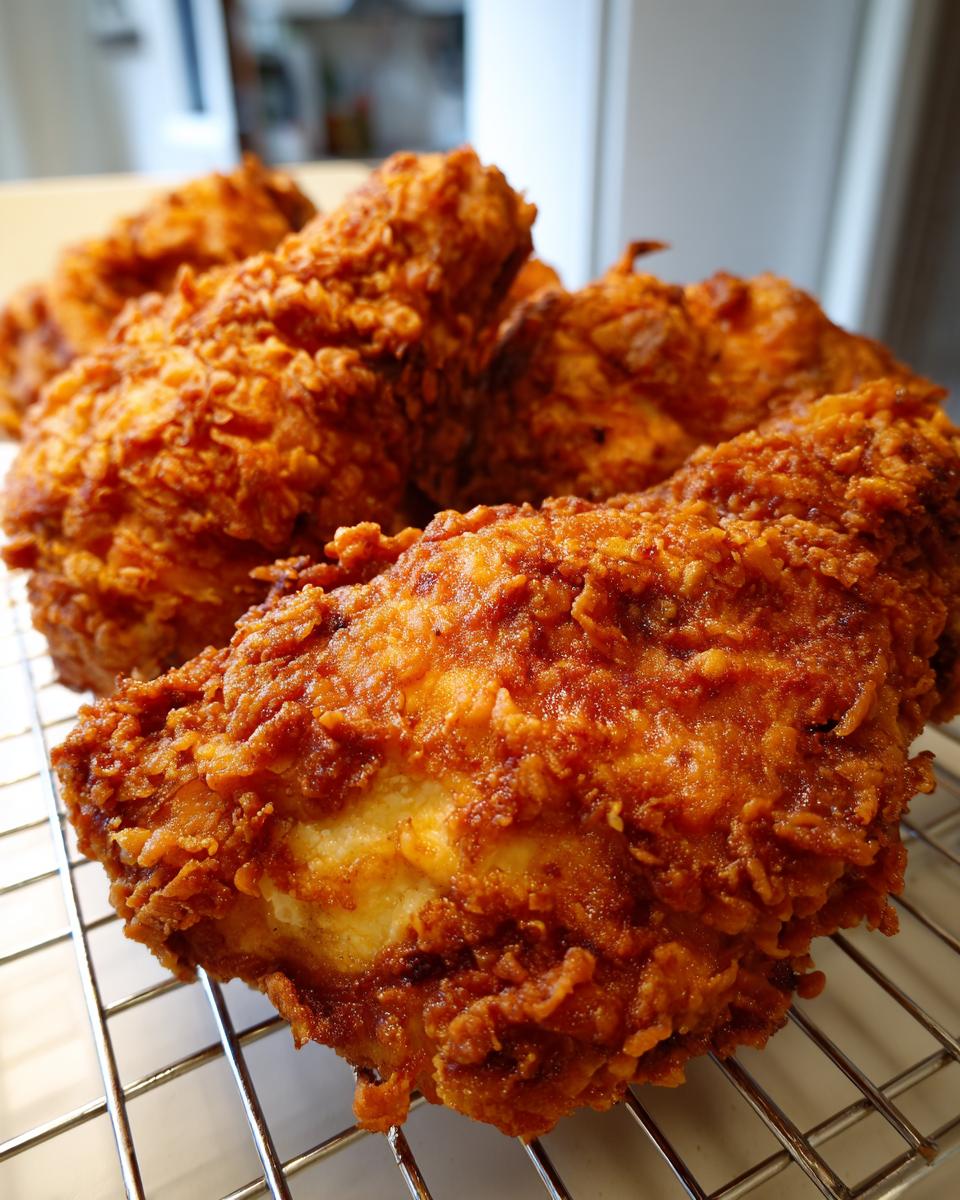
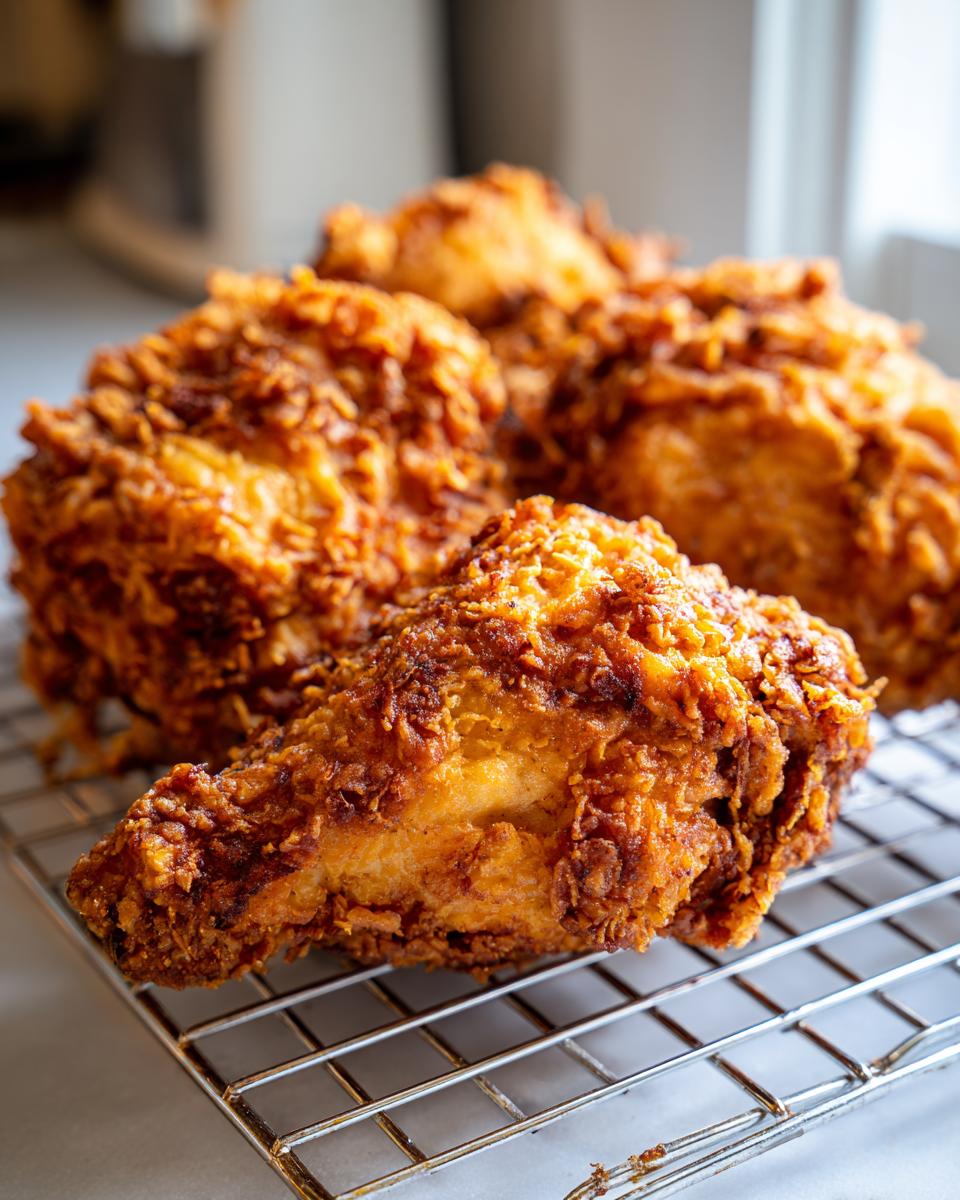
That amazing crust doesn’t happen by accident! It’s all about the double-dredge. After that first toss in the seasoned flour, we dip the piece briefly back into the wet buttermilk. That thin layer of liquid gives the second dredge something extra to grab onto, creating those famously deep ridges. Plus, the tiny bit of baking powder in the flour mix reacts with the heat, puffing up slightly to give you that gorgeous, airy, golden brown crackle crust chicken texture.
Tender Chicken Frying Method via Buttermilk Marinated Chicken
Forget just seasoning the outside; the secret to juicy fried chicken starts hours before it hits the oil. That long soak in the buttermilk marinated chicken is crucial. The acid gently breaks down the tough muscle fibers, making the meat unbelievably tender and juicy throughout the entire cooking process. It’s the foundation for a fantastic cajun chicken pasta, but applied here for deep-fried success!
Ingredients for Your Classic Homemade Fried Chicken
Gathering your ingredients is step one in making sure this classic homemade fried chicken turns out perfectly. I like to organize everything into three stations before I even touch the chicken: the marinade bath, the dry dredge mix, and the frying station, with my thermometer nearby. Remember, getting the proportions right in the seasoning mix is key to that rich flavor. You definitely want to invest in a good thermometer for this recipe; it makes all the difference when you’re aiming for that golden brown color!
For the Buttermilk Marinade
This is the tenderizing crew! We need about four cups of buttermilk—don’t skimp here—along with two tablespoons of hot sauce. For seasoning, I use one tablespoon of salt, one teaspoon each of black pepper, paprika, garlic powder, and onion powder. Mix it all together and get that chicken completely submerged. This first soak is vital for juicy fried chicken.
For the Seasoned Flour Dredge
This is where the crunch is born! We’re mixing three cups of all-purpose flour. To boost that crispiness, add one cup of cornstarch—that’s non-negotiable for crunch—and one tablespoon of baking powder. Finally, add one teaspoon of cayenne pepper if you like a little fire, but even without it, this mix gives you the best texture. Remember this flour mixture needs to be whisked really well so those leavening agents are totally distributed.
We’ll need about four to six cups of vegetable or peanut oil for frying, just enough to cover the chicken by about two or three inches in your pot. You can check out how I make crispy mashed potato cakes for another great side that uses a similar textural coating technique!
How to Make Incredible Fried Chicken: The Step-by-Step Tutorial
Okay, you have your ingredients ready—now for the fun part! This is where we take good chicken and turn it into the most incredible fried chicken you’ve ever tasted. Patience is key here, so remember that buttermilk brine needs at least four hours, but overnight is truly better. That soak does heavy lifting in keeping the final product so juicy.
Brining and Preparing the Chicken
First things first, make sure your seasoned buttermilk brine is mixed up well in that big bowl. Pop those chicken pieces in until they are swimming. Cover that up and stick it in the fridge. While that’s going, go ahead and toss your flour, cornstarch, and spices together in that second dish—that’s your seasoned flour mix you made earlier.
Once they’ve had their bath, you pull the chicken out, letting a little extra milk drip off, but seriously, don’t towel it dry! We need that moisture to help the crust stick when making this classic homemade fried chicken.
The Best Technique for Crunchy Chicken Coating
Next, we dredge! Take each piece and press it down hard into that flour mixture. I mean, really press it! We’re looking for a thick, almost shaggy coat. Then, for that ultra-crispy coating we want, you’re going to dip it back into the buttermilk super fast—just a quick dip—and immediately place it back into the flour to coat again. Press, press, press! This double-dredge creates those crunchy bits.
Here’s a vital step for a crunchy coating: lay the coated pieces on a wire rack for about 20 minutes before they hit the oil. This resting time lets that coating set up beautifully so it doesn’t fall off when frying. Don’t skip the rest!
Deep Fried Chicken Guide: Frying for Perfection
Now we move to the oil. Pour your oil deep into your pot—like two or three inches—and heat it up carefully to 325°F. You absolutely must use that thermometer! When you drop the chicken in, you want those pieces to sizzle right away, but don’t crowd the pot, or the temperature tanks, and you get greasy chicken. Fry in batches, maintaining that temperature between 300°F and 325°F. Thighs and legs take about 12 to 15 minutes until they’re deep golden brown. Once they come out, put them right on a clean rack to drain; that keeps the bottom from getting soggy! This juicy fried chicken tutorial is all about temperature control.

If you want to see another great recipe that relies on oven precision, check out my slow cooker beef tips, but honestly, for fried chicken, the thermometer is your best friend! For more pro tips on getting that perfect exterior, feel free to check out this external guide on crispy buttermilk southern fried chicken.
Tips for Success with Your Fried Chicken
Look, making truly incredible fried chicken isn’t hard, but it is reliant on a few non-negotiable rules. I learned these the hard way, usually by ending up with crusts that slid right off! My biggest piece of advice focuses on the oil. You simply must keep that temperature steady. If it dips too low, you soak up grease, and we are aiming for that light, airy crunch, not oil saturation. That’s why using a thermometer is not optional; it’s essential for the best experience.
Another trick I always follow is using mixed cuts. Dark meat, like the thighs or drumsticks, handles the heat beautifully and stays succulent. If you’re leaning heavily on just breasts for your batch of fried chicken, pull those out just a minute or two sooner than the dark cuts. Also, remember those juicy baked pork chops I shared? They prove that you can get amazing results with careful heat management even outside of the deep fryer!
Making This Authentic Southern Chicken Recipe Ahead of Time
I get it, sometimes you need to prep ahead, especially when making a big batch of this authentic southern chicken recipe for a crowd. The great news is you can prep the raw chicken right after that crucial 20-minute rest. Just place the double-dredged pieces in a single layer on a baking sheet lined with parchment and freeze them uncovered until solid. Then, transfer them to a sealed bag. When you’re ready to cook, move them straight from the freezer into the hot oil—you’ll just need to add a few extra minutes to the frying time.
For leftovers, my advice is not to store them in an airtight container right away! Cooked fried chicken gets steamy. Let it cool slightly, then place it in a breathable container with a paper towel lining. Reheat leftovers in an oven at 375°F until hot and crispy again. You won’t beat fresh, but it’s the next best thing! For other make-ahead meals, my crockpot chicken fajitas are amazing for busy evenings.
Serving Suggestions for Your Comfort Food Chicken Dinner
You can’t just serve magnificent fried chicken by itself, right? That would be a real shame! This is the ultimate comfort food chicken dinner experience, so you need sides that stand up to that rich flavor and that perfect crunch. I always try to balance the richness with something bright or tangy. My classic creamy broccoli salad cuts through the fat perfectly, or you can never, ever go wrong with a big scoop of my ultra-fluffy creamy mashed potatoes under that crispy skin. Don’t forget a crisp pickle or some coleslaw for the necessary tang!
FAQ: Mastering Your Fried Chicken
These are the questions I get asked the most after people try making my recipe for the first time! Honestly, mastering any good rice casserole or chicken dish comes down to clarifying a few key steps. Let’s dive into the nitty-gritty so your next batch is absolutely flawless.
Can I bake or air fry this fried chicken recipe?
You totally can try, but I have to be honest with you: this buttermilk marinade and double-dredge method is designed for deep-fried chicken. When you bake or air fry, you won’t get that specific, flavorful snap and golden color we worked so hard for. You’re going to end up with a lovely baked chicken, but it won’t have that classic, thick, crunchy coating that makes this recipe so special. Stick to the oil if you want the ultimate crispy result!
How long should I marinate the chicken for the juiciest results?
While you technically can pull the chicken after four hours in that magic buttermilk bath, trust me on this: overnight is a game-changer. If you can swing it, let it rest in the fridge for 10 to 12 hours. That extended time really allows that acid in the buttermilk to tenderize the meat deeply. That’s the top secret for getting tender chicken frying straight from the fridge, even if the outside takes a little longer to crisp up!
What is the secret to preventing greasy fried chicken?
If you take only one thing away from this whole tutorial, let it be this: oil temperature control is the single most important factor. If your oil is too cool—below 300°F—the coating just sits there absorbing fat like a sponge, and it won’t set properly. If it’s too hot, the outside burns before the inside cooks, resulting in raw spots you can’t eat. Keep that thermometer glued to your pot and aim for that sweet spot between 300°F and 325°F during the actual frying time. For more reliable tips on getting that perfect crispness, I always recommend checking out what other pros are saying, like this guide from Nora’s Kitchen.
Nutritional Estimate for This Fried Chicken
I always want to give you a full picture, but I have to be upfront: crunching numbers for homemade fried chicken is tricky because we all dunk and dredge differently! These figures are just an estimate based on the core ingredients for one piece of bone-in chicken, using average component weights. They aren’t government regulations, that’s for sure!
This is based on one serving, remember. When you’re making a big batch of this classic homemade fried chicken, everyone might eat a thigh or two mixed with breasts, so what you eat really changes the total. These numbers just help us understand what we are dealing with when we sit down for this ultimate comfort food chicken dinner.
- Serving Size: 1 piece
- Calories: 450
- Fat: 28g (This includes the oil absorption, so watch your frying temp!)
- Saturated Fat: 7g
- Carbohydrates: 20g
- Protein: 30g
- Sodium: 650mg
Just keep in mind that using leaner cuts or slightly less flour when you double-dredge can bring those numbers down a bit. It’s all about adjusting for your own needs while you chase that perfect crunch!
Share Your Family Favorite Fried Chicken Creations
Now that you’ve made the best fried chicken imaginable—crispy, juicy, and ridiculously flavorful—I really, really want to hear about it! Cooking is always better when you share the results, and seeing your attempts at achieving that perfect golden brown crackle crust makes my day. Did the double-dredge technique work wonders for you? Did you find a new side dish that pairs perfectly with your family favorite fried chicken?
Don’t be shy! Head down to the comments below and drop a rating for the recipe. If you took pictures, tag me on social media so I can see your results! I love seeing how this recipe travels from my kitchen to yours.
Sharing your adventures helps everyone else out there reading this who might be nervous about taking the plunge into deep frying. If you’re looking for more tried-and-true content about why we cook the way we do, feel free to check out the About Page! And hey, if you just want to relive the excitement, go check out how other folks are making their perfect batches over at Sweet Dreams Kitchen for some extra inspiration!
PrintThe Best Crispy & Juicy Southern Fried Chicken with Buttermilk Brine
Make the ultimate comfort food with this recipe for classic homemade fried chicken. You achieve an ultra-crispy, golden crust and a tender, juicy interior using a simple buttermilk marinade and a double-dredge technique.
- Prep Time: 30 min
- Cook Time: 45 min
- Total Time: 4 hours 45 min
- Yield: 4 servings 1x
- Category: Dinner
- Method: Deep Frying
- Cuisine: Southern American
- Diet: None
Ingredients
- 3 lbs bone-in, skin-on chicken pieces (thighs, breasts, drumsticks)
- 4 cups buttermilk
- 2 tablespoons hot sauce
- 1 tablespoon salt
- 1 teaspoon black pepper
- 1 teaspoon paprika
- 1 teaspoon garlic powder
- 1 teaspoon onion powder
- 3 cups all-purpose flour
- 1 cup cornstarch
- 1 tablespoon baking powder
- 1 teaspoon cayenne pepper (optional, for a kick)
- Vegetable oil or peanut oil, for frying (about 4-6 cups)
Instructions
- In a large bowl, combine the buttermilk, hot sauce, salt, pepper, paprika, garlic powder, and onion powder. Stir well.
- Add the chicken pieces to the buttermilk mixture, ensuring they are fully submerged. Cover the bowl and refrigerate for at least 4 hours, or preferably overnight. This step tenderizes the chicken.
- In a separate shallow dish, whisk together the flour, cornstarch, baking powder, and cayenne pepper (if using). This is your seasoned flour mix.
- Remove the chicken from the marinade, letting excess drip off, but do not wipe it dry.
- Dredge each piece thoroughly in the seasoned flour mix, pressing the flour onto the chicken to create a thick coating.
- For the double-dredge technique (for extra crunch), dip the floured chicken back into the leftover buttermilk mixture for just a second, then immediately return it to the flour mix and coat again, pressing firmly.
- Place the coated chicken pieces on a wire rack set over a baking sheet. Let the chicken rest at room temperature for 20 minutes before frying. This resting period helps the coating adhere.
- Pour 2 to 3 inches of oil into a heavy-bottomed pot or deep fryer. Heat the oil to 325°F (160°C). Use a thermometer to monitor the temperature accurately.
- Carefully place 3 to 4 pieces of chicken into the hot oil, ensuring you do not overcrowd the pot, which lowers the oil temperature.
- Fry the chicken until golden brown and cooked through. Thighs and drumsticks usually take 12-15 minutes, while breasts may take 10-14 minutes. Maintain the oil temperature between 300°F and 325°F (149°C and 160°C) throughout the process.
- Remove the cooked chicken and place it on a clean wire rack set over paper towels to drain excess oil. Sprinkle lightly with salt immediately after removing from the oil.
- Repeat the frying process with the remaining chicken, allowing the oil to return to temperature between batches.
Notes
- For the juiciest results, use a mix of dark and white meat. Dark meat (thighs and legs) handles longer frying times better.
- Maintain your oil temperature. If the oil is too cool, the crust becomes greasy; if it is too hot, the outside burns before the inside cooks.
- This recipe focuses on the best technique for crunchy chicken; do not skip the 20-minute rest period after dredging.
Nutrition
- Serving Size: 1 piece
- Calories: 450
- Sugar: 2
- Sodium: 650
- Fat: 28
- Saturated Fat: 7
- Unsaturated Fat: 21
- Trans Fat: 0
- Carbohydrates: 20
- Fiber: 1
- Protein: 30
- Cholesterol: 110