
Oh, you know that feeling when you’re craving deeply satisfying, utterly cheesy Italian food, but you just can’t handle another soggy takeout box? I totally get it. My mission here at The YumMagnet, thanks to my roots running deep in home cooking, is taking those treasured, classic flavors—like the perfect **chicken parmesan recipe**—and making them real for your busy weeknights. We all want that restaurant-quality experience where the chicken is juicy, the cheese is ridiculously bubbly, and—this is the big one—the crust CRUNCHES! That’s the battle everyone fights, right? Soggy breading ruins everything. My background, as detailed in our story over at The YumMagnet Recipe Box, is all about adapting those classic techniques for real life. You’re going to get the most incredibly thin, crisp cutlet wrapped around tender meat, all ready in less than an hour!
- Why This Is The Best Chicken Parmesan Recipe You Will Make
- Ingredients for Your Homemade Chicken Parm
- How to Prepare the Ultimate Crispy Chicken Parmesan Recipe
- Ingredient Notes and Substitutions for Your Chicken Parmesan Recipe
- Tips for Success: Making the Crispiest Chicken Parmesan
- Serving Suggestions for Your Chicken Parmesan Dinner Ideas
- Storage and Reheating Instructions for Leftover Chicken Parmesan
- Frequently Asked Questions About This Chicken Parmesan Recipe
- Estimated Nutritional Data for This Classic Italian Comfort Food
Why This Is The Best Chicken Parmesan Recipe You Will Make
I know, I know, everyone claims their recipe is the Best Chicken Parmesan, but stick with me here. We cracked the code so you never have to deal with a sad, soggy dinner again. This method guarantees a savory, golden crust that holds up to the sauce and cheese. It’s truly satisfying when you bite in and find that perfectly Juicy Chicken Parmesan waiting for you!

- It uses a genius breading blend that locks in moisture while giving you that crackle we all crave.
- The two-step cooking process gets the chicken cooked through without drying it out.
- You’re looking at a full, Restaurant Style Chicken Parm on the table in about 40 minutes flat.
Achieving Restaurant Style Chicken Parm Texture
The real secret weapon here, aside from the pounding technique, is the breading. We mix standard breadcrumbs with Panko. Panko crumbs are those light, airy flakes that shatter when you bite them—that’s what gives you that ultra-Crispy Chicken Parmesan texture. Then, frying them quickly (just until golden, not cooked all the way!) sets that crust before it ever sees the oven. It’s the best of both worlds.
Quick Chicken Recipes for Weeknight Italian Dinner Success
For me, perfection means nothing if it takes three hours of effort. This whole process slides in under the 45-minute mark. That means you get a spectacular, hearty plate of Easy Chicken Parmesan for a busy Tuesday night. It’s the ultimate Weeknight Italian Dinner solution that tastes like you spent all day simmering sauces!
Ingredients for Your Homemade Chicken Parm
One thing I learned from my mom while researching the best way to update these old recipes is that you cannot skimp on the flavor foundations. For this chicken parmesan recipe, the quality of your sauce and cheese really shines through since the cook time in the oven is short. Think rich marinara and the creamiest mozzarella you can find. Don’t worry if you need to use store-bought sauce, just make sure it’s one you genuinely love the taste of!
Here is what you’ll need to gather for four amazing servings:
- 4 boneless, skinless chicken breasts (If you can find them around 6 ounces each, that’s perfect!)
- 1 cup all-purpose flour
- 2 large eggs, just lightly beaten—we don’t want them too frothy!
- 1 teaspoon salt
- 1/2 teaspoon black pepper
- 1 cup plain breadcrumbs (I use fine ones here)
- 1/2 cup grated Parmesan cheese (Make sure this is freshly grated, please! It truly melts better.)
- 1/2 cup Panko breadcrumbs (These are our crispness insurance!)
- 1/4 cup olive oil, for frying (We only need a little bit to get that beautiful golden color.)
- 2 cups quality marinara sauce (Your favorite jarred brand works wonders here.)
- 8 ounces fresh mozzarella cheese, sliced (Fresh slices melt into those gorgeous pools of gooey goodness.)
- 1/4 cup grated Parmesan cheese (This is for the cheesy topping later!)
- Fresh basil, chopped, for garnish (It adds that pop of color and freshness right at the end.)
See? Nothing too crazy! These are all pantry staples, which is exactly what I strive for when creating an Easy Chicken Parmesan that fits right into your routine. If you’d like some tips on why we use both regular and Panko crumbs, check out some of the fantastic advice other home cooks have shared on achieving that perfect crunch right here.
How to Prepare the Ultimate Crispy Chicken Parmesan Recipe
This is where the magic happens, transforming simple cutlets into that beautiful chicken parmesan recipe you dream about. My goal for you is maximum juiciness inside and maximum crunch outside, so pay attention to the prep! We’re using a hybrid approach: a quick fry to set that crust, followed by the oven to melt the cheese and finish the cooking. This keeps your kitchen from getting too smoky, but guarantees that beautiful texture.
Pounding and Setting Up the Dredging Station
First things first! We need even cooking for that Juicy Chicken Parmesan. Lay your chicken breasts between plastic wrap and just pound them gently until they are all an even half-inch thick. This is so important, trust me. Then, set up your three shallow dishes for dredging. Dish one gets the flour. Dish two holds your lightly beaten eggs. Dish three is the star: mix your regular breadcrumbs, Panko, salt, pepper, and that half-cup of Parmesan. You want to coat each piece really well in the flour, shake off the excess, dip completely in the egg, and then—this is key—press that breadcrumb mix firmly onto every surface. Really press it in so it sticks!
Building the Perfect Crust: Frying for the Best Chicken Parmesan Recipe
Next, heat up some olive oil over medium-high heat. We’re not deep frying here; we just need enough oil to coat the bottom of the pan nicely. Put in two cutlets at a time, being careful not to crowd the pan. Fry them for just 2 to 3 minutes on each side. They should look golden brown and beautiful, but they won’t be cooked all the way through yet. That’s fine! That quick fry just sets the crust tight for the bake. Pull them out immediately and set them on a little wire rack over paper towels to drain off any extra oil. You want them dry and golden!
Assembling and Baking the Cheesy Chicken Bake
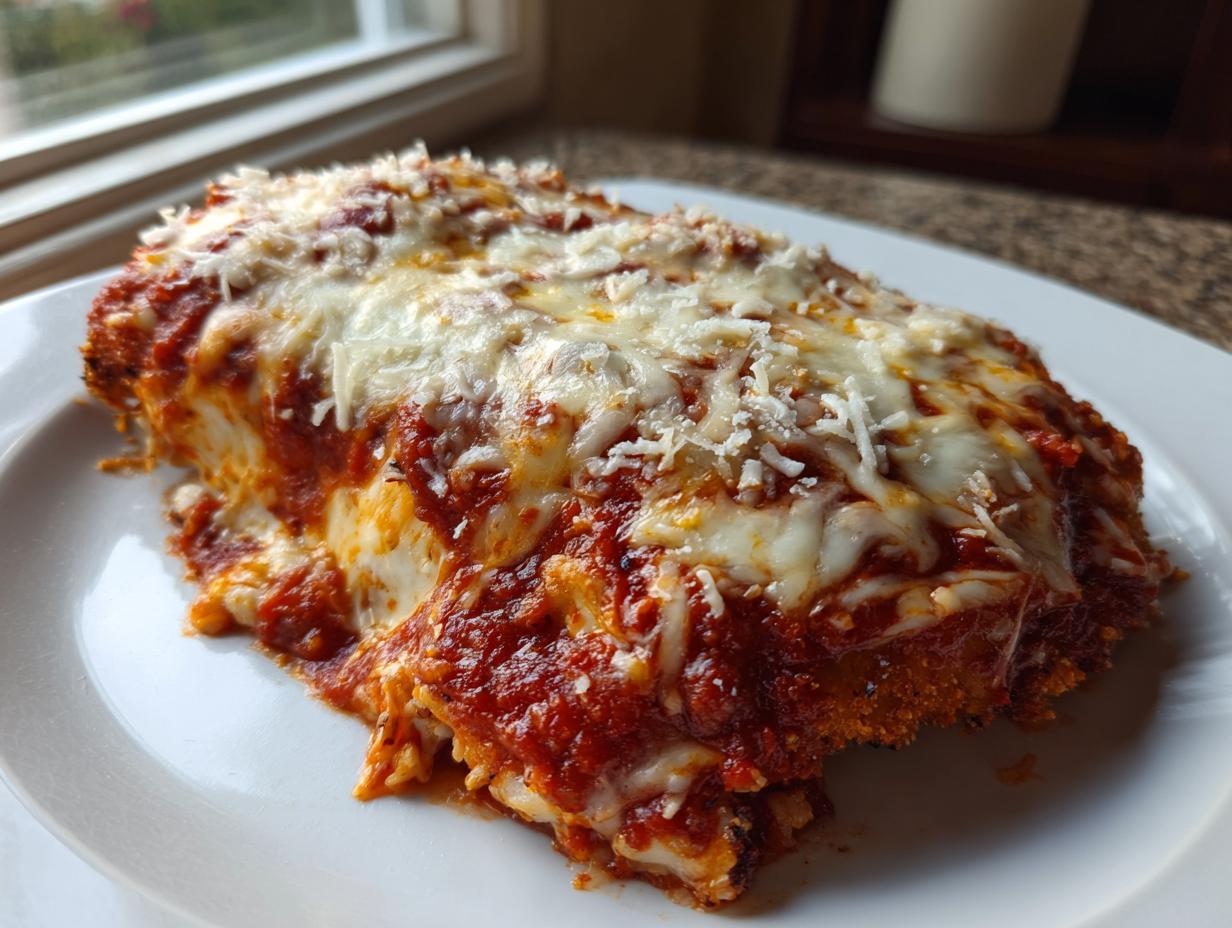
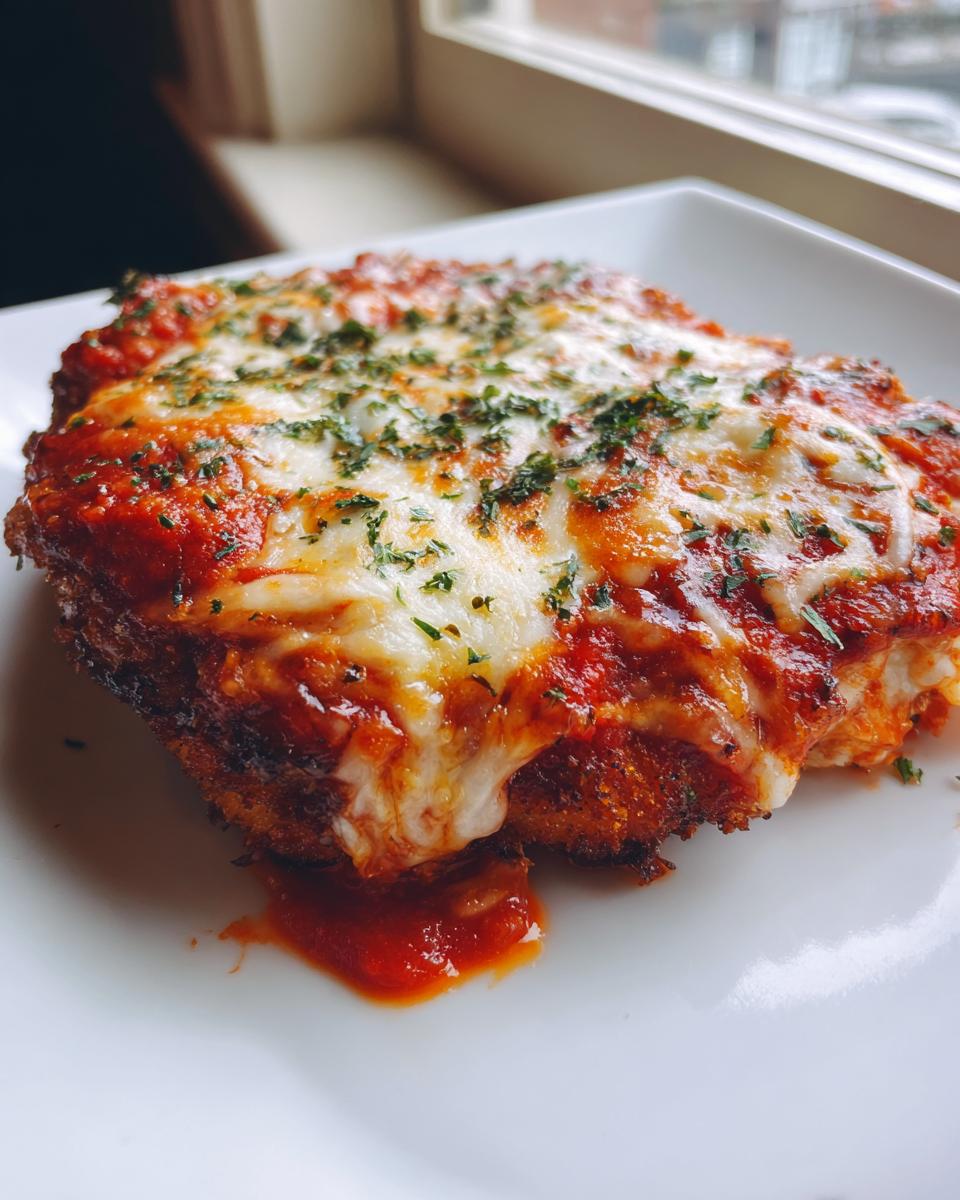
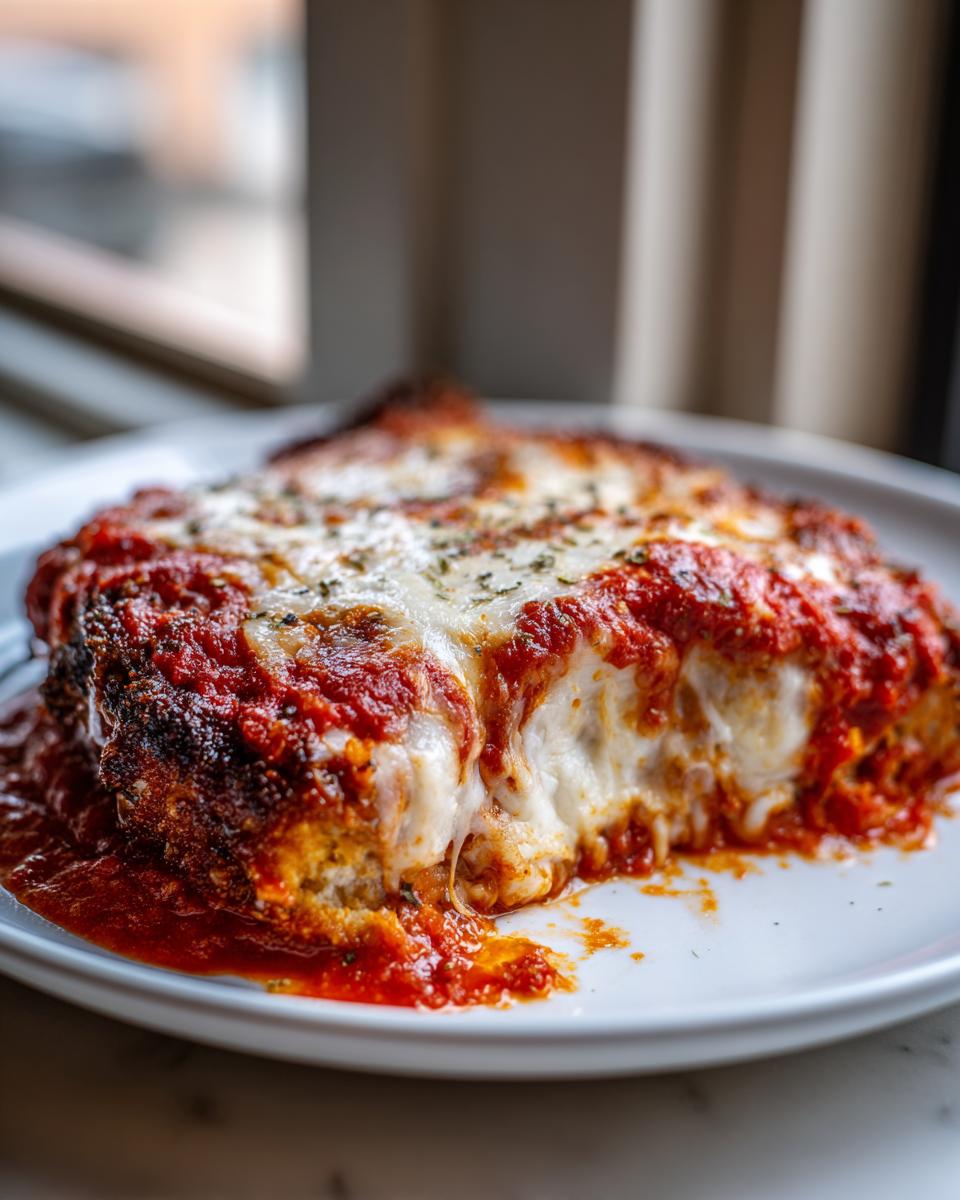
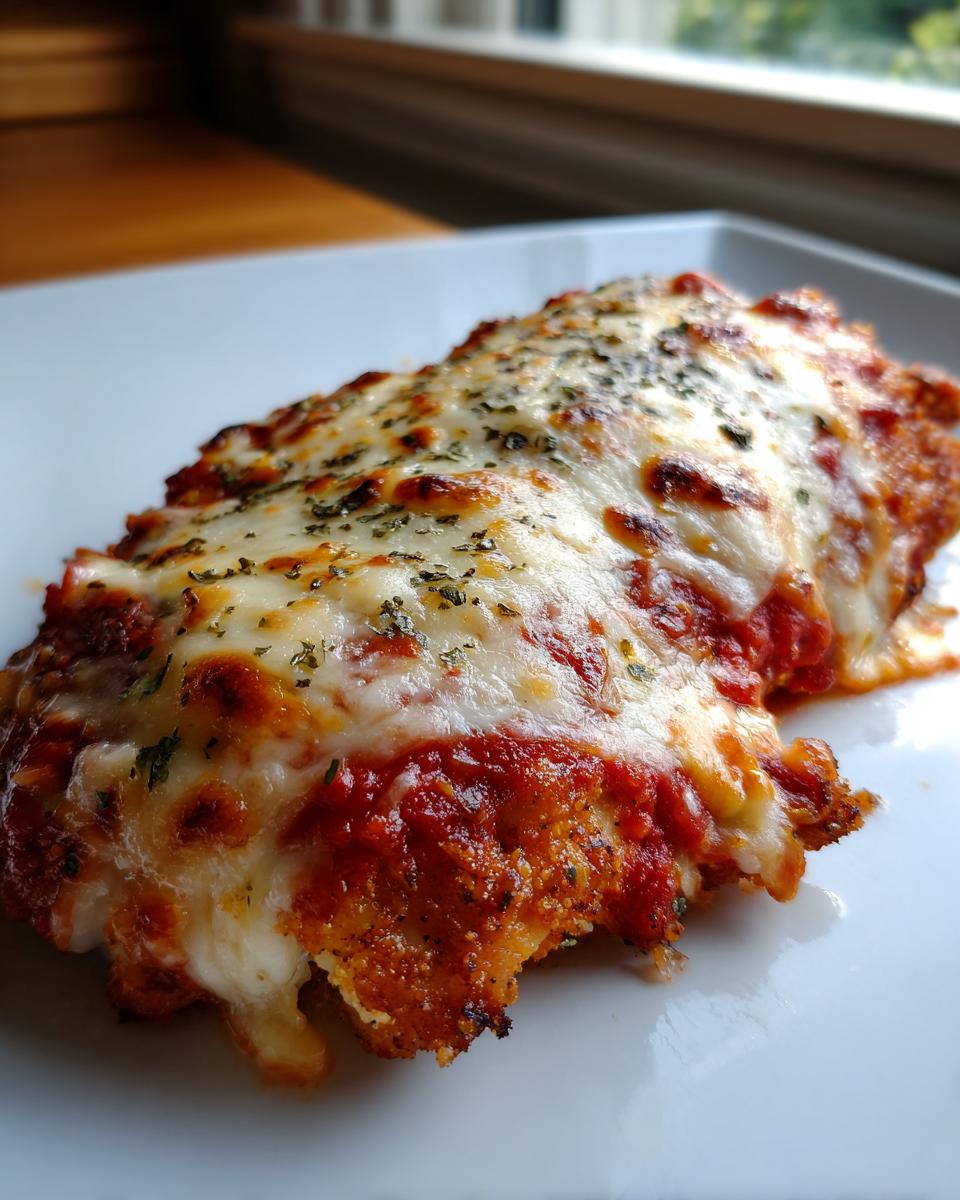
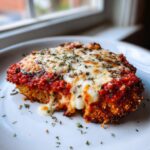
Time to build your Cheesy Chicken Bake! Spread a thin layer of your favorite marinara sauce right on the bottom of a greased baking dish. Lay those crispy cutlets on top of that sauce base. Spoon just a *touch* more sauce over each one—don’t drown them! Then pile on the fresh mozzarella slices and sprinkle generously with that last bit of Parmesan cheese. Pop the whole dish into a preheated 400-degree oven for about 12 to 15 minutes. You’re checking for 165°F internal temperature, and if that cheese isn’t brown and bubbly enough for you, switch the oven to broil for just the last minute. Watch it like a hawk when broiling, though!
I actually linked to some great advice on getting that perfect fry right here if you want to check out another expert’s take before you start. Don’t forget to check out our usage guidelines here!
Ingredient Notes and Substitutions for Your Chicken Parmesan Recipe
Look, my kitchen philosophy centers on making amazing food accessible, but sometimes we have to make swaps based on what’s in the fridge or what we have on hand. This section is all about making sure your chicken parmesan recipe works perfectly even if you run out of one thing. Trust me, I’ve been there! The biggest questions I always get revolve around that breading and the cheese. Let’s tackle those first so you can feel confident walking into the kitchen.
For the ultimate crunch, you already noticed we used both regular breadcrumbs and Panko. If you only have regular ones, don’t panic! Just use the standard breadcrumbs, but maybe add a tablespoon of cornstarch to the mix. That little bit of starch helps wick away moisture, which keeps things crispier during the bake. If you only have Panko, use that exclusively, but make sure you press it on extra firmly because it doesn’t adhere as readily as fine crumbs do.
Why Fresh Mozzarella Beats Pre-Shredded
This is non-negotiable for me when shooting for that Restaurant Style Chicken Parm look. Pre-shredded mozzarella is coated in anti-caking agents, usually potato starch or cellulose. Guess what those things do when they hit heat? They tend to make the cheese gummy instead of that glorious, stringy, stretchy melt you want!
Fresh mozzarella is wetter, but when thinly sliced, it melts down beautifully. If you absolutely must use the bagged stuff, just buy the pre-shredded low-moisture kind, not the ‘fresh’ type sold in a ball soaking in water—that one’s too wet for the topping!
Handling the Marinara Sauce Situation
Since this is a Quick Chicken Recipes favorite, the marinara sauce doesn’t have hours to simmer and deepen in flavor. This is why I stress using a jarred sauce you already love. If your jarred sauce tastes a little flat, try adding a tiny pinch of sugar and a shake of dried oregano while it heats up. It makes a surprising difference, I promise!
And hey, if you are trying to skip the frying step entirely because you’re looking for a lower-oil option, remember the cheat code from the instructions! You can totally skip the oil entirely. Just spray those breaded cutlets lightly with cooking spray and bake them at 400 degrees F for about 15 minutes before you add the sauce and cheese. You won’t get the exact same intense crispness you get from frying, but it’s a great way to keep this a lighter meal. For more thoughts on boosting flavor, you can check out how others approach the breading process over here.
Tips for Success: Making the Crispiest Chicken Parmesan
Getting that perfect, loud crunch on your cutlet is the whole reason we went through the trouble of pounding and breading, right? If you skip a few crucial details, that beautiful crust can turn into wet mush the second it meets tomato sauce. No, thank you! I’ve learned a few things along the way to battle the dreaded soggy factor, and these tips will make sure your Crispy Chicken Parmesan stays crispy until the last bite.
My first big tip revolves around the oil temperature during that initial quick fry. If your oil isn’t hot enough—and I’m talking shimmering, just barely smoking—the breading soaks up the oil instead of searing. That soggy outcome starts right there! You want the oil right around 350 degrees F. It’ll sizzle aggressively when that cutlet hits the pan, but it cooks the crust fast enough that the raw chicken inside stays safe while the crust gets set.
Sauce Management is Everything
This might sound obvious, but the sauce is usually the culprit! Make sure you are warming your marinara sauce up before you start assembling. Cold sauce hitting hot, crispy chicken instantly steams the breading right off! We want the sauce warm so it blends nicely with the hot chicken and heats up, not cools down, the cheese layer.
Also, don’t go crazy with the sauce on top of the cutlets before they go into the oven. Use just enough to cover the top surface minimally, like a blanket, not a swimming pool! Remember, the chicken is already mostly cooked through from the fry; the oven time is just for melting the cheese and finishing the internal temperature. Less sauce means a crisper boundary layer between the coating and the cheese topping.
Don’t Skip the Rest Period
Just like a steak, chicken needs to rest, and this applies even when it’s smothered in cheese! Once the chicken comes out of the oven, let it sit on the counter for 5 minutes before you even attempt to carve into it or serve it. This resting time lets the juices settle back into the meat, guaranteeing that super Juicy Chicken Parmesan we are aiming for. It also lets that cheese set up just slightly so you don’t end up with just soupy mozzarella sliding everywhere.
For even more ways to ensure you get that perfect non-soggy golden texture, you should take a look at some of the excellent advice shared by others in the home cooking community. It’s always fun to see different techniques, like what they swear by for their favorite crispy crusts!
Serving Suggestions for Your Chicken Parmesan Dinner Ideas
Okay, the main event is done! You nailed the crust, the cheese is melting perfectly, and your kitchen smells like the absolute best Italian takeout spot. Now, we need to figure out what to serve alongside this amazing chicken parmesan recipe! This isn’t a dish that needs much company, but it definitely needs a couple of simple sidekicks to make it a complete meal.
When I’m planning out my Chicken Parmesan Dinner Ideas, I usually focus on balancing the richness of the chicken cutlet. Since we’ve got sauce and cheese, you need something to soak up all that extra marinara, or something bright and fresh to cut through the fat.
The Perfect Pasta Base
You absolutely cannot usually serve Chicken Parm without pasta underneath it—it just feels wrong, doesn’t it? I almost always go with spaghetti or linguine. They have the right thickness to stand up to the weight of the chicken and the sauce you ladle over it. Make sure you cook your pasta *al dente*! If it’s mushy, it won’t hold up when you pile this heavy, cheesy chicken on top. Drain it well and toss it lightly with a little olive oil right before plating, just to stop it from sticking together.
Don’t Forget the Garlic Bread!
This is mandatory when serving Classic Italian Comfort Food like this. Seriously, what is marinara sauce without some crusty garlic bread for dipping? Five minutes under the broiler with some butter, garlic powder, and maybe a sprinkle of dried parsley, and you’re golden. It’s fast, easy, and everyone—especially the picky eaters—will demolish it before the main course is even halfway done!
Keep the Veggie Side Simple
To keep this a true Weeknight Italian Dinner solution, you don’t want a heavy, complicated vegetable side. A very simple green salad is my go-to recommendation. Think crisp romaine or mixed greens, maybe some thin slices of red onion, and dress it super light. A simple vinaigrette made with good quality olive oil and red wine vinegar is all you need. This little bit of crisp acidity is the perfect palate cleanser between bites of rich chicken and mozzarella!
Storage and Reheating Instructions for Leftover Chicken Parmesan
If you’re anything like me, an amazing chicken parmesan recipe tastes almost as good the next day, provided you handle the leftovers right! We put so much effort into getting that crispy crust, and the last thing we want is to ruin it by microwaving the cheese into a rubbery disc. Don’t fret; we can salvage that glorious texture!
First, storage is simple but important. You want to avoid trapping moisture, which leads to sogginess even in the fridge. Make sure the chicken has completely cooled down after dinner. Then, store the leftovers in an airtight container. If you have a lot, you can layer them, but I prefer to put a paper towel between pieces that have sauce on them just to absorb any residual moisture that collects overnight. Get it into the fridge within two hours of cooking, and it should be good for about three to four days. That’s a fantastic amount of Homemade Chicken Parm for lunch!
The Best Way to Reheat for Maximum Crispness
Okay, this is the most critical step for achieving that almost-fresh-out-of-the-oven experience. I’m going to tell you right now: put the microwave away! Microwaving melts the cheese perfectly, sure, but it turns that beautiful Panko crust into steamed bread. We’re aiming for texture here, remember?
The absolute best method is returning the chicken to a baking sheet. If you have a toaster oven, even better—it heats up faster and circulates the heat nicely. Preheat whatever oven you use to 375 degrees F. Place the leftover cutlet directly on the baking sheet (you can add a tiny drizzle of oil if the crust seems dry, but usually, it’s not necessary). Bake for about 10 to 15 minutes. You’ll know it’s done when the cheese is bubbling again and the edges of the crust smell hot and toasty. It reheats quickly because we set the crust during that initial fry!
When to Add Fresh Sauce or Cheese
If you’re reheating just one or two pieces, you might notice that the existing sauce has soaked in a bit too much. If you want that lovely, saucy top layer again, simply scoop a spoonful of marinara sauce over the top of the chicken *before* it heads into the oven, and add a sprinkle of fresh Parmesan cheese. You don’t usually need extra mozzarella unless the original topping totally disappeared. Remember, you can always reach out to me directly if you have specific questions about keeping your leftovers perfect after you try this great recipe!
Frequently Asked Questions About This Chicken Parmesan Recipe
I know you’ve got questions! When you’re aiming for Restaurant Style Chicken Parm at home, it’s natural to wonder about the small details. I’ve gathered some of the most common things people ask me when they’re trying this recipe for the first time. It’s all about demystifying those little steps so you can cook with confidence and nail that perfect crust every time. As a true Family Favorite Dinner, we want everyone to succeed!
Can I make this Easy Chicken Parmesan recipe entirely in the oven?
Oh, absolutely! I totally understand the desire to skip the stovetop frying step, especially on a busy evening when you are looking for Quick Chicken Recipes. You can definitely make this entire dish baked. Remember those notes I shared? You’ll want to skip the oil entirely. Just bread the cutlets as instructed, place them on a lightly sprayed baking sheet, and bake them at 400 degrees F for a good 15 minutes first. Then, pull them out, top with your sauce and cheese, and bake for another 10 to 12 minutes until bubbly! You won’t get the exact same aggressive crispiness that comes from the quick pan-fry, but it’s still a fantastic, Easy Chicken Parmesan option!
What is the best way to ensure a Juicy Chicken Parmesan cutlet?
This is the million-dollar question for any Chicken Parmesan Dinner Ideas post! Keeping that meat tender is all about consistency and not overcooking it. The very first step, pounding the chicken breasts to a uniform half-inch thickness, is the key, because thick spots cook slower than thin spots, leading to uneven results. Also, remember the initial fry step in our hybrid method: we are only frying it for 2 to 3 minutes per side just to *set* the breading. It doesn’t have to be cooked through! That final bake takes care of the internal temperature (up to 165°F), finishing the cook gently and locking in all that moisture. Don’t rush that fry!
If you’re running questions about making this meal even easier or quicker, check out some great tips from other home cooks over at Happy Fork Recipes for their take on a fast dinner solution!
Estimated Nutritional Data for This Classic Italian Comfort Food
Okay, now that we’ve covered how to make this Classic Italian Comfort Food—and how to make sure that crust stays loud and proud—let’s talk briefly about the numbers. I always include this because while we cook with love, knowing what’s in the plate helps you plan! When I calculated this out based on using the pan-fry method (which gives you that amazing flavor complexity), here are the estimates for one serving of this chicken parmesan recipe.
Keep in mind, these figures are straight estimates for one cutlet based on the recipe as written. If you use thin chicken breasts, load up on extra mozzarella, or serve it with a huge side of pasta, the macros will definitely shift. This is just a starting point for your planning!
- Serving Size: 1 cutlet
- Calories: 550
- Protein: 45g
- Fat: 28g
- Saturated Fat: 12g
- Carbohydrates: 35g
- Fiber: 3g
- Sugar: 8g
- Sodium: 750mg (Please watch this if you use high-sodium jarred sauce or use pre-shredded cheese!)
Important Disclaimer About These Numbers
I feel like I should say this like Grandma used to warn me about over-mixing the batter—pay attention! These numbers reflect the chicken cutlet assembled right before serving; they don’t include any pasta or extra garlic bread you might devour (and trust me, you should probably have the garlic bread).
Because we are dealing with home cooking, brands of Parmesan, the exact thickness of that fresh mozzarella, and even how much oil you absorb in the initial fry can change things. If you use the fully baked alternative, your fat content, especially the saturated fat, will drop significantly! Always refer to the privacy policy here if you ever have questions about how we handle data on the site.
PrintThe Ultimate Crispy Chicken Parmesan Recipe: Restaurant-Quality at Home
You can make restaurant-style Chicken Parmesan tonight. This recipe focuses on achieving a perfectly crispy crust on juicy chicken cutlets, smothered in rich marinara and melted mozzarella and Parmesan cheese. It is an easy weeknight Italian dinner that tastes fantastic.
- Prep Time: 15 min
- Cook Time: 25 min
- Total Time: 40 min
- Yield: 4 servings 1x
- Category: Dinner
- Method: Pan-Frying and Baking
- Cuisine: Italian-American
- Diet: Meat
Ingredients
- 4 boneless, skinless chicken breasts (about 6 oz each)
- 1 cup all-purpose flour
- 2 large eggs, lightly beaten
- 1 teaspoon salt
- 1/2 teaspoon black pepper
- 1 cup plain breadcrumbs
- 1/2 cup grated Parmesan cheese (for breading)
- 1/2 cup Panko breadcrumbs (for extra crispiness)
- 1/4 cup olive oil, for frying
- 2 cups quality marinara sauce
- 8 ounces fresh mozzarella cheese, sliced
- 1/4 cup grated Parmesan cheese (for topping)
- Fresh basil, chopped, for garnish
Instructions
- Preheat your oven to 400 degrees F (200 degrees C). Lightly grease a baking dish large enough to hold the chicken.
- Prepare the chicken: Place each chicken breast between two sheets of plastic wrap. Pound the chicken to an even 1/2-inch thickness using a meat mallet. This helps the chicken cook evenly and stay juicy.
- Set up your dredging station using three shallow dishes. In the first dish, place the flour. In the second dish, whisk the eggs. In the third dish, combine the breadcrumbs, 1/2 cup Parmesan cheese, Panko breadcrumbs, salt, and pepper.
- Dredge each cutlet: Coat the chicken first in the flour, shaking off any excess. Dip it completely into the egg mixture. Finally, press the chicken firmly into the breadcrumb mixture, ensuring both sides are fully coated. Press the coating on to help it adhere.
- Pan-fry for crispness: Heat the olive oil in a large skillet over medium-high heat. Carefully place two cutlets in the hot oil. Fry for 2 to 3 minutes per side until golden brown. The chicken does not need to be cooked through at this stage; you are building the crust. Remove the chicken and place it on a wire rack set over a paper towel to drain excess oil. Repeat with the remaining cutlets.
- Assemble the bake: Spread a thin layer of marinara sauce in the bottom of your prepared baking dish. Place the crispy chicken cutlets over the sauce. Spoon a small amount of marinara over the top of each cutlet, then top generously with the sliced mozzarella and the remaining 1/4 cup of grated Parmesan cheese.
- Bake: Bake for 12 to 15 minutes, or until the chicken is cooked through (internal temperature reaches 165 degrees F) and the cheese is melted and bubbly. For extra browning on the cheese, switch the oven to broil for the last 1-2 minutes, watching closely to prevent burning.
- Rest and serve: Let the cheesy chicken rest for 5 minutes before serving. Garnish with fresh chopped basil. Serve this family favorite dinner immediately over pasta or with a side salad.
Notes
- For the crispiest results when baking, ensure your breadcrumb coating is pressed firmly onto the chicken before frying.
- If you prefer a baked-only method to skip frying, lightly spray the breaded cutlets with cooking spray and bake at 400 degrees F for 15 minutes before adding sauce and cheese, then bake for another 10-12 minutes.
- Use high-quality marinara sauce; since it is a main flavor component, a good sauce makes a big difference in this quick chicken recipes dish.
Nutrition
- Serving Size: 1 cutlet
- Calories: 550
- Sugar: 8
- Sodium: 750
- Fat: 28
- Saturated Fat: 12
- Unsaturated Fat: 16
- Trans Fat: 0.5
- Carbohydrates: 35
- Fiber: 3
- Protein: 45
- Cholesterol: 140