
There’s just something magical about biting into a perfectly cooked piece of fish where the outside is crisp and nutty, and the inside melts in your mouth like butter. If you think getting that incredible restaurant-quality dish at home requires hours of work, I’m here to prove you wrong! My mission here at The YumMagnet Recipe Box, which you can read more about on our About Page, is exactly that: bringing amazing meals to your table when life gets hectic. Forget complicated steps; this recipe for **Seared Ahi Tuna** is honestly the quickest way to deliver a truly gourmet tuna experience. Jessica Thompson developed this technique specifically because she needed those impressive, healthy dinners on the table fast, proving you don’t need to sacrifice flavor for speed.
- Why This Seared Ahi Tuna Recipe Works for Your Busy Schedule
- Essential Ingredients for Perfect Seared Ahi Tuna
- Step-by-Step Instructions for Seared Ahi Tuna
- Tips for Success When Making Seared Ahi Tuna
- Serving Suggestions for Your Healthy Dinner
- Storage and Reheating Instructions for Leftover Seared Ahi Tuna
- Frequently Asked Questions About Seared Ahi Tuna
- Nutritional Estimates for This Quick Seafood Recipe
- Share Your Perfect Seared Ahi Tuna Results
Why This Seared Ahi Tuna Recipe Works for Your Busy Schedule
When I was trying to get dinner on the table and still have energy left over for the family, I knew I needed recipes that were fast but didn’t taste like I rushed them. This method for tuna is the perfect cheat code. It lets you bring that fine dining feel right into your own kitchen without needing a sous chef!
Quick Seafood Recipe Ready in Under 20 Minutes
Seriously, look at the clock! The prep time is just 10 minutes, and the cooking is done in about four minutes total. That means you go from deciding you want fish to sitting down to eat in less than 20 minutes. It’s a lifesaver on those Tuesday nights when you’re running on fumes.
Achieving a Gourmet Tuna Experience
The real magic happens when that super-hot cast iron hits the sesame-crusted fish. You get that deep, dark sear—that crust you expect at a high-end spot. It tricks everyone into thinking you spent hours prepping, but it’s all about two minutes per side. Hello, **gourmet tuna** without the gourmet wait time!
Essential Ingredients for Perfect Seared Ahi Tuna
When you’re working with something as delicate and fantastic as high-quality tuna, you don’t need a cabinet full of weird specialty items. Nope! The beauty of this **Seared Ahi Tuna** recipe is that the ingredients are simple, but they have to be the *right* ones. I stick strictly to what I list here because these elements create the perfect contrast: a sharp, savory crust against that cool, clean center. Don’t skip the prep work on the fish itself—that’s where the real flavor foundation is laid.
Selecting the Best Sushi Grade Tuna
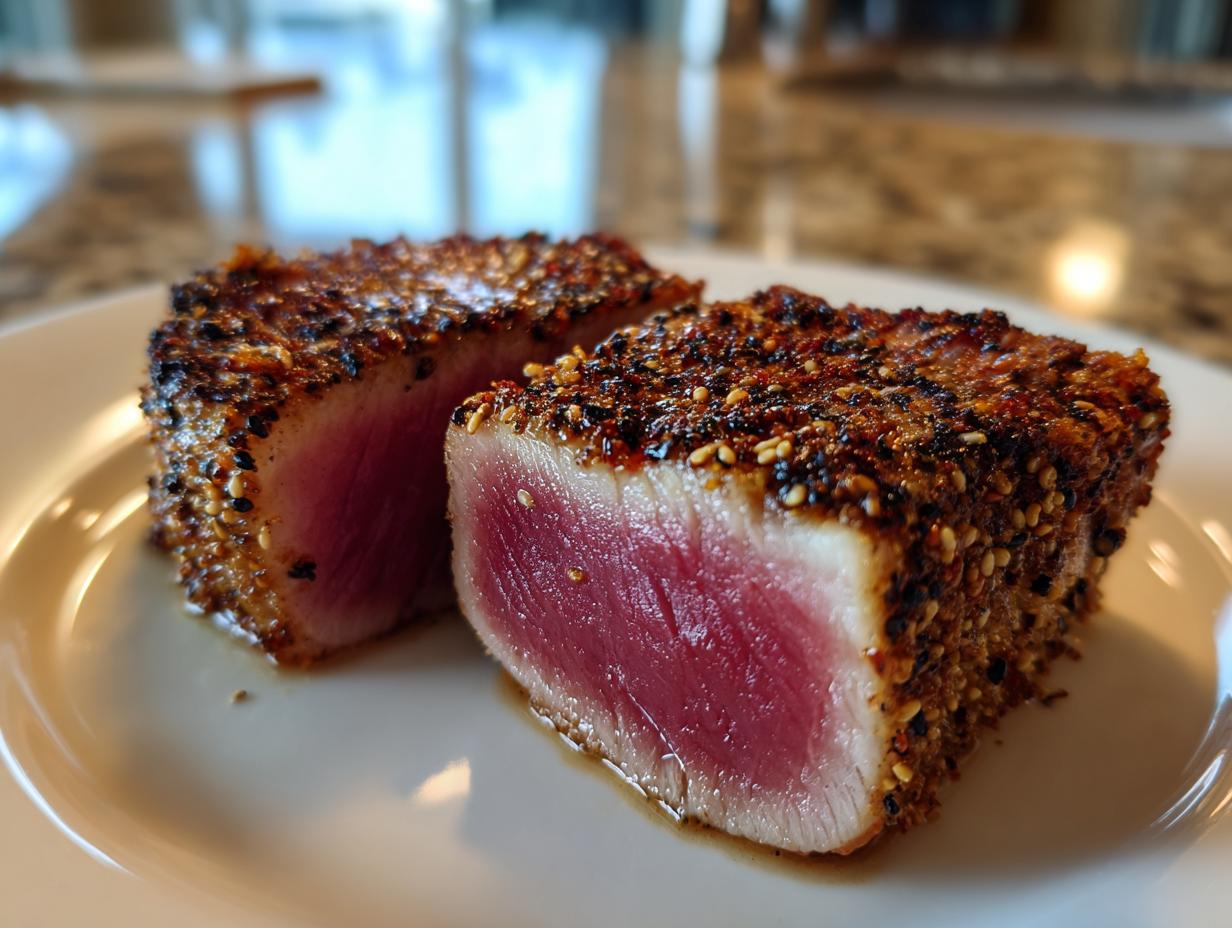
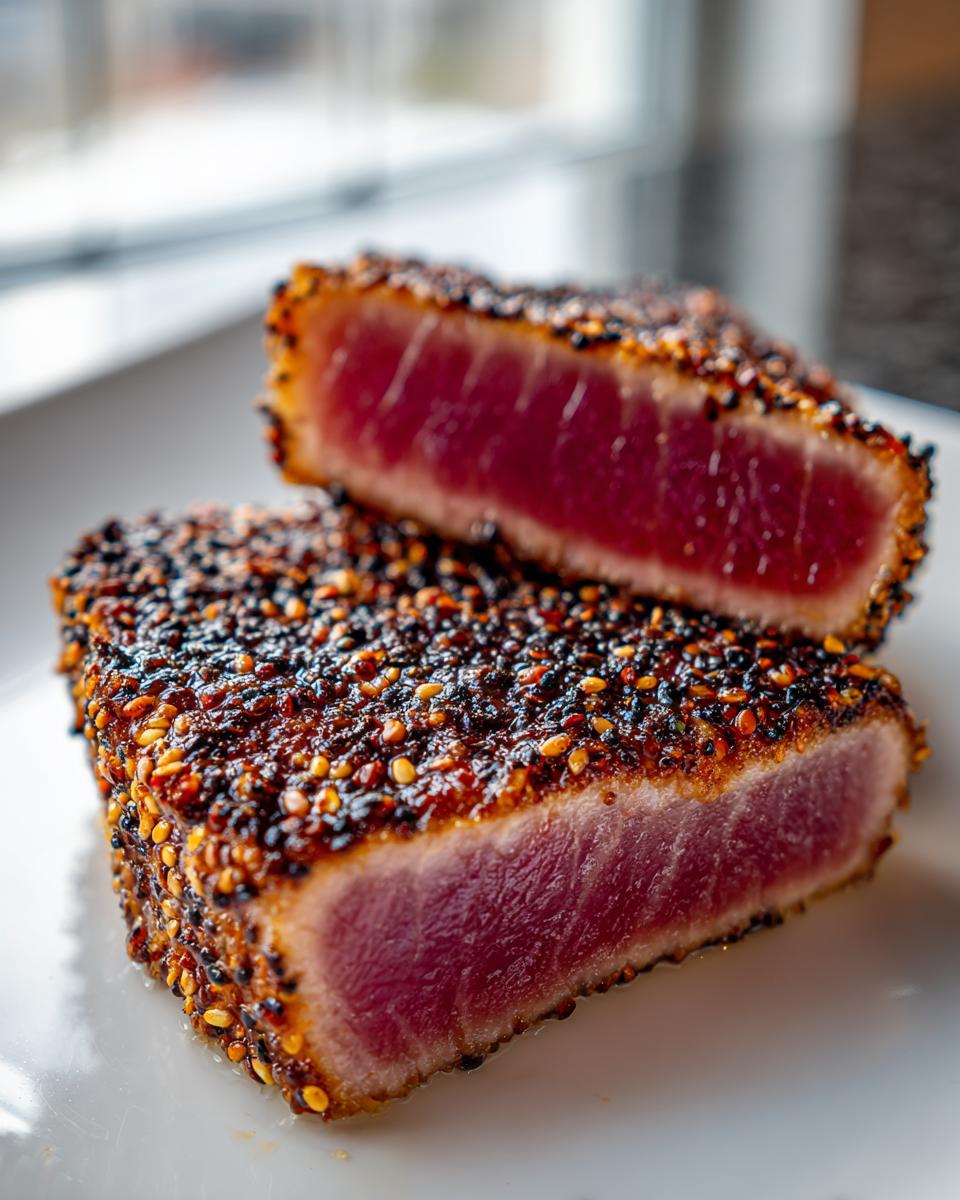
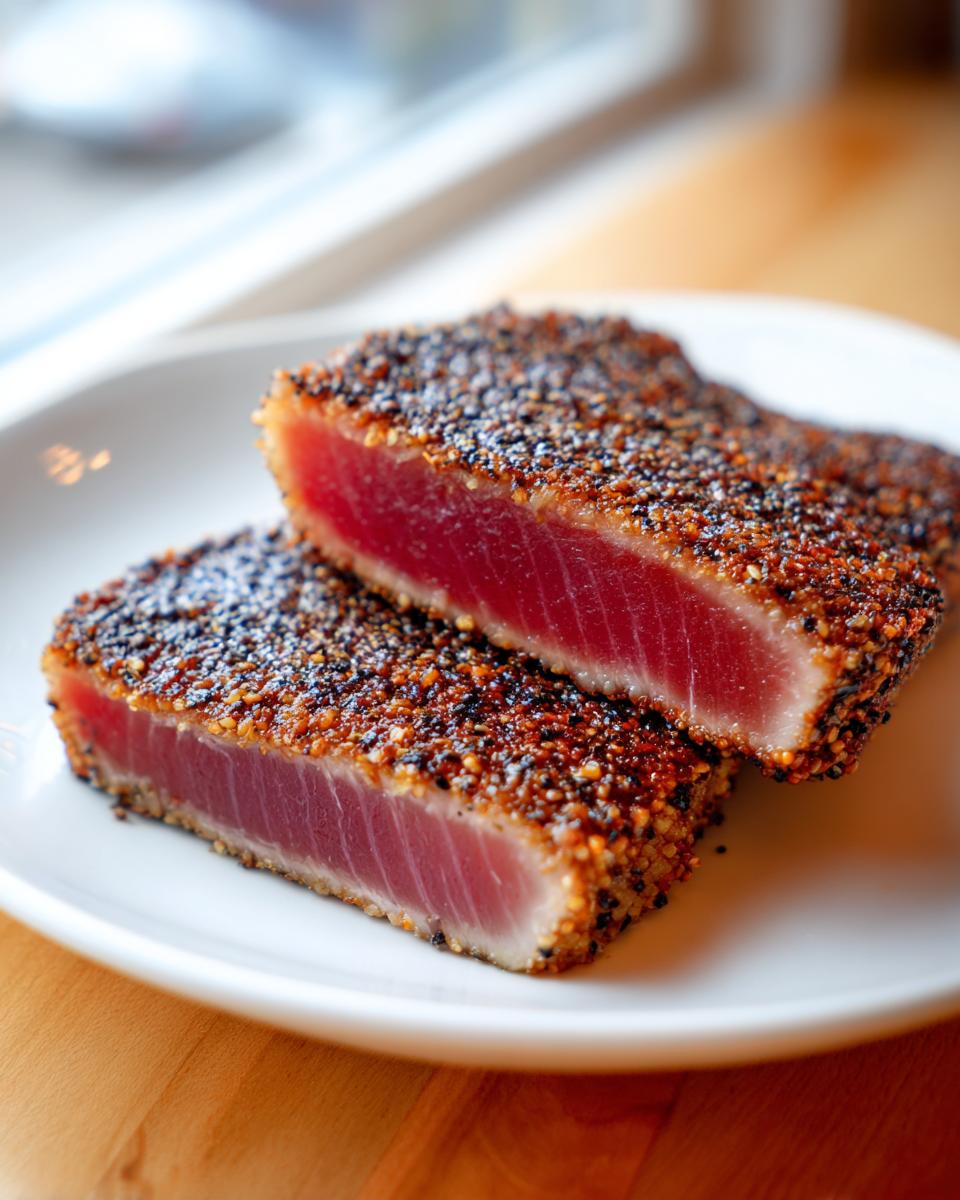
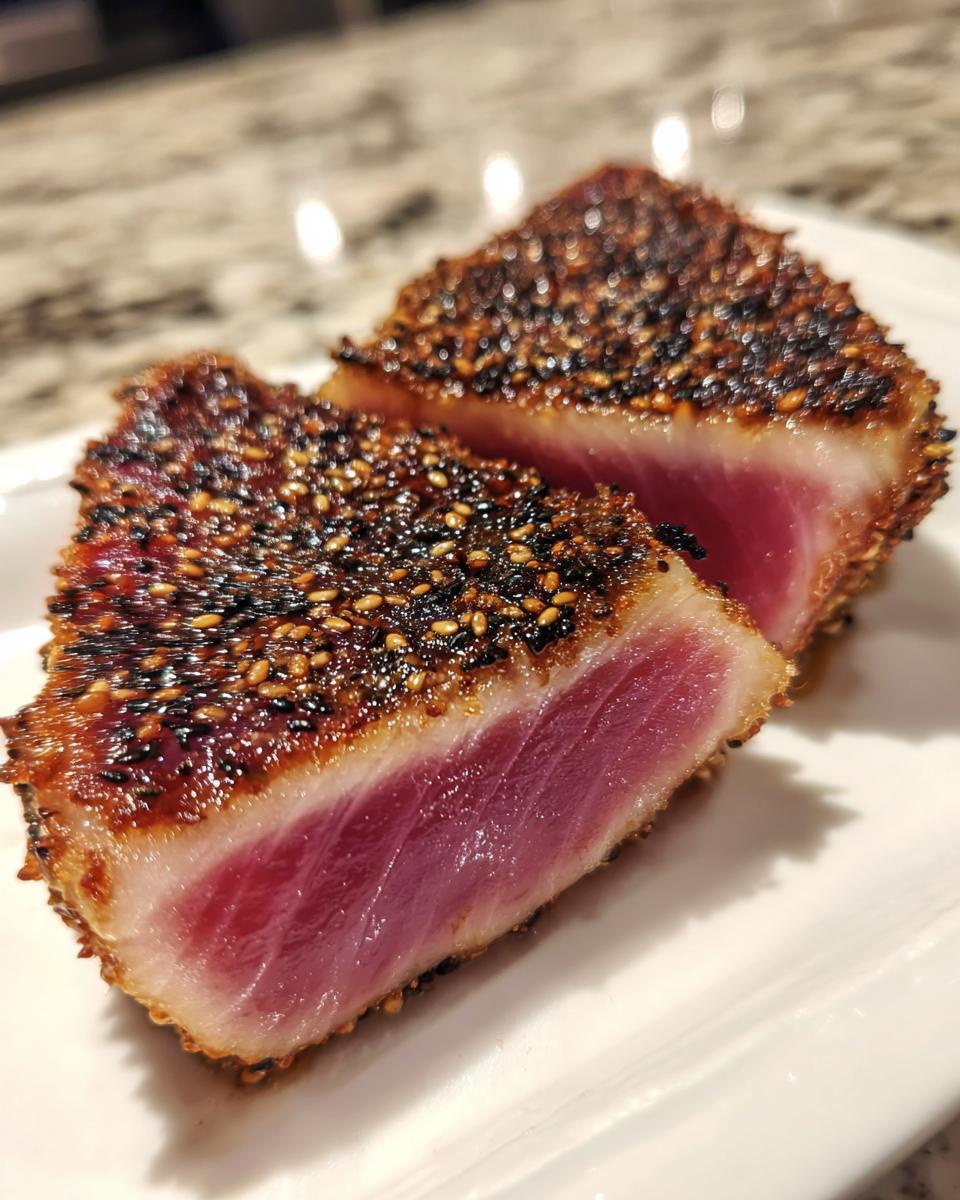
This is my non-negotiable rule, folks. If you aren’t buying **sushi grade tuna**, don’t even bother turning on the stove. We’re using **yellowfin tuna** here because it holds up to the high heat beautifully and has that classic, deep red color we all want. Make sure your steaks are cut consistently, ideally about one inch thick. If they are too thin, you’ll miss that creamy, raw center entirely. If they are too thick, you risk burning the crust before the inside warms up even slightly. Consistency is everything for that perfect sear ratio!
The Simple Marinade for Your Asian Tuna Recipe
Don’t let the marinade list fool you; it’s all about intensity in small doses. You whisk together sesame oil—that nutty aroma is crucial—with just a little bit of soy sauce (or tamari if you’re going gluten-free). Then, you need that little kick from freshly grated ginger and minced garlic. That combination brings the classic **Asian tuna recipe** flavor without having to simmer anything for hours. A little black pepper finishes the mix, turning simple flavors into something gourmet, pronto!
Step-by-Step Instructions for Seared Ahi Tuna
Okay, this is where the action happens! Since we are aiming for that perfect crust on our **Seared Ahi Tuna**, every second counts. I’ve mapped out the steps so you can move confidently from the prep bowl right to the screaming-hot pan. Trust me, following this sequence is how you go from good tuna to *wow, this is incredible* tuna.
Preparation: Drying and Coating the Yellowfin Tuna
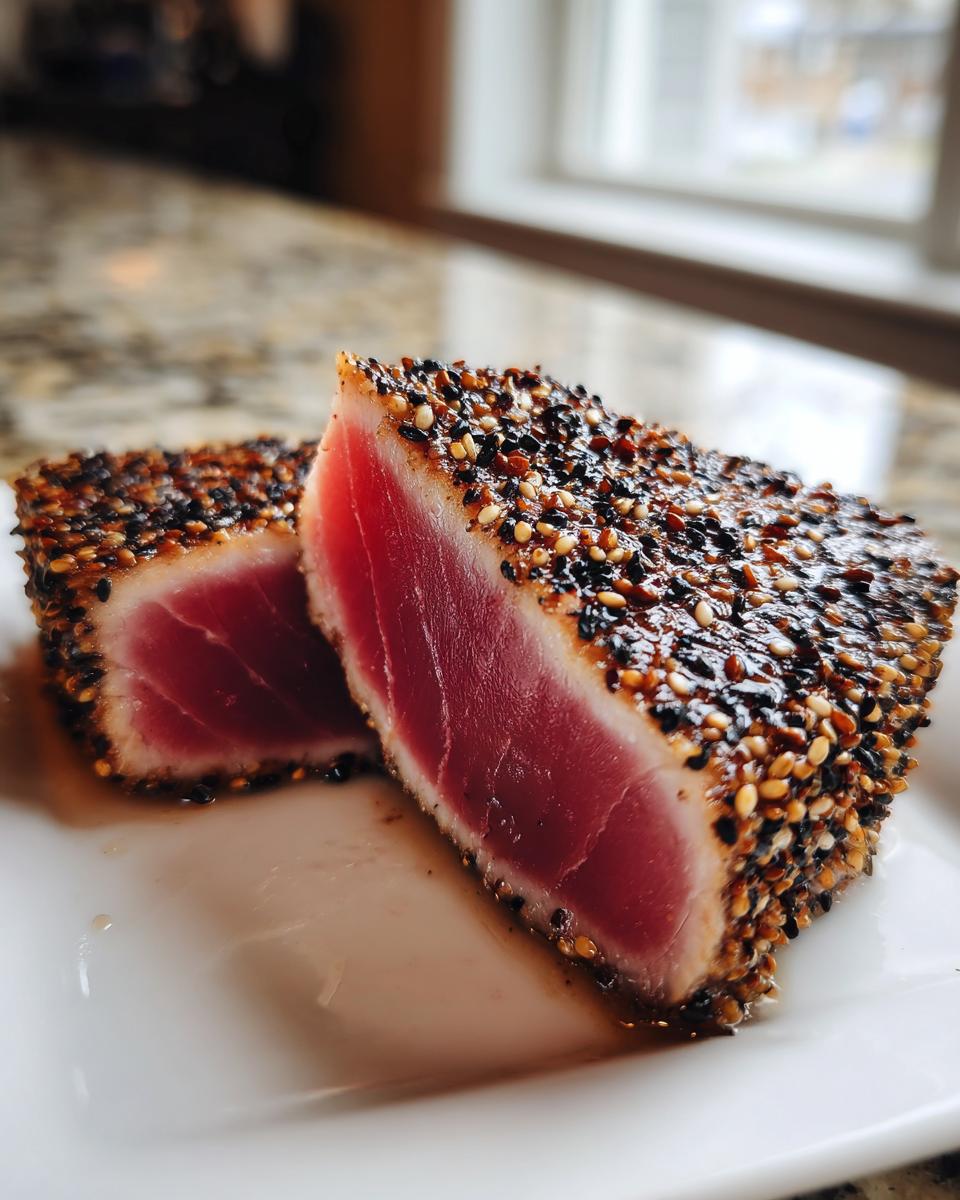
Before anything touches the marinade, you need to do something my mom always stressed: pat the fish completely dry! Grab those paper towels and blot every last bit of moisture off your **yellowfin tuna** steaks. If the surface is wet, the heat will only steam the outside instead of searing it. Once dry, brush that homemade marinade mixture all over. Then, spread your sesame seeds on a flat plate and just gently press both sides of the steak into the seeds. You want a solid coating, but don’t mush the meat!
The High-Heat Technique for Searing Ahi Tuna
Get your heavy-bottomed skillet, preferably cast iron, on the highest heat setting you have. You want it hot—and I mean *hot*—until you see just a wisp of smoke starting up. Add no oil to the pan! Carefully place your coated tuna steaks in there. This is critical for timing: For that perfect rare center, you’re only searing these for 60 to 90 seconds per side. If you like it closer to medium-rare, bump that up to two minutes max per side. The goal is a dark, crispy crust and a cool, red interior. Pull it out the second that timer dings!
Resting and Slicing Your Seared Ahi Tuna
After the sear, the fish needs a quick break! Don’t start slicing immediately, or all those beautiful juices will run out onto your cutting board. Let the steaks rest for exactly five minutes. Once rested, grab your sharpest knife. You must slice the tuna against the grain—those little muscle fibers—and keep the pieces thin, about 1/4-inch thick. Slicing it right ensures every bite is tender and easy to eat. Serve this beauty up right away!
Tips for Success When Making Seared Ahi Tuna
Look, even with the best recipe, sometimes the tuna struggles to cooperate. I’ve learned a few tricks over the years, mostly through trial and, honestly, a few sad, lukewarm batches of fish. When you’re dealing with quality **sushi grade tuna**, you want to maximize that sear and minimize any chance of overcooking. These little nudges will make you feel like a true expert in your own kitchen.
First off, let’s talk about the pan again. I mentioned it in the steps, but I can’t stress this enough: use cast iron if you possibly can. A Teflon pan just doesn’t hold the necessary heat. You need a pan that gets screaming hot—almost smoking—and *stays* that way when the cold fish hits it. That temperature shock is what creates that gorgeous, instant crust on your **Seared Ahi Tuna**.
Another thing people often forget is the marinade time. This isn’t a slow-cook recipe; we’re looking for flavor enhancement, not deep penetration. A quick brush on all sides is plenty. If you let it sit too long in that sesame oil and soy sauce mixture, the marinade starts to break down the fish fibers on the surface, which actually makes it harder to get that clean sear we’re after. Think of it as a quick flavor hug, not a long soak!
Finally, when you remove the fish after its lightning-fast sear, make sure you’re not peeking at it while it rests. Five minutes is the sweet spot for letting the internal temperature equalize. If you cut it too soon, all the moisture runs out, and your beautiful crust ends up sitting in a puddle of juice instead of on top of perfectly rested **yellowfin tuna**. Patience for five minutes guarantees a better, more elegant slice!
Serving Suggestions for Your Healthy Dinner
Now that you’ve mastered the sear—amazing job on that **Seared Ahi Tuna**!—you need to know what to put next to it on the plate. Since we developed this recipe to be such a fantastic, quick, and **healthy dinner**, we should keep the sides simple so the tuna remains the star. You don’t want heavy sauces competing with that delicate sesame crust!
The most classic pairing, which leans right into that Asian inspiration, is rice. But not just any rice! I always opt for plain steamed short-grain white rice or, if I have an extra five minutes, a quick brown rice. The rice soaks up any residual marinade wonderfully. It feels very elegant but takes almost no active cooking time on your part.
If you’re cutting back on grains or just want something super fresh, a simple salad is the perfect foil. Think light, crisp greens—maybe some arugula or butter lettuce. Toss it with a whisper of rice vinegar, a tiny bit of olive oil, and maybe some shredded cucumber. That little bit of acidity and crunch cuts right through the richness of the tuna fat. It keeps the entire meal light, vibrant, and absolutely perfect for a weeknight when you want something delicious without feeling weighed down.
Storage and Reheating Instructions for Leftover Seared Ahi Tuna
Here’s the honest truth about this beautiful **Seared Ahi Tuna**: it *really* wants to be eaten the second it comes out of that hot pan. That brief 5-minute rest period is about as long as it wants to wait. Since the goal here is that cool, red center contrasting with a warm crust, reheating it completely ruins the whole concept, trust me!
If, by some miracle, you managed to have leftovers—maybe you were testing the recipe and made four steaks but only ate two—you need to handle them carefully. This is not something you want to microwave or toss back into a skillet. That heat will turn your lovely **sushi grade tuna** into tough, gray fish flesh instantly. Yuck!
How to Safely Store Any Leftover Yellowfin Tuna
If you absolutely must save some, treat it like you would any high-quality leftover seafood. Get the steaks into a truly airtight container immediately after they’ve cooled down completely on the board. I mean, tightly sealed! You don’t want any air touching it for extended periods. Store that container right in the coldest part of your refrigerator. Because this is **yellowfin tuna** and not a fully cooked fish, you should really aim to eat it within 24 hours, tops. Any longer, and you’re honestly playing a bit of a risky game, and the texture will definitely degrade.
The Only Way to ‘Reheat’ Seared Ahi Tuna
When I say reheating, I need you to understand I mean gently *warming* it, not cooking it further. If you want to salvage the texture and enjoy it again, the best method is very quick cold slicing followed by a very slight temperature lift. Slice the cold leftovers thinly, against the grain just like we did before. Then, you can place those slices on a plate for about 10 minutes to take the deep chill off, or—if you’re feeling fancy—a quick drizzle of very warm (not hot!) sesame oil can help lift the flavor without steaming the fish.
Honestly though, the ultimate way to enjoy leftovers from this **quick seafood recipe** is to slide those pre-seared slices into a salad or a cold stir-fry the next day. That way, they integrate nicely as a cold protein element, which honors the texture you worked so hard to achieve in the first place!
Frequently Asked Questions About Seared Ahi Tuna
I know you want to get this perfect, and that’s what I love about this recipe! When you’re dealing with something as amazing as **Seared Ahi Tuna**, people always have questions about sourcing and doneness. Don’t worry if you’re new to cooking tuna; tackling these common questions makes you a better, more confident cook!
What is the safe internal temperature for yellowfin tuna?
That’s a super important question, especially when we talk about using **sushi grade tuna**. Because we are using fish that is handled specifically for raw consumption, we aren’t aiming for ‘well done’ like we would with chicken. For the best taste and texture—that cool, almost raw middle part—most people aim for the fish to only reach about 90°F to 100°F internally, leaving it solidly rare. If you are anxious about it, pushing it closer to 125°F is medium-rare, but remember, you *must* start with the highest quality **yellowfin tuna** you can find for this method to be safe. Always trust the source!
Can I substitute the soy sauce in this Asian tuna recipe?
You absolutely can! While the soy sauce provides that classic savory, salty depth perfect for any **Asian tuna recipe**, I know some folks are avoiding gluten or watching their sodium intake. If you look in the notes, I mention that coconut aminos make a fantastic swap. It offers a similar savory boost but often comes with a slightly sweeter, more complex flavor profile. Try it out! I think you’ll find it works beautifully with the salty sesame crust.
What equipment is necessary for the best sear?
If you take away one piece of advice regarding equipment, please let it be this: Ditch the flimsy aluminum pans for this job! You need maximum, sustained heat retention. I cannot emphasize enough the power of a heavy-bottomed skillet, specifically cast iron. It’s the only thing that gets hot enough and *stays* hot enough when you lay that cool, marinated fish down so you get that dark, beautiful crust we are aiming for in this **quick seafood recipe**. If your pan cools down too much, you end up steaming the fish instead of searing it, and that’s just a tragedy!
Nutritional Estimates for This Quick Seafood Recipe
Listen up, because one of the best parts about this **Seared Ahi Tuna** is how truly nourishing it is! It’s proof you don’t need heavy cream or loads of butter to make a spectacular meal—this is genuinely a fantastic option when you’re looking for a light, high-protein, **healthy dinner**. Because this recipe relies on just two small, quality steaks, the numbers stay delightfully low, which I love for weeknight clean eating.
Now, I need to be clear, though. I develop these recipes based on standard ingredient measurements, but since everyone’s measuring spoons are slightly different, and the exact cut of your **yellowfin tuna** steak can vary, consider these figures a very good guide, not a scientific guarantee. These estimates are based on one serving, which is one steak in this recipe.
- Calories: About 250 per serving. That’s incredibly lean for such a satisfying amount of protein!
- Protein: Around 28 grams! This is why this dish is so great for keeping you full without feeling heavy.
- Total Fat: Roughly 14 grams. Most of that good, healthy fat comes right from the sesame oil we used for our Asian inspiration.
- Carbohydrates and Sugar: Very low here, with only about 3 grams of carbs and just 1 gram of sugar total.
- Sodium: This runs around 350mg, mostly coming from the soy sauce—so if you switch to coconut aminos, that number might drop a bit!
See? High protein, low everything else—it just works. This is the kind of easy math I like when I’m trying to keep things light but still serve up a fantastic piece of **gourmet tuna**!
Share Your Perfect Seared Ahi Tuna Results
Wow, you made it! If you followed along, you now have stunning, restaurant-quality **Seared Ahi Tuna** on your plate. That’s a huge win, and I’m so proud of you for tackling a dish that feels so gourmet but is honestly a speedy workhorse in the kitchen. Now, I really, *really* want to hear about it!
Here at The YumMagnet, our community is what keeps me experimenting and finding those perfect shortcuts for busy cooks like us. So, when you get a chance, hit that five-star rating system right below this section. Was the sesame crust perfect? Did your **yellowfin tuna** stay pink and cool in the middle?
More than just a rating, please drop a comment below! Did you serve it with an extra sprinkle of Togarashi spice? Maybe you tried serving it over a different type of rice? I love hearing about the little twists that make the recipe work for *your* family’s dinner table. Every time you share your success or a small tweak, you’re helping another busy cook nail this **quick seafood recipe** next time.
If you ran into a snag, or maybe you just want to ask a super specific question about sourcing the best **sushi grade tuna**, don’t hesitate! You can always reach out directly to me via my contact page right here. Let’s keep the conversation going and make sure every meal is a magnet for smiles!
PrintPerfectly Seared Ahi Tuna Steaks
Learn how to sear sushi grade yellowfin tuna quickly for a healthy, gourmet dinner that tastes like it came from a restaurant.
- Prep Time: 10 min
- Cook Time: 4 min
- Total Time: 19 min
- Yield: 2 servings 1x
- Category: Dinner
- Method: Pan-Searing
- Cuisine: Asian-Inspired
- Diet: Low Fat
Ingredients
- 2 (6 ounce) sushi grade yellowfin tuna steaks, about 1 inch thick
- 2 tablespoons sesame oil
- 1 tablespoon soy sauce (or tamari for gluten-free)
- 1 teaspoon grated fresh ginger
- 1 clove garlic, minced
- 1/2 teaspoon black pepper
- 1 tablespoon sesame seeds (for coating)
Instructions
- Remove the tuna steaks from the refrigerator 15 minutes before cooking. Pat them completely dry with paper towels. This step is key for a good sear.
- In a small bowl, whisk together the sesame oil, soy sauce, grated ginger, minced garlic, and black pepper to make the marinade.
- Lightly brush the marinade mixture over all sides of the tuna steaks.
- Place the sesame seeds on a shallow plate. Press each side of the tuna steaks into the seeds to coat them evenly.
- Heat a heavy-bottomed skillet, such as cast iron, over high heat until it is very hot, almost smoking.
- Carefully place the coated tuna steaks in the hot, dry skillet. Do not overcrowd the pan.
- Sear the tuna for 60 to 90 seconds per side for rare (cool, red center) or up to 2 minutes per side for medium-rare. The goal is a dark crust with a raw or barely cooked interior.
- Remove the tuna from the skillet immediately. Let the steaks rest on a cutting board for 5 minutes before slicing.
- Slice the tuna against the grain into 1/4-inch thick pieces. Serve immediately.
Notes
- For the best sear, use a skillet that holds heat well, like cast iron.
- If you prefer a stronger flavor, you can substitute the soy sauce with coconut aminos.
- Serve this quick seafood recipe with a side of steamed rice or a simple salad for a complete healthy dinner.
Nutrition
- Serving Size: 1 steak
- Calories: 250
- Sugar: 1
- Sodium: 350
- Fat: 14
- Saturated Fat: 2
- Unsaturated Fat: 12
- Trans Fat: 0
- Carbohydrates: 3
- Fiber: 0
- Protein: 28
- Cholesterol: 65