
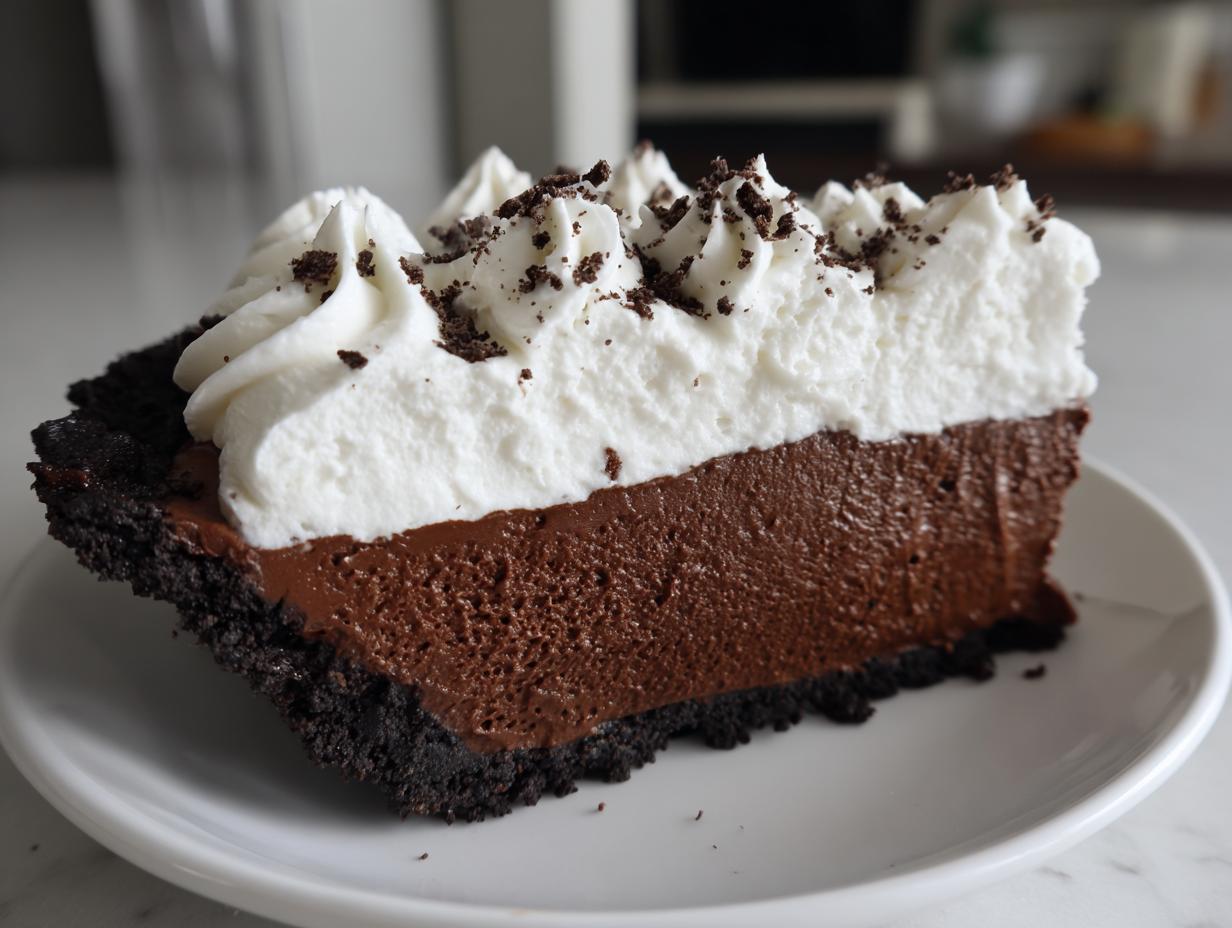
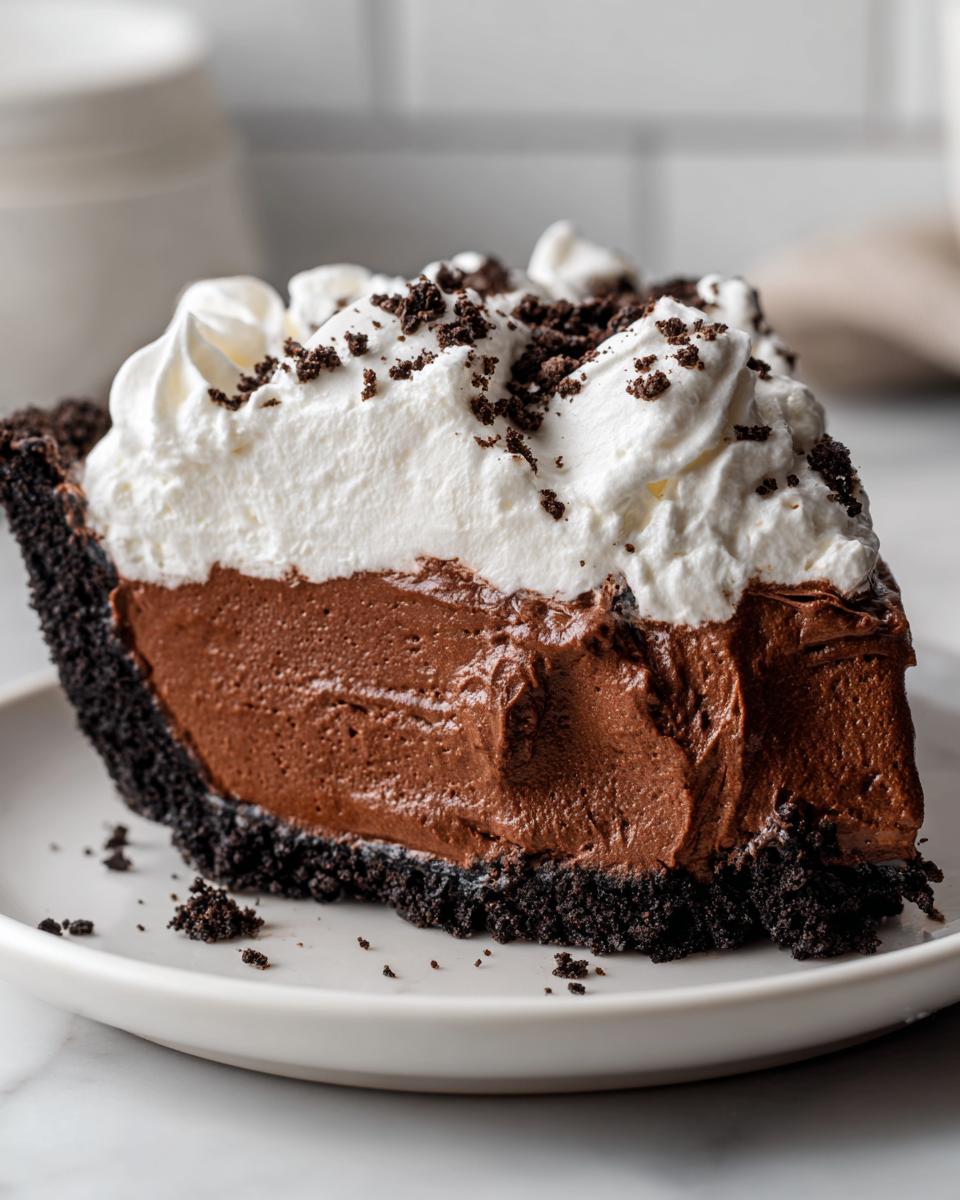
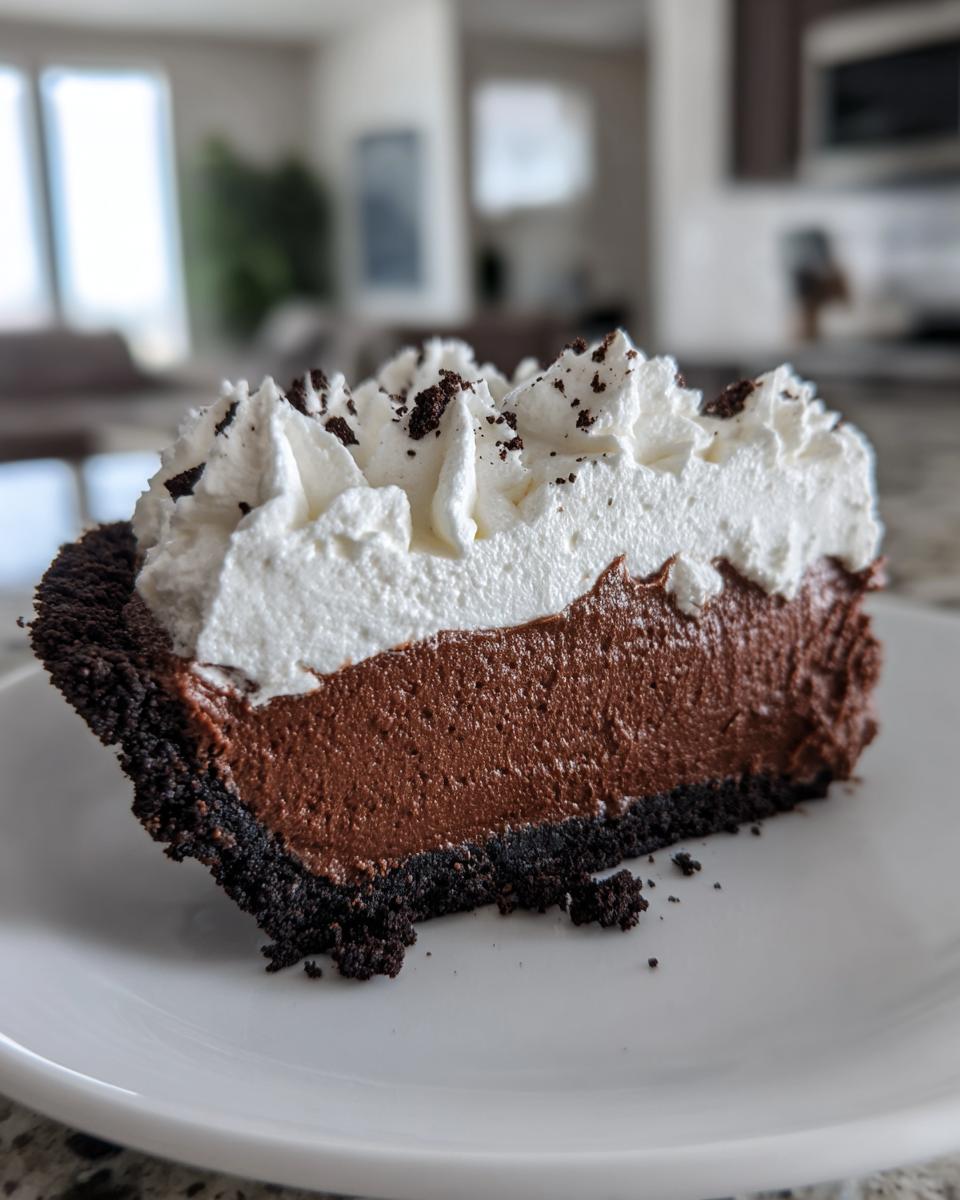
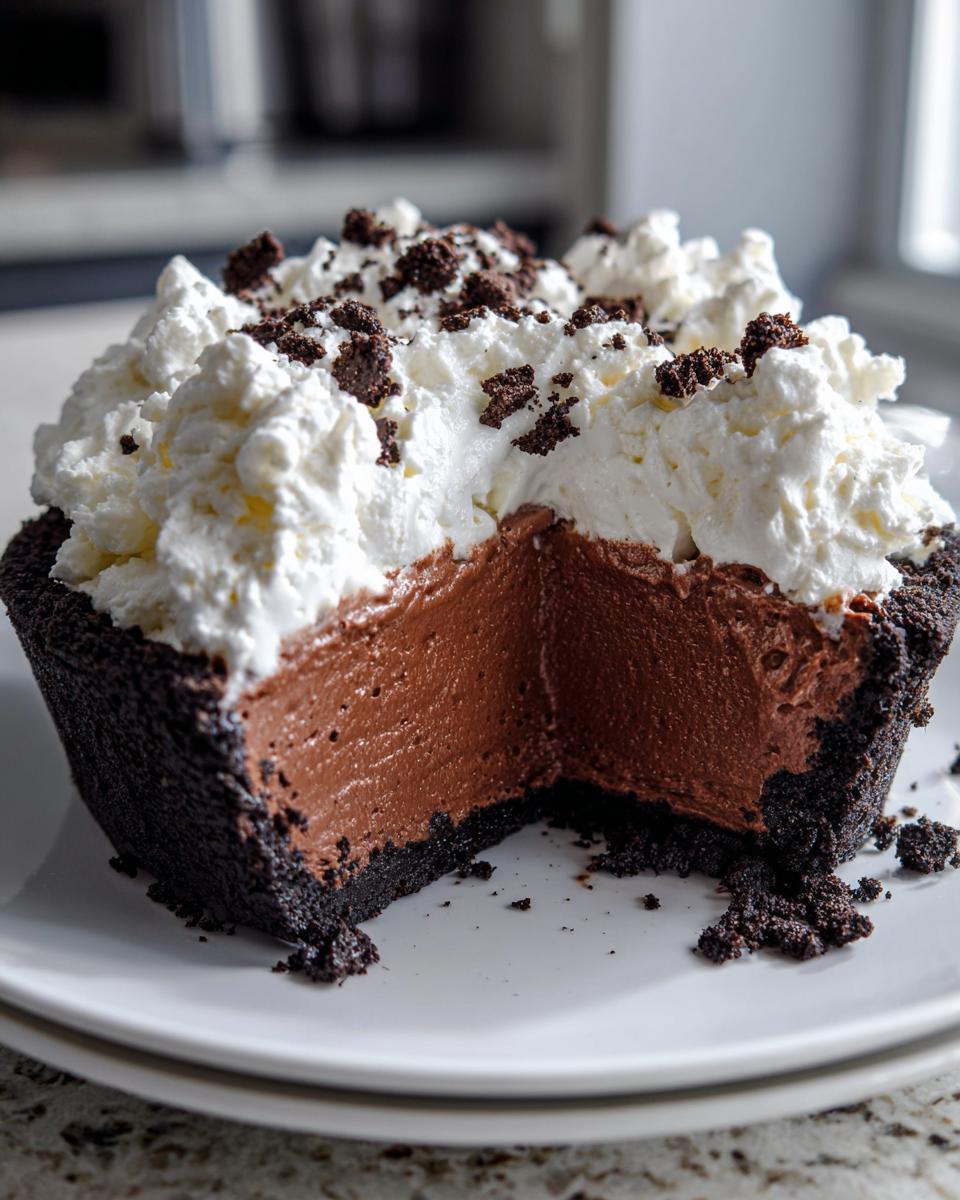
You know those times when you need a dessert that screams “WOW!” but turning on the oven feels like too much effort, especially when it’s already warm outside? Well, I got you covered. Here at The YumMagnet, we’re all about making life easier without sacrificing flavor. That’s why I’m sharing my absolute favorite for those moments: the Easy No-Bake Chocolate Mousse Pie.
This isn’t just any recipe; it’s built on the same practical magic my mom taught me—using simple ingredients to create something truly unforgettable. My version cuts straight to the chase, giving you that incredibly rich, silky mousse texture you’re dreaming about, all tucked into a crunchy Oreo base. It’s totally foolproof, which means you get all the applause for making a decadent dessert without breaking a sweat. I promise, once you make this dreamy chocolate treat, it’s going straight into your regular rotation!
- Why This No-Bake Chocolate Mousse Pie Is Your New Go-To
- Gathering Ingredients for Your Chocolate Mousse Pie
- How to Prepare Your Easy No-Bake Chocolate Mousse Pie
- Tips for the Perfect Chocolate Mousse Pie
- Making Variations on Your Chocolate Mousse Pie
- Serving Suggestions for Your Holiday Chocolate Pie
- Storage and Reheating Instructions for Chocolate Mousse Pie
- Frequently Asked Questions About This No Bake Pie
- Nutrition Estimates for This Dreamy Chocolate Treat
Why This No-Bake Chocolate Mousse Pie Is Your New Go-To
Look, I get it. Life is busy. That’s why this chocolate mousse pie is my secret weapon for making things look fancy without the fuss. Forget turning the oven on; this recipe is all about speed and pure indulgence. It’s the easiest way to deliver an ultimate chocolate indulgence that guests always rave about!
Here’s why you need this in your dessert arsenal:
- It’s stunningly elegant but requires zero actual baking time.
- The texture is impossibly light and airy—seriously luxurious.
- You *must* make it ahead, which means zero stress on party day!
Quick Prep Time for a Dreamy Chocolate Treat
Seriously, the active time here is crazy fast. We’re talking maybe 20 minutes of actual mixing before it goes into the fridge. That means you’ve got a show-stopping desert ready to go after work, ticking off one of those essential quick dessert ideas. The rest is just chill time!
Achieving the Ultimate Silky Mousse Pie Texture
The secret to that airy, melt-in-your-mouth feel—that specific silk pie recipe texture—comes from gently folding in that homemade whipped cream into the pudding and cream cheese base. It results in a light, dreamy chocolate treat that feels way more complicated than it is!
Gathering Ingredients for Your Chocolate Mousse Pie
Okay, ingredient list time! Since this is a no bake pies recipe, we want everything measured perfectly before we start mixing, because once that filling comes together, it moves fast! Don’t worry, you can find all of these things in any standard grocery store. We’re keeping it real and simple here, just like Jess promises.
For the Oreo Crust Desserts Base
This part is the easiest!
- 1 3/4 cups chocolate sandwich cookie crumbs (Trust me, you need the whole sandwich! We want that crunch.)
- 6 tablespoons unsalted butter, melted
Ingredients for the Creamy Chocolate Filling
The key to that gorgeous texture is making sure your base is perfectly smooth. Remember, the cream cheese has to be fully softened for this creamy chocolate filling to come out right!
- 1 package (8 ounces) cream cheese, softened (This is non-negotiable!)
- 1 cup powdered sugar
- 1 teaspoon vanilla extract
- 1/2 cup cold milk
- 1 package (3.4 ounces) instant chocolate pudding mix
- 1 1/2 cups heavy whipping cream, cold, divided (We use most of this now!)
Whipped Cream Topping Ideas Ingredients
For the final flourish of our whipped cream topping ideas:
- 1/2 cup heavy whipping cream (The rest of the cup we saved!)
- 1/4 cup granulated sugar
How to Prepare Your Easy No-Bake Chocolate Mousse Pie
Alright, this is where the real magic happens! Since there’s no baking, we have to be smart about mixing to get that light, airy texture this easy pie recipe demands. Have all your ingredients ready to go, because the filling comes together quickly once you start.
Step 1: Setting the Oreo Crust
First things first: we need that crust to be solid. Just dump your chocolate cookie crumbs and that melted butter into a bowl. Use a fork or your clean hands to mix it up until everything looks like wet sand. Press that mixture firmly into the bottom and evenly up the sides of your 9-inch pie plate. Pop that whole thing right into the freezer! It needs to chill while you tackle the filling.
Step 2: Creating the Silky Mousse Pie Filling Base
Grab your electric mixer for this part. Beat that slightly softened cream cheese until it’s totally smooth—no lumps allowed! Then, whip in your powdered sugar and vanilla. In a *separate* bowl, whisk your cold milk and the instant chocolate pudding mix until it starts getting thick, about two minutes. Let that sit for just five minutes. Then, gently fold that thickened pudding into the cream cheese mixture. Don’t whip it—folding keeps it fluffy!
Step 3: Whipping Cream and Final Assembly
Time for the air! Take 1 cup of your cold heavy whipping cream and beat it until it just hits soft peaks. Be gentle when you fold this whipped cream into your chocolate base until you see no more streaks. This is what makes it the perfect silky mousse pie! Pour this wonderful mixture into your frozen crust. Now, cover it loosely and stick it in the fridge for a minimum of 4 hours. You really need that time for this chocolate mousse pie to set up firm.
Finishing the Rich Chocolate Pie with Topping
Right before you serve this rich chocolate pie, whip up the last half-cup of heavy cream with your granulated sugar until it holds stiff peaks. Dollop that gorgeous, fresh whipped cream right on top. Slice it cold, and get ready for compliments!
Tips for the Perfect Chocolate Mousse Pie
I’ve seen this recipe go from stellar to just okay because of one little step that people skip! Honestly, since this is a no-bake wonder, temperature and timing are everything. If you follow the rules I learned from all my test batches, you’ll nail that perfect texture every single time. You want that gorgeous, dreamy slice that holds its shape, right?
Ingredient Temperature Matters for Creamy Chocolate Filling
Okay, let’s talk temperature—it’s huge for getting that fantastic creamy chocolate filling. Your cream cheese? It has to be fully softened. If it’s cold, you’re going to end up with tiny, hard chunks when you mix in the sugar, and trust me, you don’t want that in your mousse! However, for the whipping cream elements, cold is your best friend. You cannot whip warm heavy cream to get those soft peaks—it just turns soupy.
Make Ahead Desserts: Chilling for Structure
Because this is packed with cream cheese and whipped cream, it needs time to firm up completely. The recipe calls for at least four hours, but listen to me: If you can plan ahead and let this chocolate mousse pie chill overnight, you win! Overnight chilling ensures the firmest structure possible. This makes slicing the chocolate mousse pie look professional, which is great when you’re serving it at a party or as one of your favorite make ahead desserts!
Making Variations on Your Chocolate Mousse Pie
Even though this recipe is perfect as is, I know you creative cooks out there love to tweak things! The beauty of this easy, no-bake structure is that it handles small additions really well. You don’t need complex techniques to make this decadent chocolate dessert your own. It’s all about small swaps that make a big difference in flavor!
Crust Substitutions for This Decadent Chocolate Dessert
If you’ve run out of Oreos, don’t panic! You can totally swap in graham cracker crumbs. You’ll need about 1 1/2 cups of crumbs, and you might need to slightly increase the melted butter—maybe add an extra tablespoon—just to make sure it still presses nicely together.
Flavor Twists for Your Silky Mousse Pie
Want to take that silky mousse pie up a notch? Here are my favorite, super-easy additions. Try whisking in about half a teaspoon of instant espresso powder into the cream cheese/pudding mixture. It deepens that chocolate flavor beautifully! Or, swirl in just a teaspoon of peppermint extract right before you fold in the whipped cream for a minty holiday version.
Serving Suggestions for Your Holiday Chocolate Pie
When this rich chocolate pie comes out of the fridge, it looks like a million bucks! Since we top it with fresh whipped cream, you don’t need much else. Presentation is everything for a good holiday chocolate pie.
Try dusting the top lightly with unsweetened cocoa powder right before serving, or maybe a few chocolate shavings if you’re feeling fancy. It pairs perfectly with a small cup of good coffee or maybe a raspberry sauce drizzled around the edge of the plate. It’s already decadent, so keep the sides simple!
Storage and Reheating Instructions for Chocolate Mousse Pie
This is the best part about making a chocolate mousse pie—it’s a perfect make-ahead dessert! Since this is entirely chilled, we definitely don’t worry about reheating; we want it cold and firm. Store any leftovers tightly covered in the refrigerator. Because of the cream cheese and the whipped cream topping, I wouldn’t push it past four days.
Keep it covered so that fresh whipped cream doesn’t absorb any weird fridge smells. Trust me, this chocolate mousse pie tastes even better the next day once the flavors have really settled in!
Frequently Asked Questions About This No Bake Pie
I’ve gathered up some of the questions I get asked most often about this pie. If you’re thinking about whipping this up for a gathering, these little tips should help you feel totally confident making this no bake pie!
Can I use a graham cracker crust instead of Oreos for this chocolate mousse pie?
Oh yes, you absolutely can! If you want a less intense chocolate flavor, graham crackers are beautiful here. You’ll need about 1 1/2 cups of graham cracker crumbs. Since they aren’t as rich as the Oreos, you might need to bump that melted butter up just a tiny bit—maybe add one extra tablespoon—to make sure it packs tightly into the plate. It’s a great swap for a slightly lighter bite!
What if I don’t have instant pudding mix for the creamy filling?
That instant pudding mix is truly the backbone of this recipe; it’s what guarantees our creamy chocolate filling sets up beautifully without baking. If you’re truly stuck without it, you *could* technically use finely chopped bittersweet chocolate melted into the cream cheese base, but then you absolutely MUST use a full 2 cups of heavy cream well-whipped and folded in to make up for the lack of stabilizer. Honestly though, for reliable easy pie recipes, that little box of pudding is worth grabbing!
How long can this rich chocolate pie sit out before serving?
This is important because we are dealing with real dairy here! This is a rich chocolate pie that relies on those chilled fats to stay firm. You should keep it refrigerated until the absolute last minute. I would never let it sit out on the counter for more than an hour, max. Any longer, and that gorgeous mousse starts to get a little floppy, and that whipped cream topping won’t look nearly as nice. Keep it cold until slicing!
If you want a different kind of decadent treat later on, check out my recipe for an easy chocolate cake recipe—though this pie is definitely faster!
Nutrition Estimates for This Dreamy Chocolate Treat
Now, I always tell people not to worry too much about the numbers when it comes to an ultimate indulgence like this chocolate mousse pie, but since you asked! Keep in mind these are just estimates based on the ingredients listed. I’ve included the key stats below for our 8-slice yield. This is what you can expect for one slice of this dreamy chocolate treat:
- Calories: Around 450
- Total Fat: About 30g
- Carbohydrates: Roughly 42g
- Protein: About 5g
It’s definitely decadent, but honestly, totally worth it for the showstopper dessert it is!
Print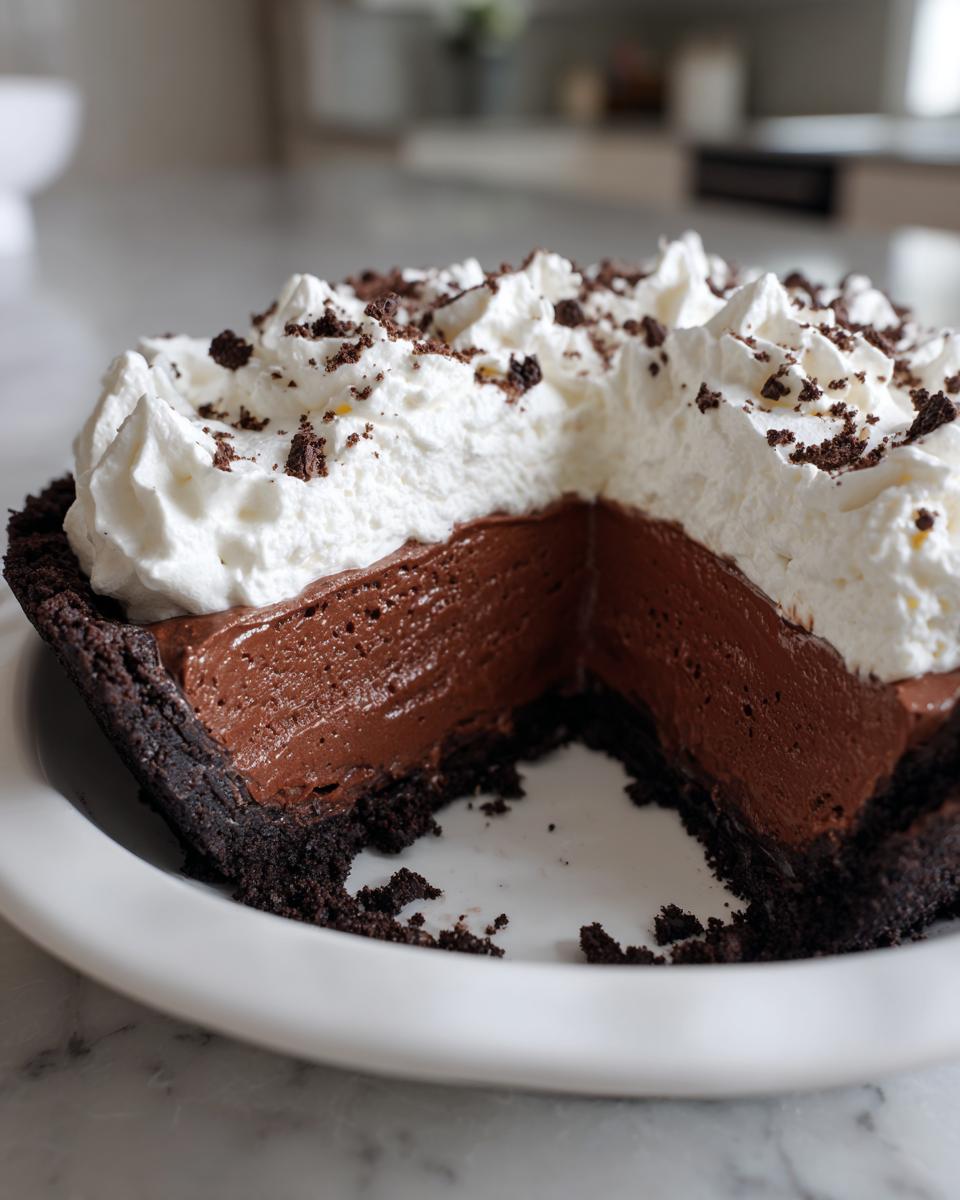
Easy No-Bake Chocolate Mousse Pie with Oreo Crust

Make this decadent, silky chocolate mousse pie without turning on your oven. It features a rich, airy filling set in a crunchy Oreo crust and is topped with homemade whipped cream. This is the ultimate make-ahead dessert for any gathering.
- Prep Time: 20 min
- Cook Time: 0 min
- Total Time: 4 hr 20 min
- Yield: 8 servings 1x
- Category: Dessert
- Method: No-Bake
- Cuisine: American
- Diet: Vegetarian
Ingredients
- 1 3/4 cups chocolate sandwich cookie crumbs (about 24 cookies)
- 6 tablespoons unsalted butter, melted
- 1 package (8 ounces) cream cheese, softened
- 1 cup powdered sugar
- 1 teaspoon vanilla extract
- 1/2 cup cold milk
- 1 package (3.4 ounces) instant chocolate pudding mix
- 1 1/2 cups heavy whipping cream, cold, divided
- 1/4 cup granulated sugar (for topping)
Instructions
- Prepare the crust: Combine the chocolate cookie crumbs and melted butter in a medium bowl. Press the mixture firmly and evenly into the bottom and up the sides of a 9-inch pie plate. Place the crust in the freezer while you prepare the filling.
- Make the cream cheese base: In a large bowl, beat the softened cream cheese with an electric mixer until smooth. Gradually beat in the powdered sugar and vanilla extract until fully combined.
- Prepare the mousse filling: In a separate bowl, whisk together the cold milk and instant chocolate pudding mix for two minutes until it begins to thicken slightly. Let it sit for five minutes.
- Combine the filling: Gently fold the pudding mixture into the cream cheese mixture until just combined.
- Whip the cream: In a clean, chilled bowl, beat 1 cup of the heavy whipping cream until soft peaks form. Gently fold the whipped cream into the chocolate mixture until no streaks remain, creating an airy mousse. Do not overmix.
- Assemble the pie: Pour the chocolate mousse filling into the chilled Oreo crust and spread evenly. Cover the pie loosely with plastic wrap and refrigerate for at least 4 hours, or until the filling is firm.
- Prepare the topping: Before serving, pour the remaining 1/2 cup of heavy whipping cream and the granulated sugar into a bowl. Beat until stiff peaks form.
- Serve: Top the chilled pie with the fresh whipped cream. Slice and serve immediately.
Notes
- For the best texture, ensure your cream cheese is fully softened before mixing.
- Chill the pie for a minimum of 4 hours; overnight chilling results in the firmest, silkiest texture.
- If you prefer a chocolate topping, fold 1 tablespoon of cocoa powder into the heavy cream before whipping for the topping.
Nutrition
- Serving Size: 1 slice
- Calories: 450
- Sugar: 35g
- Sodium: 280mg
- Fat: 30g
- Saturated Fat: 18g
- Unsaturated Fat: 12g
- Trans Fat: 0g
- Carbohydrates: 42g
- Fiber: 2g
- Protein: 5g
- Cholesterol: 85mg