
When life gets hectic—and let’s be honest, it always seems to be hectic!—I reach for recipes that deliver maximum flavor for minimum fuss. That’s why I’m so thrilled to share this absolute winner: our go-to tuna kimbap. Forget tedious prep; this amazing Korean seaweed rice roll comes together faster than delivery and tastes one hundred times better. It’s honestly the perfect solution for those busy weeknights or when you need something portable for school lunches. It fits perfectly with our philosophy here at The YumMagnet Recipe Box: great food shouldn’t be complicated. This creamy, slightly spicy *tuna kimbap* is our family’s secret weapon for turning a rushed evening into a satisfying, homemade win. If you’re looking for more quick solutions like this one, be sure to check out my list of healthy lunch ideas!
- Why This Spicy Tuna Kimbap Recipe is Your New Kitchen Staple
- Gathering Ingredients for Homemade Tuna Kimbap
- How to Make Tuna Kimbap: An Easy Kimbap Tutorial
- Tips for Success with Your Tuna Kimbap Recipe
- Serving Suggestions for Your Spicy Tuna Kimbap
- Storage and Reheating Instructions for Leftover Tuna Kimbap
- Frequently Asked Questions About Tuna Kimbap
- Understanding the Nutrition of Your Tuna Kimbap
- Share Your Homemade Tuna Kimbap Creations
Why This Spicy Tuna Kimbap Recipe is Your New Kitchen Staple
When I started The YumMagnet Recipe Box, I promised to deliver meals that actually fit into real life, and this recipe is the poster child for practicality. We aren’t aiming for a four-hour cooking project here! We want bold flavor without the fuss, which is exactly what you get when you combine perfectly seasoned rice with that addictive, creamy filling. Trust me, this version beats anything you grab from the store cooler.
-
Quick Prep Time for Busy Weeknights
Seriously, you read that right: 15 minutes total time! If you have leftover rice, you can have these rolled and sliced before you even decide what show to watch. It’s perfect for a fast dinner or a last-minute lunch prep.
-
The Creamy, Spicy Tuna Kimbap Filling Secret
This isn’t just plain canned tuna! The magic is in the balance—that rich creaminess from Japanese mayo paired with just the right amount of Sriracha kick. That little bit of heat makes all the difference, transforming a simple pantry staple into something truly exciting.
-
Perfect for Korean Lunch Box Ideas and Picnics
Kimbap rolls hold their shape beautifully, which makes them superior picnic food. They travel so well and look fantastic when you open up that bento box. They’re hearty enough to be a main course but simple enough to feel like a fun snack.
Gathering Ingredients for Homemade Tuna Kimbap
Okay, let’s get serious now. Even though this recipe is speedy, it only works if you grab the right components. The quality of your rice, in particular, is what makes this a fantastic Homemade Seaweed Rolls experience instead of just a mushy mess. I always aim for short-grain rice because it has the right starch content to hold everything together when you’re rolling. Don’t worry if you’re new to this; just make sure you get that sticky rice!
You’ll notice we’re using a few pantry superstars here—things that pull double duty in making this quick and delicious. I’ve broken down what you need into three simple groups. Keep your ingredients prepped and ready to go, and you’ll nail that 15-minute total time. If you want to practice your rice skills, my chicken fried rice recipe uses the same base!
Seasoning the Rice for Perfect Tuna Kimbap
This seasoning might seem like a small step, but the rice is the glue, right? You need that slight nutty flavor infused throughout. Make sure your short-grain rice is cooked and slightly cooled—working with piping hot rice is a recipe for burn marks, and it makes the seaweed flimsy. You’re looking for just a touch of salt and the warmth of sesame oil mixed right in.
- 2 cups cooked short-grain rice
- 1 teaspoon sesame oil (for rice)
- 1 teaspoon salt (for rice)
- 1 teaspoon sesame seeds (for rice)
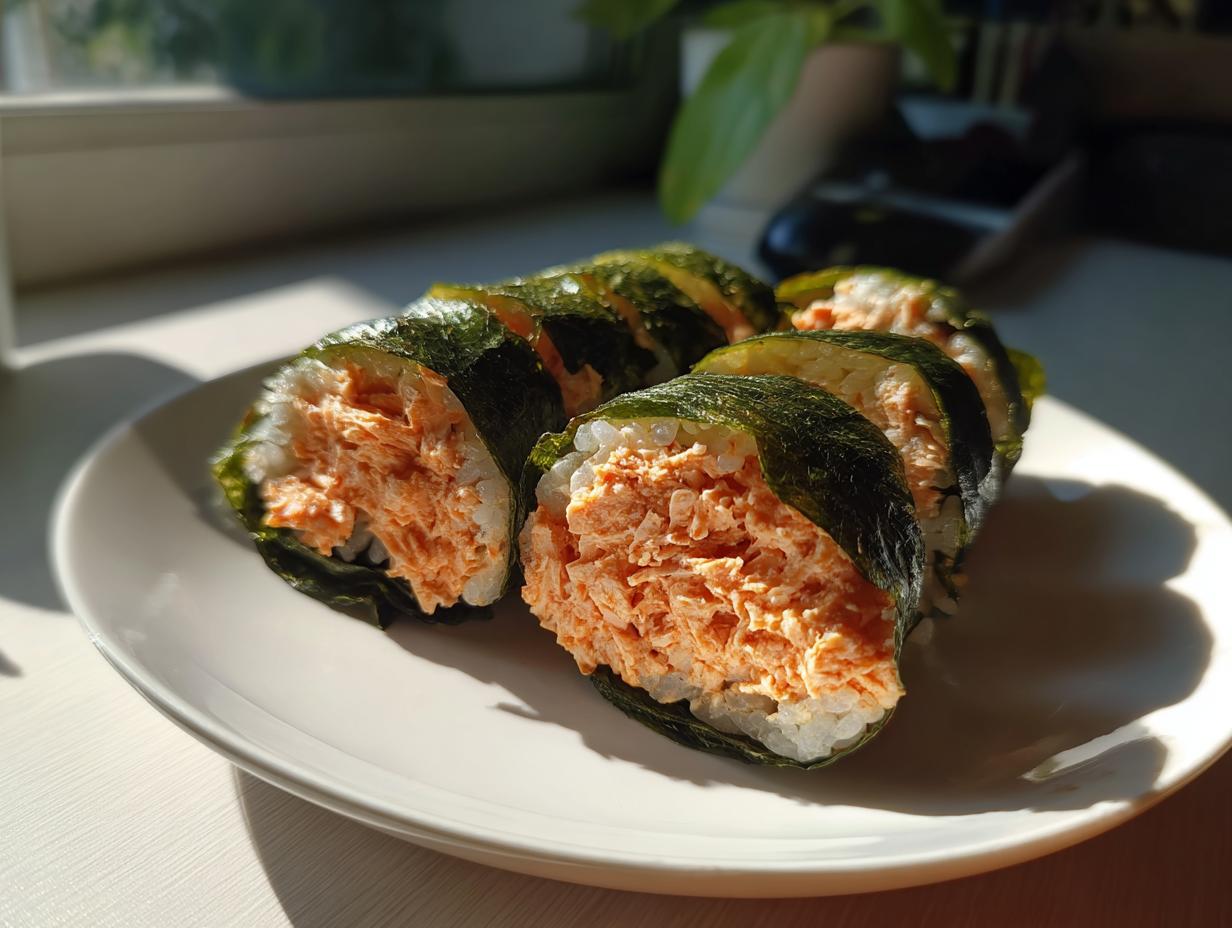
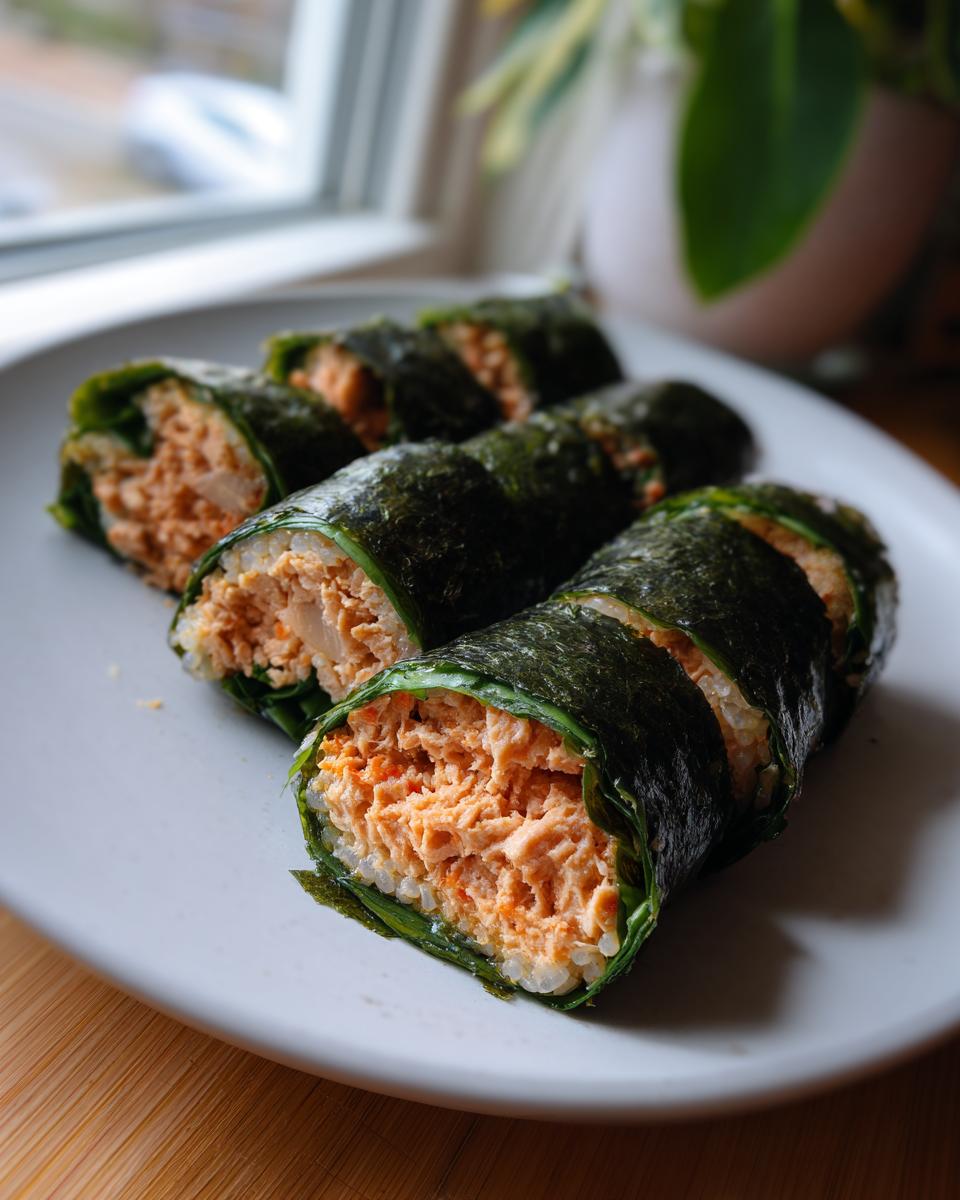
Creating the Spicy Tuna Salad Roll Filling
This is where the main event happens! The key here is draining that tuna really, really well. Soggy tuna equals a watery filling, and nobody wants that leaking out when they cut their roll. Once it’s drained, we mix it up with our spicy and creamy agents. Don’t skimp on the Japanese mayonnaise—it adds a richness you just can’t replicate with standard stuff.
- 1 can (5.3 oz) tuna in oil, drained (This is critical!)
- 2 tablespoons Japanese mayonnaise (Kewpie preferred)
- 1 tablespoon Sriracha sauce
- 1 tablespoon finely chopped green onion
How to Make Tuna Kimbap: An Easy Kimbap Tutorial
Alright, deep breath! Rolling Kimbap for the first time can feel a little intimidating, but trust me, once you get the rhythm down, you’ll be flying through this. Since this is the famous tuna kimbap, we skip cooking tons of vegetables, which cuts down that prep time dramatically. I’ve laid out the process step-by-step below, focusing on exactly how much pressure to use during the roll. If you really want to master this, I have a super detailed breakdown of the whole process over here in my guide on how to make kimbap for beginners!
Preparing the Rice and Spicy Tuna Mixture
First things first, grab your seasoned rice (remember, slightly cooled is best!) and get that filling ready. In one bowl, everything goes together for the tuna salad roll filling: the drained tuna, your Kewpie mayo, the Sriracha, and the green onion. Mix it until it’s creamy, homogenous, and smelling perfectly spicy. That’s it for that bowl—quick, right?
Now for the base: Lay your sheet of seaweed down shiny-side down on your rolling mat. You need to spread about a quarter of your seasoned rice evenly across that sheet. Here’s a crucial point: leave a one-inch border clean at the very top edge. That empty space is what seals the whole deal closed later on!
Assembling and Rolling Your Tuna Kimbap
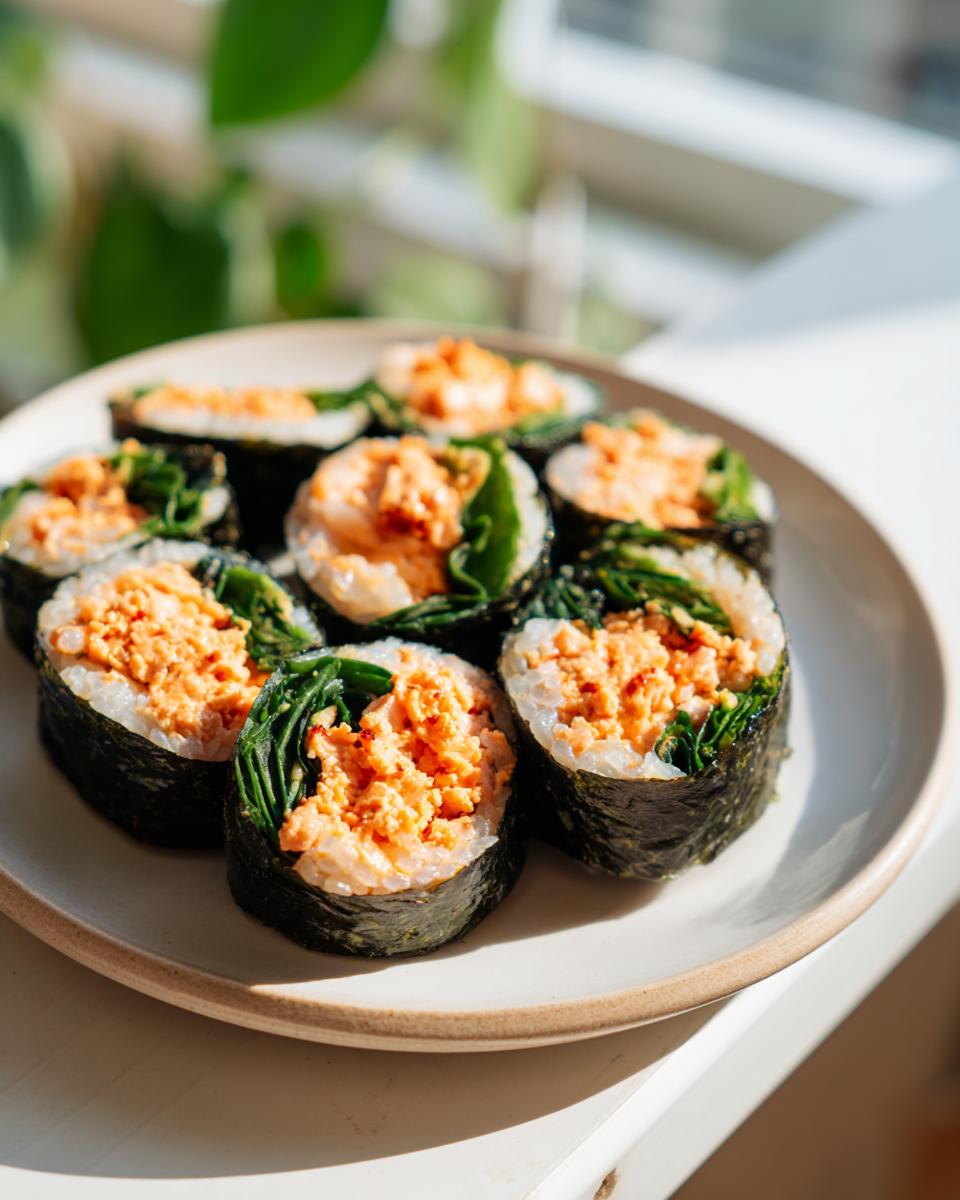
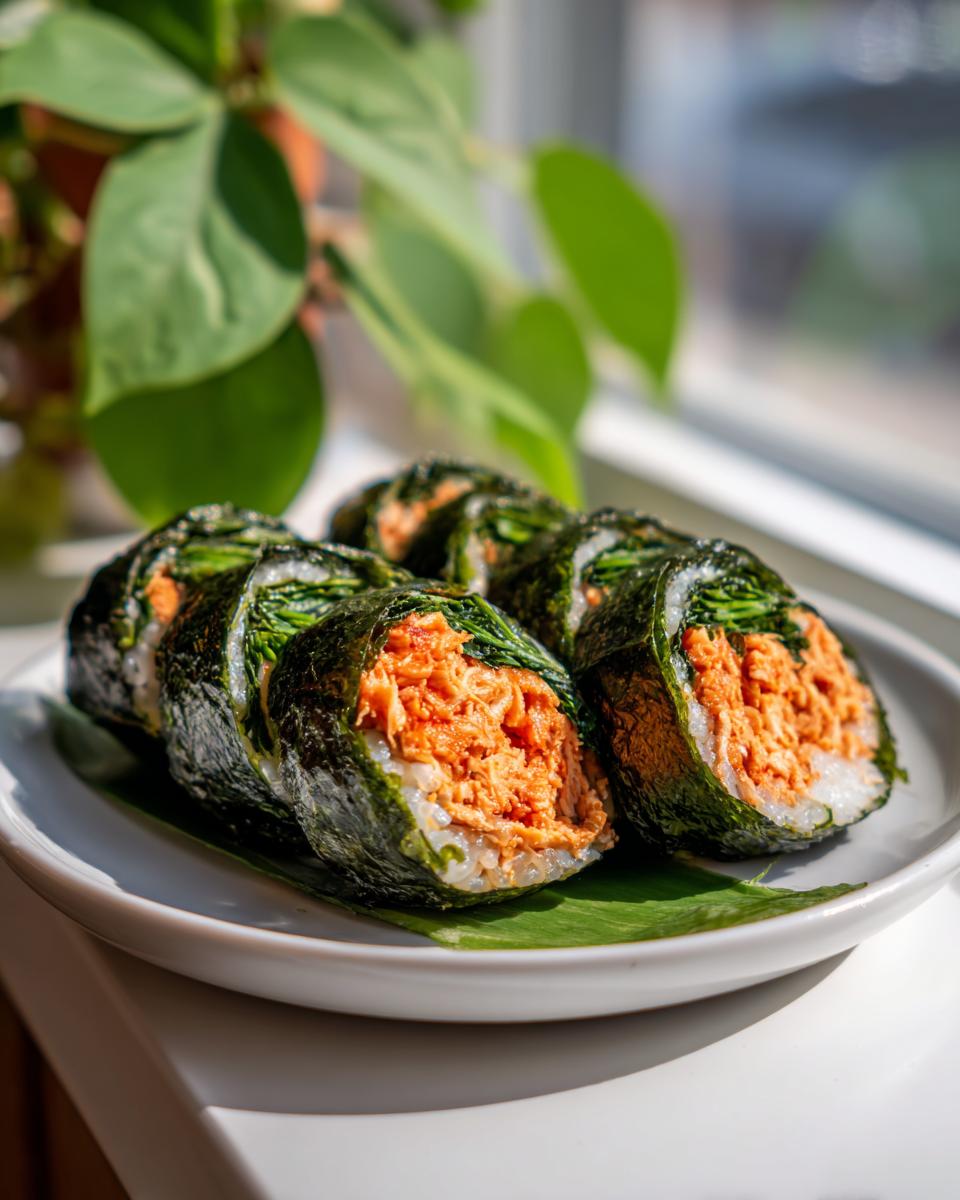
Time for layering! Place one perilla leaf right on top of the rice; this adds such a lovely fresh note. Next, put a line of that spicy tuna mixture right across the center of the rice. Don’t put too much filling, or it’ll squish out the sides when you roll. Now, starting from the bottom edge closest to you, grab the mat and roll it tightly over the filling, pressing firmly but gently to compact everything into a log shape. When you get to that clean 1-inch border you left, just dab a tiny bit of water on it—that acts like edible glue to seal your roll tight.
Finishing and Slicing the Homemade Seaweed Rolls
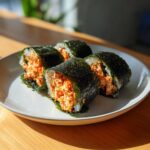
You are almost done with your Homemade Seaweed Rolls! Once sealed, flip the log over so the seam is on the bottom. Take a little bit of sesame oil on a pastry brush and lightly coat the entire outside of the roll. Then, sprinkle those sesame seeds evenly across the top. It just gives it that professional look! For slicing, use a sharp knife, and wipe the blade with a damp towel between each cut. This keeps the rice from sticking and ensures you get clean, beautiful pieces ready for serving.
Tips for Success with Your Tuna Kimbap Recipe
We’ve made the filling and we’ve rolled the rolls, but there are a couple of little secrets from my notes that really elevate this from good to totally irresistible. When we talk about building flavor in a simple recipe—especially when we want this to be part of your Kimbap Rolling Techniques success story—it all comes down to those key ingredient choices and timing. These small adjustments make sure your Spicy Tuna Kimbap is the best it can be, whether you eat it right away or pack it for later!
Ingredient Spotlight: Japanese Mayo Tuna Kimbap Filling
I know I mentioned it before, but I have to emphasize this part one more time because it’s a game-changer for this kind of creamy roll. If you can find Japanese mayonnaise—Kewpie is the big name brand—please grab it! It’s not just a fancy substitution; it genuinely tastes different. It has a richer, more savory flavor profile because it’s made primarily with egg yolks, not whole eggs, which gives the whole spicy tuna mixture a depth that standard mayo just can’t match.
It’s the secret ingredient that makes the texture so ridiculously velvety and satisfying against the rice. For me, anything involving a creamy salad filling benefits hugely from that Kewpie flavor boost. You buy one bottle, and suddenly all your tuna salad, avocado toast toppings, and even homemade dressings are better!
Make Ahead Korean Meal Prep Advice
This is where this recipe shines as a fantastic Make Ahead Korean Meal option. The great news is that you can certainly prepare the seasoned rice ahead of time, and you can definitely make the spicy tuna filling hours before you plan on rolling. Just keep them both covered tightly in the fridge.
However, here is the critical timing advice for texture: assemble the rolls completely—roll them tight, seal them up, brush with oil—but do not slice them until you are genuinely ready to eat them or pack them for the lunch box. Once you slice the roll, the rice starts to dry out much faster against the air. Keeping them whole maintains peak moisture and flavor. If you’re packing for a picnic the next day, just assemble everything tonight, wrap the logs tightly in plastic wrap, and slice them right before you head out!
Serving Suggestions for Your Spicy Tuna Kimbap
Now that you’ve mastered your incredibly quick and highly flavorful tuna kimbap, the only question left is what to serve it alongside! Because the filling is already rich and creamy from that Japanese mayo and has that wonderful spicy kick from the Sriracha, we don’t need anything too heavy. This roll is fabulous all on its own, especially when you’re grabbing a quick dinner or packing it up for a road trip buffet.
But if you want to turn this into a real spread, think about things that offer a bright, acidic cut to balance that richness. A classic pairing is the famous salty-sweet combination you find around every Korean restaurant. You really can’t go wrong trying some amazing dipping sauces!
For example, a simple soy sauce dip mixed with a dash of vinegar is always perfect, especially if you want to keep the flavor profile clean and let that spicy tuna shine. If you made a batch of something to go with my Korean BBQ steak earlier in the week, that same dipping sauce works brilliantly here too.
If you’re looking for something crunchy on the side, grab some store-bought kimchi—the sour crunch is exactly what cuts through the richness of the mayo in the filling. Sometimes, I keep it super simple and just serve a few slices of pickled radish (danmuji) right next to the plate. It’s bright yellow, crunchy, and gives the palate a nice little reset between the creamy bites. Honestly, though, these rolls are so good, sometimes I just eat them standing over the cutting board, no sides required!

Storage and Reheating Instructions for Leftover Tuna Kimbap
We all know the drill—sometimes you just make too much, which is never a problem when it comes to leftovers, unless you’re dealing with something as delicate as a seaweed roll! With tuna kimbap, the biggest enemy is moisture loss and that seaweed sheet getting chewy or soggy. The general rule of thumb in my kitchen is that rice rolls taste best when fresh, but these are pretty resilient if you follow a couple of key pointers.
If you have any leftovers from your meal prep, here’s how I keep mine safe until the next day. You want to keep the rolls intact. Do not slice them ahead of time if you plan on storing them for more than a few hours—that’s the golden rule I mentioned before!
First, wrap each log tightly in plastic wrap, like a little gift. Then, place the wrapped logs into an airtight container before sticking them in the fridge. This double layer of protection keeps exterior moisture out while hopefully keeping the rice from drying out too quickly. They should stay great for up to two days this way.
Now, about reheating: Don’t! I’m serious. Reheating kimbap—especially if you use the microwave—turns that beautiful seaweed sheet into something tough and unpleasant, and the rice gets weirdly hot and sticky. The spicy tuna filling handles the refrigeration just fine. My advice? Eat the leftovers cold or at room temperature. Honestly, they are still fantastic straight from the fridge, especially for a quick snack or packed lunch the next day. Just pull them out about 20 minutes before you plan to eat them if you want the rice to soften up just a touch!
Frequently Asked Questions About Tuna Kimbap
I know whenever I try a new recipe, I have a dozen little questions pop up as I’m assembling the ingredients. That’s totally normal! Making the switch from store-bought to homemade is exciting, but you want to make sure you’re doing it right. Here are the main things I get asked most often when people try this super Easy Kimbap Tutorial for the first time.
Is this recipe closer to Maki or Kimbap?
That is a fantastic question that trips up a lot of people new to Korean Food Recipes! The biggest difference is in the seasoning. Maki (sushi rolls) uses vinegared rice, similar to the way we season sushi rice. Our tuna kimbap uses rice seasoned with mostly sesame oil and salt. Plus, traditional kimbap typically features cooked or pickled fillings, while maki leans heavily on raw fish. Since this recipe uses cooked tuna and a heavy sesame flavor, it’s all Kimbap, baby!
Can I use regular mayonnaise instead of Japanese Mayo in this tuna kimbap?
Yes, you absolutely can if that’s what you have on hand! But let me warn you, the flavor won’t be quite the same depth you get from the Japanese mayonnaise. The recipe calls for that specific mayo because the Kewpie brand is richer and tangier—it’s a key part of creating that incredible Kewpie Mayo Tuna Recipe flavor in our filling. If you use standard American mayo, you might find the filling a little less “wow” factor, but it will still taste great!
How do I keep the rice from drying out?
This ties back into our storage tips, but the best defense against dry rice starts before you even roll! First, make sure you’re using just enough seasoning for the rice you use; too much salt can wick moisture away. Second, if you are making these for later, remember my advice: keep the logs assembled tightly, wrapped in plastic wrap, and out of the open air. The other thing people sometimes experiment with for a truly No Cook Kimbap Filling approach is adding a bit more oil to the rice when seasoning it, which can help it stay pliable overnight!
Understanding the Nutrition of Your Tuna Kimbap
It’s all about balance here at The YumMagnet Recipe Box. You want a delicious, satisfying meal that helps you feel good, and that’s why I always try to give you the scoop on what’s going into your body. While these tuna kimbap rolls are made with simple, honest ingredients perfect for a quick Asian dinner, it’s good to know the numbers, especially if you’re planning these for a regular rotation of Korean Meal Prep!
I pulled all the estimates based on the ingredients list provided above—that’s 1/4th of the total recipe yield. Remember, since we are using canned tuna, and it’s a fantastic way to include protein, the fat content comes largely from the oil your tuna was packed in, plus that rich Japanese mayo we love so much. These are estimates, of course, but they give you a solid baseline for what you’re enjoying.
Here’s what you can generally expect from one serving (about 8 pieces) of our homemade Spicy Tuna Kimbap:
- Serving Size: 1 roll (approx. 8 pieces)
- Calories: 350
- Fat: 14g (Saturated Fat: 3g, Unsaturated Fat: 11g, Trans Fat: 0g)
- Carbohydrates: 45g (Fiber: 2g)
- Protein: 15g
- Sodium: 550mg
- Sugar: 3g
- Cholesterol: 30mg
See? You get a great hit of protein in that 15-minute preparation time! This makes it a fantastic, complete light meal or snack. Just keep an eye on the sodium if you are sensitive, as canned tuna and seaweed sheets naturally carry a bit more salt than some of our other recipes.
Share Your Homemade Tuna Kimbap Creations
Now listen, the best part of my job here at The YumMagnet Recipe Box is hearing about your kitchen successes! We’ve covered all the tips and tricks, ensuring your tuna kimbap is creamy, spicy, and perfectly rolled. But the recipe is only finished when you get to enjoy it.
I really, truly want to know how this turned out for you. Did you nail the tight roll on the first try? Were your friends impressed when you brought these on your next picnic? Don’t keep those delicious results a secret!
Please take a moment, scroll down below, and leave a rating! Tell me if you stuck exactly to the spicy filling or if you tweaked it for your family. And if you took a picture of those beautiful sliced rolls—maybe packed up perfectly in your Korean lunch box ideas—snap a photo and share it on Instagram! Tag us so I can see your amazing work. Knowing you made something simple and delicious for your family is why I do this every single day.
PrintEasy Spicy Tuna Kimbap (Chamchi Kimbap)
Make satisfying, homemade Korean seaweed rice rolls with a creamy and spicy tuna filling. This recipe is quick, perfect for lunch boxes or picnics, and simple enough for beginners.
- Prep Time: 15 min
- Cook Time: 0 min
- Total Time: 15 min
- Yield: 4 servings 1x
- Category: Main Course
- Method: Rolling
- Cuisine: Korean
- Diet: Vegetarian
Ingredients
- 2 cups cooked short-grain rice
- 1 teaspoon sesame oil (for rice)
- 1 teaspoon salt (for rice)
- 1 teaspoon sesame seeds (for rice)
- 1 can (5.3 oz) tuna in oil, drained
- 2 tablespoons Japanese mayonnaise (Kewpie preferred)
- 1 tablespoon Sriracha sauce
- 1 tablespoon finely chopped green onion
- 4 sheets roasted seaweed (nori or gim)
- 4 perilla leaves, stems removed
- 1 teaspoon sesame oil (for brushing rolls)
- 1 teaspoon sesame seeds (for topping)
Instructions
- Prepare the seasoned rice: In a bowl, mix the cooked short-grain rice with 1 teaspoon sesame oil, 1 teaspoon salt, and 1 teaspoon sesame seeds. Set aside to cool slightly.
- Make the spicy tuna filling: In a separate bowl, combine the drained tuna, Japanese mayonnaise, Sriracha sauce, and chopped green onion. Mix well until fully incorporated.
- Prepare the seaweed sheets: Lay one sheet of seaweed, shiny side down, on a bamboo rolling mat.
- Layer the ingredients: Spread about one-quarter of the seasoned rice evenly over the seaweed, leaving a 1-inch border at the top edge.
- Place the fillings: Lay one perilla leaf on top of the rice. Spoon about one-quarter of the spicy tuna mixture in a line across the center of the rice.
- Roll the kimbap: Starting from the bottom edge, tightly roll the seaweed sheet over the filling, pressing gently to secure the shape. Moisten the top edge of the seaweed with a little water to seal the roll.
- Finish the rolls: Brush the outside of the finished roll lightly with sesame oil and sprinkle with sesame seeds.
- Slice and serve: Repeat with the remaining ingredients. Slice each roll into bite-sized pieces. Serve immediately or pack for your Korean lunch box ideas.
Notes
- For the best flavor, use Japanese mayonnaise like Kewpie; it adds a distinct richness to the tuna salad roll filling.
- If you do not have perilla leaves, you can omit them or substitute with a thin layer of blanched spinach for color.
- To make this a make ahead Korean meal, assemble the rolls but do not slice them until just before serving for the best texture.
Nutrition
- Serving Size: 1 roll (approx. 8 pieces)
- Calories: 350
- Sugar: 3
- Sodium: 550
- Fat: 14
- Saturated Fat: 3
- Unsaturated Fat: 11
- Trans Fat: 0
- Carbohydrates: 45
- Fiber: 2
- Protein: 15
- Cholesterol: 30