
If you’re anything like me, you believe the best desserts are the ones you can eat in one perfect, bite-sized moment. Birthday parties, holiday tables, or just that 3 PM slump—you need something quick, impressive, and totally delicious. That’s why I am so thrilled to share my absolute favorite shortcut for making red velvet cake pops!
These aren’t the dry, crumbly versions you sometimes find; trust me, we’ve all been there. My goal here, just like my mission here at The YumMagnet Recipe Box, is to bring those warm, homemade flavors to your busy life without stressing you out. We’re using a brilliant cake mix hack combined with my signature rich cream cheese frosting to ensure every single pop is incredibly moist.
It’s all about creating treats that draw people together without demanding hours in the kitchen. Forget complicated baking from scratch; these little balls of joy deliver maximum flavor payoff with minimal fuss. They are the best chocolate cake upgrade for any celebration!
- Why Our Red Velvet Cake Pops Are the Best Cake Pop Recipe
- Gathering Ingredients for Your Red Velvet Cake Pops
- How to Prepare Moist Cake Balls for Perfect Red Velvet Cake Pops
- Mastering the White Chocolate Coating for Red Velvet Cake Pops
- Tips for Success with Homemade Cake Pops
- Variations and Festive Red Velvet Inspiration
- Storing and Serving Your Finished Red Velvet Cake Pops
- Frequently Asked Questions About Red Velvet Cake Pops
- Nutritional Estimates for Red Velvet Cake Pops
Why Our Red Velvet Cake Pops Are the Best Cake Pop Recipe
I promise you, these **red velvet cake pops** truly stand out from the crowd. Why? We specifically designed them to fix the two biggest problems people have with cake pops: being dry or falling apart during dipping. These are genuinely the best inspiration for anyone looking for easy party dessert ideas.
- They deliver those rich, decadent flavors you expect from a true red velvet, thanks to our amazing base.
- You get perfectly formed, small, **moist cake balls** every single time—no more sandy crumbs!
- They are absolutely perfect for **gifting desserts**; just wrap them up nicely!
Achieving Perfect Moisture with a Red Velvet Cake Hack
The real secret here is how we build the binder. We aren’t just adding regular buttercream. We use softened cream cheese! This is my favorite red velvet cake hack right here. The tanginess cuts the sweetness perfectly, and the fat content in the cheese locks in moisture, turning the cake crumbs into luxurious **cream cheese frosting treats** that won’t dry out.
Ideal for Party Dessert Ideas and Gifting Desserts
Because they are bite-sized, they are fantastic for any buffet table. Think about your next round of **party dessert ideas**—these look amazing in tall vases or arranged on a platter. They are a favorite for seasonal treats, too! People go crazy for them as simple **Valentine’s Day dessert ideas**, and they sparkle beautifully as little ornament shapes for **Christmas cake pops**.
Gathering Ingredients for Your Red Velvet Cake Pops
Okay, gathering your supplies is half the battle won! Since we are going for maximum flavor with minimum effort, we rely on a few store-bought heroes and some pantry staples. Don’t skip the softening step on the cream cheese, though; that’s vital for a smooth mix later!
For the cake base, we’re grabbing a standard box of red velvet cake mix. Then, for the richness that makes these **red velvet cake pops** taste truly homemade, we need good quality cream cheese and powdered sugar. I also always keep vegetable oil handy for thinning that chocolate later.
Here’s what you need to pull together before we start mixing up your irresistible **bite sized desserts**:
- One whole box of red velvet cake mix (make it according to the box directions first!).
- The necessary ingredients listed on that cake mix box, usually a couple of eggs and some oil or water.
- One full 8-ounce package of cream cheese, and it needs to be completely softened to room temperature—no shortcuts here!
- About three cups of powdered sugar, and please, sift it first! That stops lumps from ruining your smooth centers.
- A teaspoon of pure vanilla extract for depth of flavor.
- One pound of white melting wafers or good quality white chocolate chips for that gorgeous shell.
- A little bit of shortening or coconut oil—we use this as an optional insurance policy if the white chocolate gets too thick.
- And of course, don’t forget your good stack of cake pop sticks!
How to Prepare Moist Cake Balls for Perfect Red Velvet Cake Pops
This is where the magic really starts to happen for your **red velvet cake pops**! Remember, we are aiming for a wonderfully decadent, dense, yet perfectly moist texture. The first rule—and this is huge for E-E-A-T in cake pop making—is that your cake must be completely, totally cool. I mean ice-cold cool. If it’s even slightly warm, you will end up with a gooey mess when you mix in the frosting, and nobody wants sticky fingers or a sad, collapsing pop!
First, bake that red velvet cake mix according to the box, then let it cool down fully. Once it’s cool, grab your hands and really just demolish it into fine crumbs in a big bowl. You want that uniform texture so that everything blends beautifully. This is much better than trying to use a mixer for this step, trust me, you want to feel it come together!
Mixing the Cake Crumble and Cream Cheese Frosting Treats Base
Now, take that smooth cream cheese frosting we made—the one that has those lovely **cream cheese frosting treats** notes in it—and gradually add it to those crumbs. Use your hands, that’s the best tool here. You’re folding and pressing, not stirring aggressively. We are mixing just until that base mixture *just* sticks together when you squeeze a handful. Stop mixing the second it holds its shape. Overworking it releases too much moisture and you end up with something more like fudgy dough than a light cake ball.
Rolling and Chilling the Base for Stability
Once you hit that perfect texture, start rolling those babies out! Try to keep them roughly the same size, aiming for about one inch per ball. Uniformity helps them look professional and also means they bake (or chill) evenly. Line up your freshly rolled balls on a sheet of parchment paper. Now comes the hardest part: patience! They absolutely must chill in the refrigerator for at least 30 minutes, maybe even 45 if your kitchen is warm. This firming up phase is what keeps your glorious **red velvet cake pops** from cracking when we dip them into that hot chocolate later on. You can look at my guide for making other great chocolate cake treats while you wait!
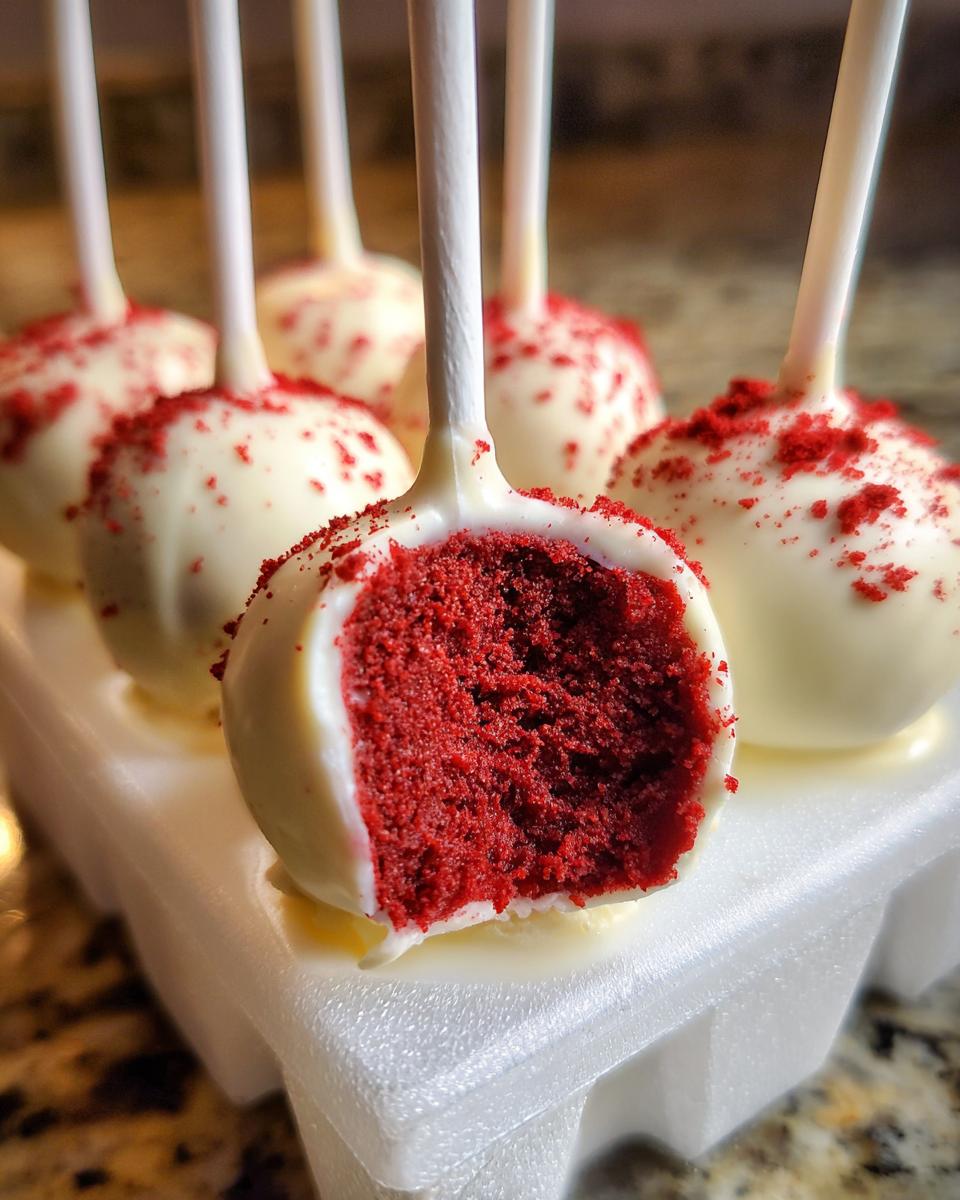
Mastering the White Chocolate Coating for Red Velvet Cake Pops
Alright, the centers are cold, firm, and ready for their beautiful red velvet glow-up! This part, getting that perfect, smooth **white chocolate coating**, is what turns a tasty cake ball into a show-stopping **red velvet cake pop**. The most common mistake people make is using chocolate chips straight from the bag, and they seize up or stay thick and gloppy. We want glossy and smooth!
Grab your white melting wafers—they melt cleaner than chips, in my experience. I always toss in about a tablespoon of vegetable shortening or coconut oil. This might sound weird, but that little bit of added fat is the ticket to a coating that stays thin enough to apply easily and dries with a nice, snappy finish. Melt this mixture slowly in short bursts in the microwave, stirring like crazy between each 30-second zap until it’s perfectly pourable. If you don’t have wafers, look at my white chocolate mousse tart recipe; I explain exactly what works best for a smooth texture there too!
The Crucial Step: Dipping the Stick into the Cake Balls
Before we dunk the whole thing, we have to secure the stick, or your beautiful **cake pop** will just break off in the chocolate! This is my most important ‘trick’ for stability. Take one chilled cake ball and dip the very tip of a cake pop stick about a quarter of an inch into the melted white chocolate. It’s acting like glue. Then, you immediately push that sticky end into the center of the cake ball. Pop that stick-inserted ball *back* into the fridge for about 10 minutes. This ‘sets the glue’ and is a major piece of advice for anyone wondering how to make cake pops that don’t fall apart!
Coating Technique for a Flawless Finish on Your Red Velvet Cake Pops
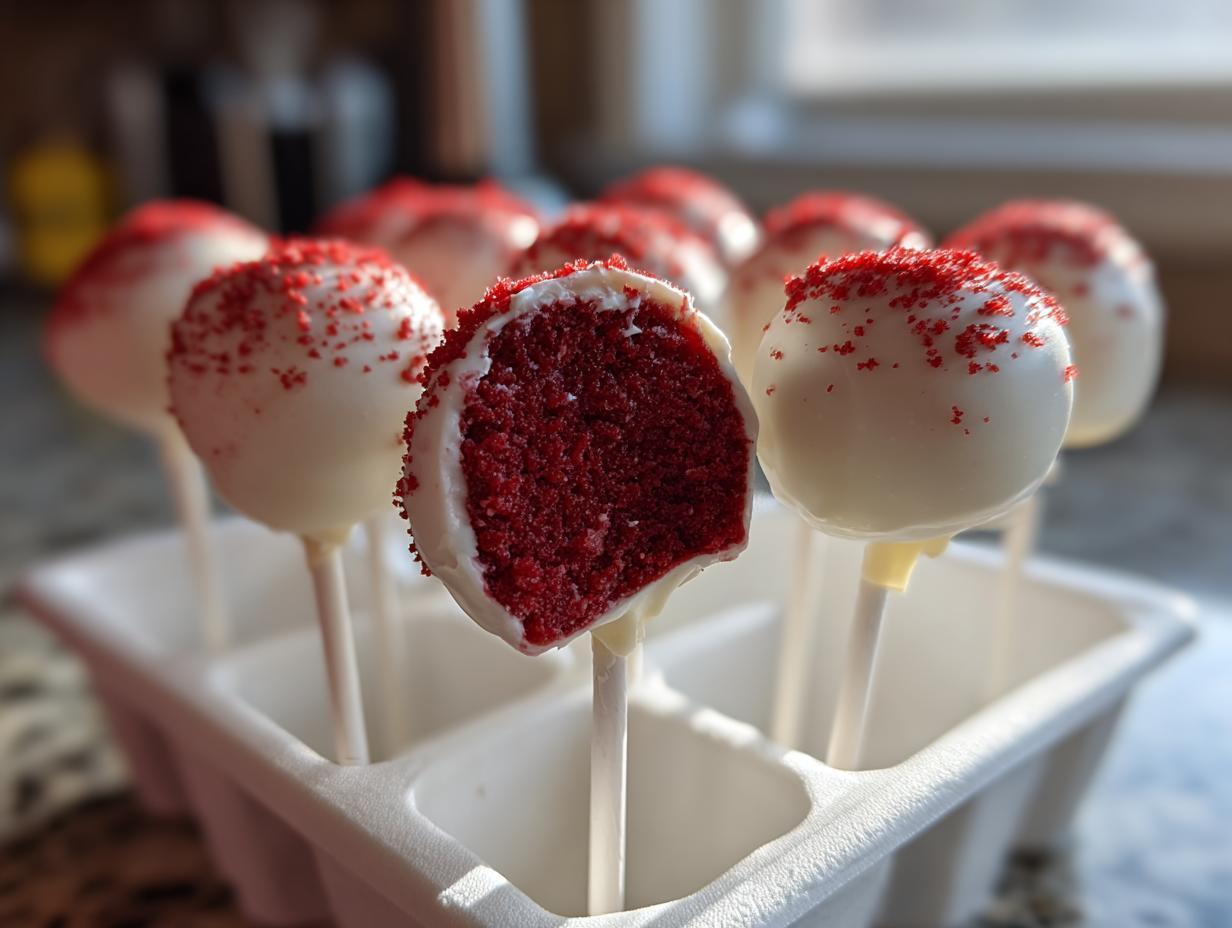
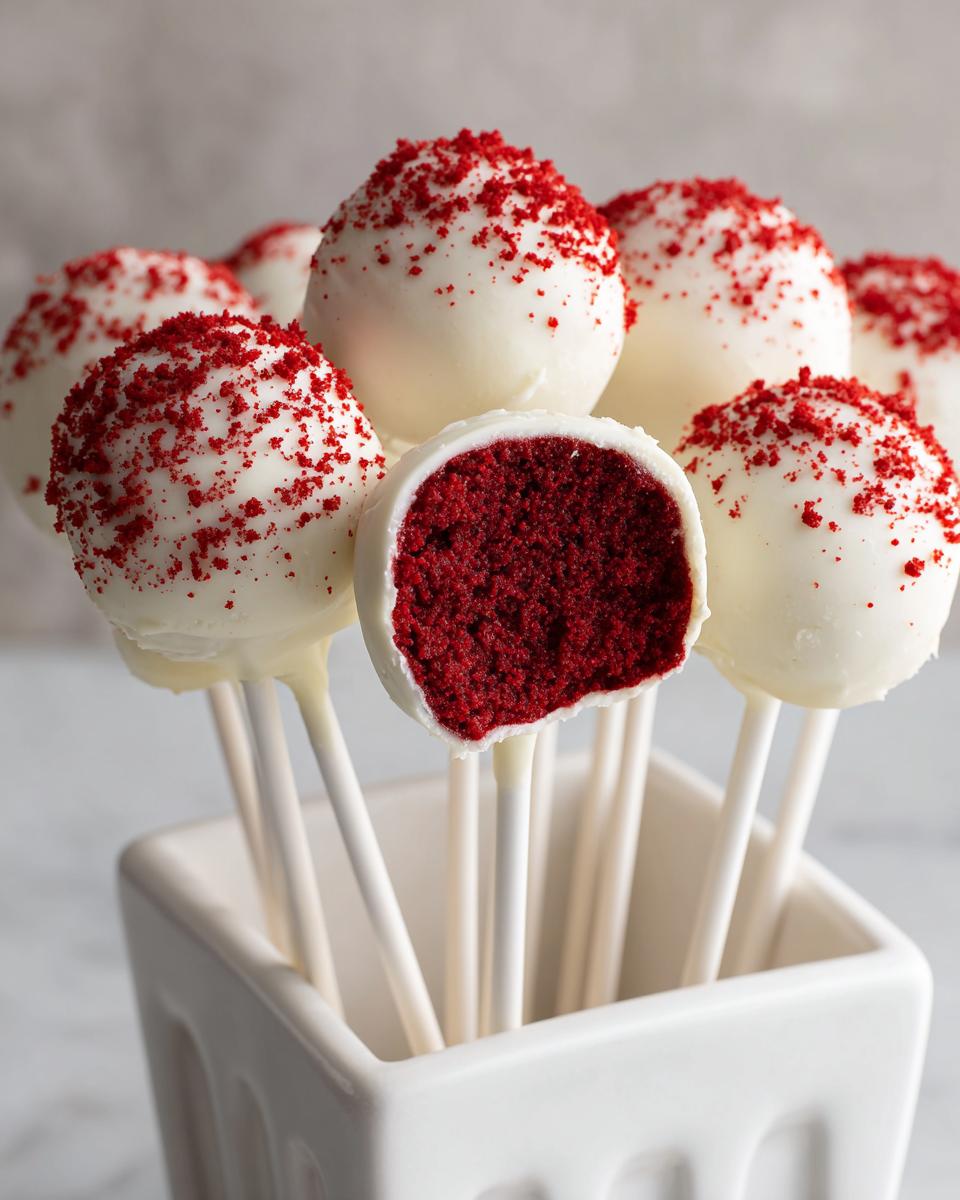
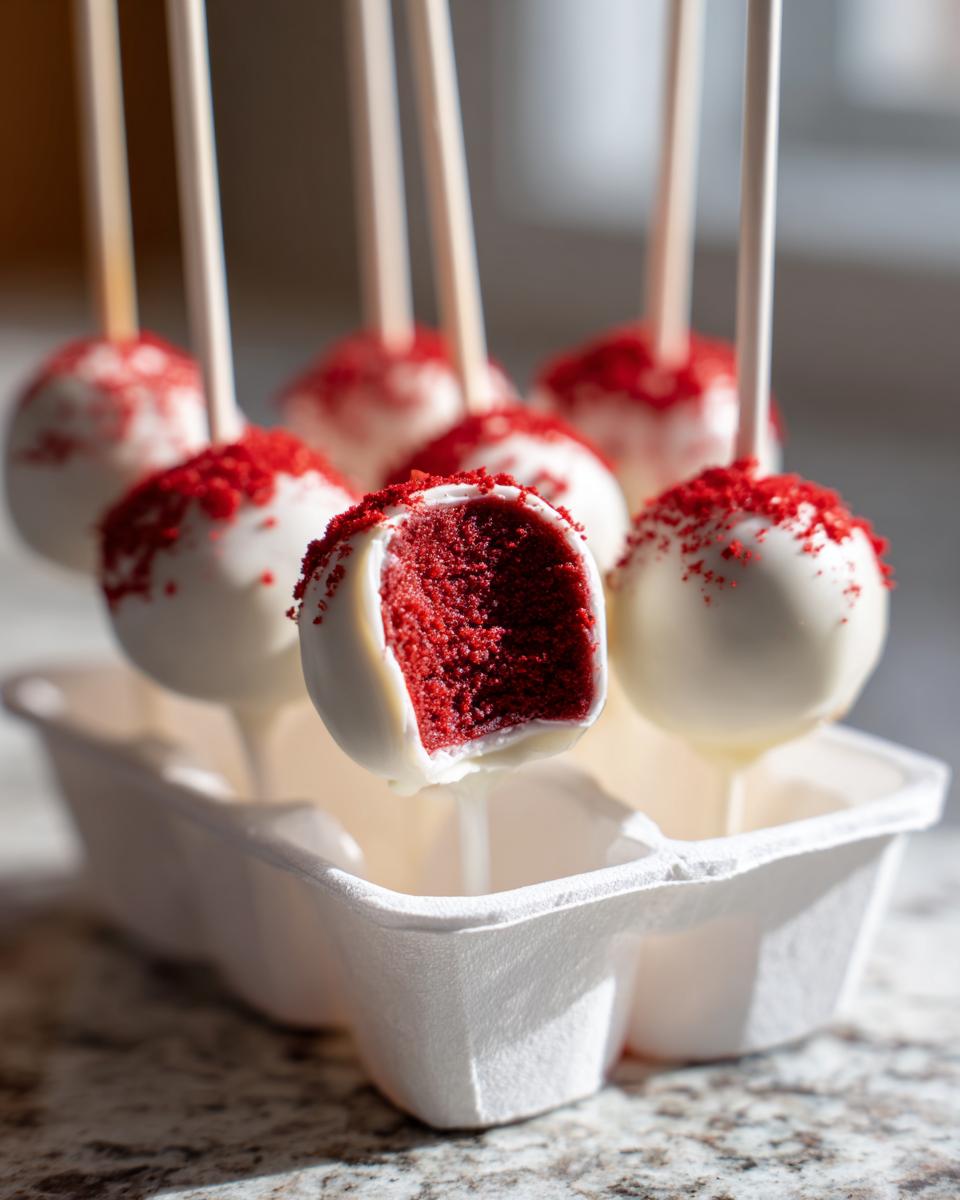
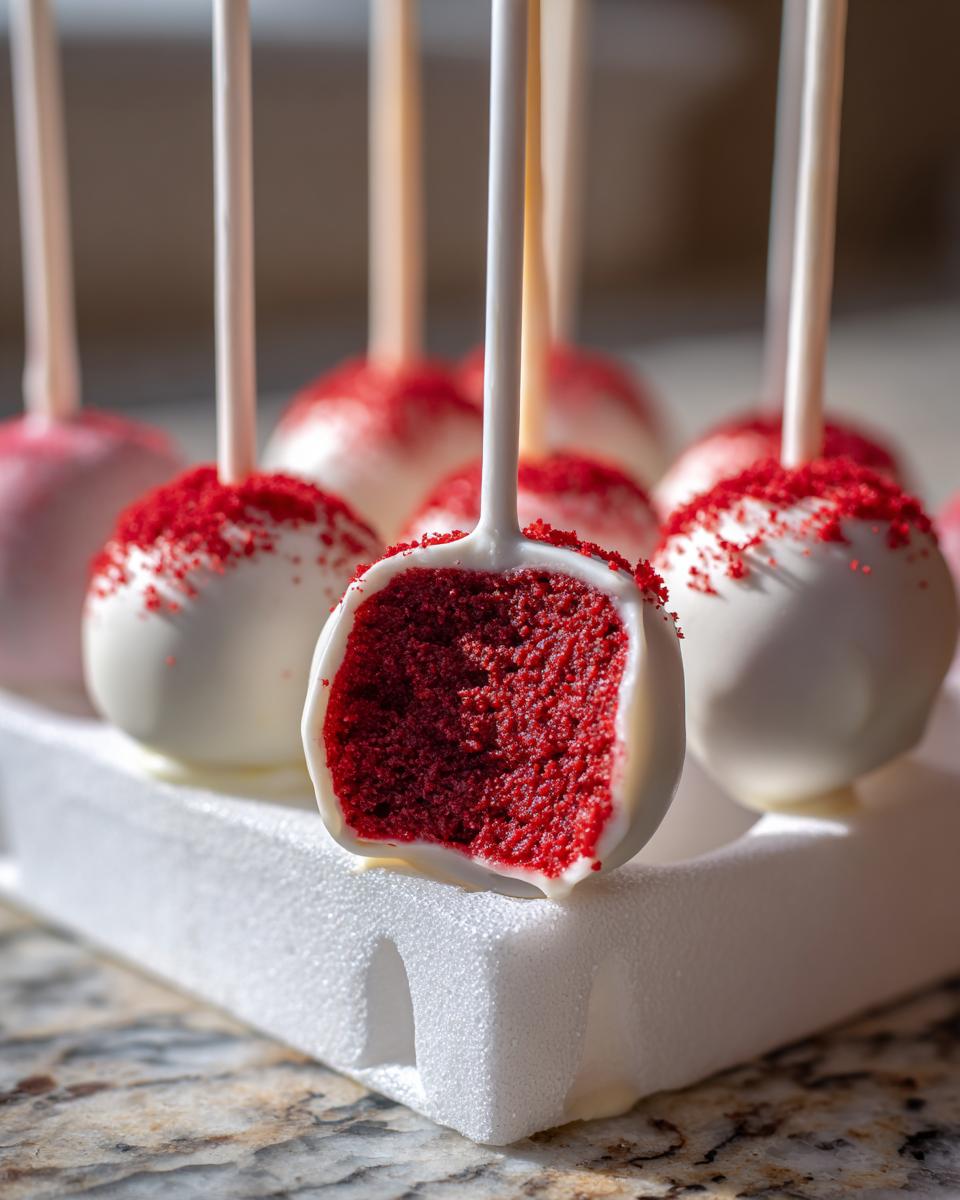
Time to dip! Hold the stick firmly, and slowly lower the chilled cake ball straight down into your melted white chocolate. You want to submerge it completely. Once it’s covered, gently lift it out. Now, as it emerges, slowly twist and rotate the stick while holding it over the bowl. Let the extra coating drip back in; you can help this along by lightly tapping the stick against the side of the bowl. Don’t over-tap, or you’ll leave a huge dent! Once the dripping slows down, immediately stand your finished **red velvet cake pop** upright in a styrofoam block or a holder. Work fast, because once the coating starts to cool, it won’t spread evenly.
Tips for Success with Homemade Cake Pops
Even with the best **cake pop recipe**, sometimes things go a little sideways. But that’s okay! That’s what a practical home cook does—troubleshoot and keep going. I’ve got a few quick fixes and little habits that have saved my batches more times than I can count.
- If your white coating starts getting too thick while you are dipping, don’t panic! Just stir in a tiny, tiny bit of vegetable oil or coconut oil until it loosens up again. A little goes a long way, I promise.
- Don’t rush the chilling phase when you stick the pop into the ball. That 10 minutes of fridge time is basically your insurance policy against heartbreak later on.
- When decorating, think about your contrasting colors ahead of time. A quick drizzle of dark chocolate right after the white shell sets is always a winner for making these look festive!
- If you mess up a dip and it looks lumpy, just let it dry completely, peel off the thick bit, and re-dip it once it’s totally set. It saves the whole pop!
Variations and Festive Red Velvet Inspiration
Once you nail down the base for your **red velvet cake pops**, they become such a fun canvas for creativity! This recipe is fantastic as is, coated in that bright white chocolate, but it’s also perfect for diving into some real **red velvet inspiration** for your next gathering. You don’t always have to stick to the classics!
If you’re doing these for a birthday party or maybe even some fun **Christmas cake pops**, switching up the dip coating is the easiest way to transform them. Don’t feel locked into just white! Dark chocolate is incredible against the slight tang of the cream cheese filling. Or, grab some colored candy melts—pink and red for **Valentine’s Day dessert ideas**, or green and red for the holidays. These melts set up slightly faster than pure chocolate, so they are great if you’re in a hurry.
Thinking about internal additions? I love tossing in some mini chocolate chips right before I roll the balls. It gives you a little surprise crunch inside that contrasts beautifully with the moist cake ball. You could even crumble some of those festive peppermint pieces into the mix if you’re looking for a great wintery twist—I use that same idea when I make my fudgy peppermint brownies!
The main thing is, these **bite sized desserts** are easy to adapt. Whether you are going for sophisticated drizzle patterns or just covering them completely in bright sprinkles, your guests are going to go crazy for these treats!
Storing and Serving Your Finished Red Velvet Cake Pops
Now that you’ve got these beautiful, glossy **red velvet cake pops**, the last thing you want to do is ruin them by storing them incorrectly! Since they have that creamy center—that rich interaction between the cake crumbs and the cream cheese frosting—they need a little special care to keep their shape and texture.
The best place for them, especially if they aren’t going to be eaten right away, is the refrigerator. I always insist on using an airtight container. Pop them in there, and they will happily chill out for about a week. Make sure the container is large enough that the pops aren’t jammed together, or you risk smashing those pretty white chocolate coatings!
But here is the absolute game-changer for serving them: never serve them straight from the fridge! When they are ice cold, the white chocolate shell is hard, and the cake inside feels stiff. They won’t have that dreamy, melt-in-your-mouth quality.
What I always do is take them out about 30 to 45 minutes before the party starts or before I plan to eat them. Letting them sit on the counter at room temperature allows that cream cheese filling to soften up just a bit. When they reach room temperature, the flavor really blooms, those **moist cake balls** really shine, and the texture becomes unbelievably luxurious. It’s the secret to making sure everyone thinks you spent hours on these easy things!
Frequently Asked Questions About Red Velvet Cake Pops
I know when you’re reading through a recipe, questions pop into your head about substitutions or troubleshooting. That’s totally normal! I’ve tried to cover all the little things that I learned the hard way back when I was figuring out the best ways to make **easy cake pops** for family gatherings. Here are the most common things folks ask about these **festive dessert balls**.
Can I skip baking the cake and use store-bought cake for these red velvet cake pops?
Oh, absolutely! If you are looking for the ultimate shortcut to amazing **no bake cake pops**, using a store-bought cake is a perfectly fine move. If you grab a pre-baked sheet cake from the bakery, just make sure it’s cooled completely before crumbling it up. But, and this is just my two cents as your kitchen friend, baking it fresh from a standard box mix is still better.
When you bake it yourself, you control the moisture; it’s usually a bit fresher than a bakery cake that might have been sitting around. The cake mix ensures the flavor is there, but that fresh bake guarantees the absolute best texture when you mix in the cream cheese. It’s a tiny extra step that makes a big difference in the final moistness.
How do I prevent my cake pops from falling off the stick?
This is the number one fear when making **homemade cake pops**, right? You don’t want to work so hard only to have a lonely little chocolate orb sitting at the bottom of your dipping bowl!
There are two non-negotiable steps for preventing separation. First, the cake balls must be thoroughly chilled—at least 30 minutes in the fridge. If they are cold, they hold their shape much better against the coating.
Second, and this is key for making sure the stick stays put: use that melted chocolate as glue. Dip the very tip of the stick into the chocolate, then push it into the chilled ball about halfway. Then, chill them again for 10 minutes before you dip the whole thing. That little bit of chocolate acts like cement, securely anchoring the stick into the structure of the **bite sized desserts**!
If you’re still having trouble or want more foundational tips on preventing collapse, check out my notes on the steps involved in the main recipe, or peek over at my guide for easy homemade bread bowls—sometimes the principles of getting a structure to hold together are surprisingly similar!
Nutritional Estimates for Red Velvet Cake Pops
Okay, now let’s talk about the real numbers. I always like to give a disclaimer here: these values are just estimates! Because we’re making **homemade cake pops** that rely on a specific cake mix brand and the exact amount of cream cheese frosting you mix in, your final counts might vary a little. But this gives you a fantastic general idea for each little bite of **red velvet dessert**.
This estimate is based on dividing the whole recipe into 24 perfect little pops, which is how I usually portion mine out. Remember, since these are small, they’re often better for portion control than bringing a whole slice of cake to the table!
For a standard serving size of one cake pop, here’s what you can generally expect:
- **Serving Size:** 1 cake pop
- **Calories:** Around 220 (That might sound like a lot for a tiny treat, but remember it includes cake, frosting, and the white chocolate coating!)
- **Fat:** About 12g
- **Carbohydrates:** Roughly 28g
- **Sugar:** About 25g (That’s where all the yummy flavor is hiding!)
- **Protein:** A small boost at about 2g
If you’re looking to compare flavors or see how these stack up against other sweet indulgences, feel free to check out another great recipe source like The Cooking Sisters for additional insights.
So while they are a treat, they are perfectly contained. Enjoy them knowing exactly what you’re indulging in!
PrintThe Ultimate Easy Red Velvet Cake Pops (Using Cake Mix & Cream Cheese Frosting)

Make moist, bite-sized Red Velvet Cake Pops using a simple cake mix hack and rich cream cheese frosting. These treats are coated in smooth white chocolate, making them perfect for Valentine’s Day dessert ideas or any party dessert idea.
- Prep Time: 45 min
- Cook Time: 30 min
- Total Time: 75 min
- Yield: 24 cake pops 1x
- Category: Dessert
- Method: No Bake Assembly
- Cuisine: American
- Diet: Vegetarian
Ingredients
- 1 box (15.25 oz) red velvet cake mix
- Ingredients listed on cake mix box (usually eggs, oil, water)
- 1 package (8 oz) cream cheese, softened
- 3 cups powdered sugar, sifted
- 1 teaspoon vanilla extract
- 1/4 cup unsweetened cocoa powder (optional, for deeper color)
- 1 pound white melting wafers or white chocolate chips
- 1 tablespoon shortening or coconut oil (for thinning coating)
- Cake pop sticks
Instructions
- Bake the red velvet cake according to the package directions, using the ingredients listed on the box. Let the cake cool completely.
- Crumble the cooled cake into a large bowl until no large chunks remain. You want a fine, uniform texture.
- In a separate bowl, beat the softened cream cheese until smooth. Add the vanilla extract.
- Gradually add the sifted powdered sugar to the cream cheese mixture, beating until fully combined and smooth. If using, mix in the cocoa powder now.
- Add the cream cheese frosting mixture to the cake crumbles. Use your hands to mix thoroughly until the mixture holds together when pressed. This forms your moist cake balls base.
- Roll the mixture into uniform 1-inch balls. Place them on a parchment-lined baking sheet.
- Chill the cake balls in the refrigerator for at least 30 minutes. This step is crucial for preventing them from falling off the sticks.
- Prepare the white chocolate coating: Melt the white wafers (and shortening or coconut oil) in a microwave-safe bowl in 30-second intervals, stirring well after each interval until completely smooth.
- Dip the tip of a cake pop stick into the melted chocolate and insert it about halfway into a chilled cake ball. Chill again for 10 minutes to set the ‘glue.’
- Dip the entire cake ball into the melted white chocolate coating, rotating gently to cover completely. Tap the stick gently against the side of the bowl to let excess coating drip off.
- Immediately decorate with sprinkles or drizzle with contrasting chocolate, if desired.
- Place the finished cake pops upright in a styrofoam block or cake pop stand to dry completely before serving.
Notes
- For the best texture, avoid over-mixing the cake and frosting base; mix just until combined.
- If your white chocolate coating becomes too thick while dipping, stir in a few drops of vegetable oil or coconut oil to thin it slightly.
- If you are making heart shapes for Valentine’s Day, gently press the sides of the chilled balls into a heart-shaped mold before dipping, or shape them by hand.
Nutrition
- Serving Size: 1 cake pop
- Calories: 220
- Sugar: 25
- Sodium: 150
- Fat: 12
- Saturated Fat: 7
- Unsaturated Fat: 5
- Trans Fat: 0.1
- Carbohydrates: 28
- Fiber: 1
- Protein: 2
- Cholesterol: 25